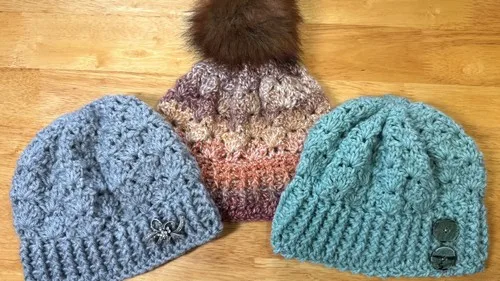
Intermediate 3-4 hours Worsted (3-4) yarn

Worked on the glider, counted out loud —

Make the Vista Point hat with shell stitch texture

A beginner-friendly crochet hat with FPDC/BPDC rib and a shell stitch crown, done in a few focused hours.

Jump to the rounds

What this one is

I think of the Vista Point Hat as the one you reach for on a cool evening walk, when you want something that looks pulled-together but took you almost no thought to put on. It suits a beginner who's ready to move past a basic single crochet cap, and it suits someone experienced who wants a quick, satisfying project between bigger ones. Make it for yourself, for a friend who likes texture, or to sell at a market table.

Your hands start with a simple foundation round, move into a tidy rib made from front post and back post double crochet, then open up into a run of shells that give the crown its texture before five rounds of shaping cinch it closed at the top. Altogether, from first chain to woven-in ends, you're looking at a few focused hours of work for most crocheters, maybe split into two sittings if you like to stop and admire your progress.
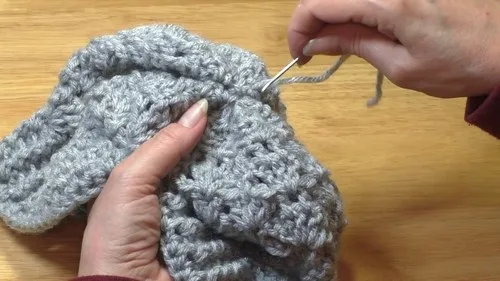
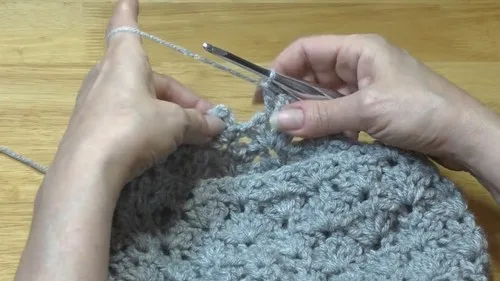
The rounds, in full

Written out, round by round

Intermediate3-4 hoursWorsted (3-4)

Bring to the porch

Everything this one takes, in the order you will reach for it.

  • One 100g ball of yarn (weight 3–4)

Two crochet hooks

  • main size and one size larger
  • Two stitch markers
  • Measuring tape
  • Yarn needle

Optional

  • Pom-pom or decorative button

Main Pattern

  1. Round 1Work a foundation single crochet or a chain in multiples of 6 + 1 to fit your head.Join ends into a circle, ensuring there are no twists.
  2. Round 2Chain 2 (does not count as a stitch). Double crochet in the same stitch and in each stitch around.
  3. Round 3Chain 2. Front post double crochet around the first stitch. Back post double crochet around the next. Repeat FPDC and BPDC around.
  4. Round 4Chain 2. Repeat Round 3, maintaining the post stitch pattern. Repeat Round 4 until the band reaches your desired height.

Part 2

  1. Round 1Chain 3 (counts as 1st double crochet), add 4 more double crochets into the same stitch (5 total = 1 shell).Skip next 2 stitches.Place 2 double crochets in the next stitch.Repeat: shell in one stitch, skip 2, 2 DC in next stitch.
  2. Round 2Chain 1 and turn. Slip stitch between the 2 DC from previous round. Chain 3 (counts as first DC), place 4 more DC in the same space to form a shell.Continue working shells between stitches.Repeat Round 2 for 2–3 more rounds, alternating between right side and wrong side for texture.

Part 3

  1. Round 1Chain 1 and turn. Slip stitch between the 2 DC. Work 4 DC instead of 5 in each shell space (decreasing shell size).
  2. Round 2Chain 1 and turn. Slip stitch between the first 2 DC. Place 3 DC in each shell space.In the middle of each shell, place 2 DC directly in the center.
  3. Round 3Chain 1 and turn. Slip stitch between the 2 DC. Place 2 DC between each set of stitches: one between stitch 1–2 and one between stitch 2–3 of the previous shell.
  4. Round 4Chain 1 and turn. Slip stitch between the 2 DC. Chain 1. Place 2 half double crochets in between each set of 2 DC.
  5. Round 5Final Decrease Make sure you're on the right side. Half double crochet two together (HDC2TOG) all the way around.

Putting it together

Step 1

Cut yarn, leaving a long tail.

Step 2

Use yarn needle to weave through remaining stitches and cinch the top closed.

Step 3

Weave in all ends securely.

Step 4

Optional : Add a pom-pom or button to the top for a stylish finish.

Marlene's notes

Note 01

Your two stitch markers earn their keep in the FPDC/BPDC rib and again through the shell rounds, where it's easy to lose track of your round start.

Note 02

Keep your tension even through the shell rounds in Part 2, since five double crochets fanned into one stitch will look uneven if some are pulled tighter than others.

Porch photos

Before you sit down

  • Weigh out your yarn before you cast on; one 100g ball of a weight 3-4 fiber is the stated amount, so check it against your gauge swatch if you're substituting a different yarn.
  • Have both hook sizes on hand — the pattern calls for your main size plus one size larger, and you'll want to know which rounds call for which before you start the brim.
  • Place your two stitch markers early, one to mark the join of your foundation circle and one to track the start of each round once the FPDC/BPDC pattern begins.
  • Read through Round 3 of the Main Pattern before you pick up your hook — the front post and back post double crochet sequence is easier to follow once you've seen the whole repeat.

How the hours go

Main Pattern (4 rounds)
about 45 minutes to an hour because it's just 4 rounds, but the FPDC/BPDC rib in round 3 goes slower than a plain double crochet round.
Part 2 (2 rounds)
about 30 to 45 minutes because the 2 shell rounds are quick once you find the skip-2-stitch rhythm.
Part 3 (5 rounds)
about 1 to 1.5 hours because the 5 rounds gradually decrease the shell size and finish with cinching the top closed, which takes patience.

Looking after it

  • Check your yarn band before you wash this one, since a weight 3-4 ball could be wool, acrylic, or a blend, and each one handles water differently.
  • Whatever the fiber, lay the hat flat to dry rather than hanging it, and ease the ribbed band back into shape by hand while it's still damp so it keeps its fit.
FAQs

Asked on the glider

the ones that come up on the glider

Can I make this hat bigger or smaller?

Yes — the foundation round works in multiples of 6 plus 1, so you can add or subtract stitches in those multiples to fit a bigger or smaller head. Work a quick swatch first if you're not sure how your yarn behaves at that stitch count.

What's the difference between Part 2 and Part 3?

Part 2 establishes the full shell stitch over 2 rounds, with 5 double crochets fanned into each shell. Part 3 then works 5 rounds that gradually shrink the shell count down, which is what pulls the crown closed at the top.

Do I need two different hook sizes?

The materials call for your main hook size plus one size larger, which lets you vary the density between the band and the crown. Keep both nearby so you're not hunting for the right one mid-round.

What are the stitch markers for?

One marks the join point of your starting circle so you always know where a round begins, and the second helps you track your place once the front post and back post double crochet pattern starts in round 3.

How do I close the top of the hat?

After the decreasing rounds in Part 3, you cut your yarn leaving a long tail, then use a yarn needle to weave through the remaining stitches and cinch them closed. Weave in your ends afterward to keep the finish tidy.

Should I add a pom-pom or a button?

Either is optional, so it comes down to the look you want: a pom-pom gives a softer, casual finish while a button feels a bit more polished. Both sit right at the cinched top where the shell rounds come to a point.