Intermediate 4-6 hours Worsted yarn

Worked on the glider, counted out loud —

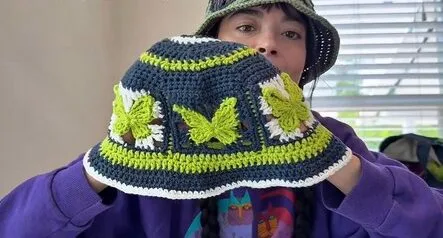
Butterfly granny square bucket hat crochet pattern

A cottagecore bucket hat for intermediate crocheters, made from six butterfly granny squares in a few sittings.

Jump to the rounds

What this one is

I made this hat for a soft early-autumn afternoon, the kind where you want something pretty perched on your head while you wander a garden or a farmer's market. It suits anyone who loves cottagecore details — a little butterfly motif worked right into the crown — but still wants a hat sturdy enough for everyday wear. If you've got six granny squares and some quiet hands, this one's for you.

Your hands spend the first stretch making six butterfly granny squares, then joining them into a ring with a slip stitch seam worked through the chain-one corner spaces. From there you flip the headband inside out to close the crown over nine rounds of half double crochet decreases, then turn it right side out to build the brim over five rounds. All told, plan on a few focused sittings, with the squares taking the longest stretch of time.
Try it another way

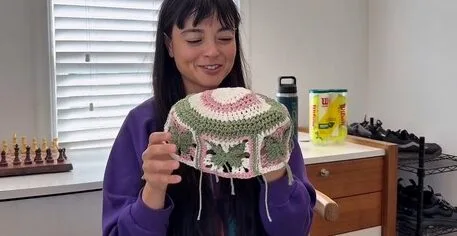
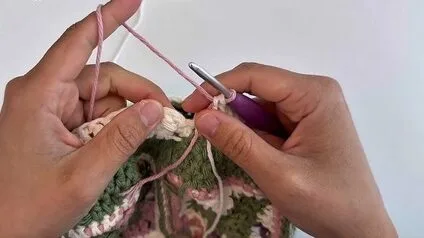
There's something deeply satisfying about watching six separate butterfly granny squares become one continuous headband — the join itself is the clever part, working through the front loop of the top square and the back loop of the bottom square so the seam disappears into the texture. Then comes the sculptural fun of closing the crown: nine rounds of half double crochet decreases pull the flat ring into a rounded dome, with a color change partway through to mark the transition. The brim works the opposite trick, half double crochet increases flaring the edge back out round by round. It's a pattern that rewards you for paying attention to shaping rather than memorizing anything complicated, and the butterfly motif gives every square a little personality before it ever gets joined.

The rounds, in full

Written out, round by round

Intermediate4-6 hoursWorsted

Bring to the porch

Everything this one takes, in the order you will reach for it.

  • Yarn in desired colors
  • Crochet hook (size suited to your yarn)
  • Scissors
  • Darning needle

Preparation and Granny Squares

Create six butterfly granny squares using a butterfly granny square pattern of your choice

Modify the last row to single crochets instead of half double crochets

For corners: use two single crochets, chain two, two single crochets

Each square should measure 3 to 3.5 inches

Leave the middle string, but weave in all other ends

Each square must have 15 chains on top, including corner chains

Connecting the Granny Squares

Slip stitch to join the squares

Place right sides facing up, then fold so backs face you

Work through the chain one spaces at corners

Use front loop (top square) and back loop (bottom square)

Form a headband by joining all six squares

Closing the Top of the Hat

Turn the headband inside out Begin at any square’s top corner, inserting the hook just before the middle

  1. Round 1Chain one, 14 half double crochets per square (84 stitches total), slip stitch to close
  2. Round 2Half double crochet decrease, five half double crochets, repeat (72 stitches)(72)
  3. Round 3Half double crochet decrease, four half double crochets, repeat (60 stitches), change color at end
  4. Round 4Half double crochet decrease, three half double crochets, repeat (48 stitches)(48)
  5. Round 5Double crochet in each stitch (48 stitches), change color at end
  6. Round 6Half double crochet decrease, two half double crochets, repeat (36 stitches)(36)
  7. Round 7Half double crochet in each stitch (36 stitches), change color at end
  8. Round 8Half double crochet decrease, one half double crochet, repeat (24 stitches)(24)
  9. Round 9Half double crochet decrease in every stitch (12 stitches) Final Row: Single crochet decreases around (6 stitches)Cut yarn, sew remaining six stitches closed with a darning needle(6)

Making the Brim

Flip the hat right side out

  1. Round 1Work 14 single crochets per square section (84 stitches), slip stitch to join
  2. Round 2Half double crochet increase, six half double crochets, repeat (96 stitches), change color at end
  3. Round 3Half double crochet around (96 stitches), change color at end
  4. Round 4Half double crochet increase, seven half double crochets, repeat (108 stitches)(108)
  5. Round 5Single crochet all the way around (108 stitches), change color at end Final Row: Single crochet increase, eight single crochets, repeatTry on the hat to ensure brim fits Cut yarn and weave in all ends

Marlene's notes

Note 01

Choose a hook sized for the yarn you're using; the fabric needs to stay drapey enough to fold into a dome, not stiff.

Note 02

Use a stitch marker for the first stitch of every round once you start the crown decreases and brim increases — both parts rely on repeated decrease and increase sequences that are easy to miscount.

Porch photos

Before you sit down

  • Have yarn in every color you want set aside before you begin — six squares use up more than you'd think once they're joined into a headband.
  • Place a stitch marker at the start of each round once you begin closing the crown — the half double crochet decreases are easy to lose track of without one.
  • Read through Row 1 of Closing the Top before you start — you're inserting the hook just before the middle of a square's top corner, and it helps to know where you're headed.

How the hours go

Making the six butterfly granny squares
about 2 to 3 hours because each square needs its own round of corner shaping before the set is ready to join
Closing the Top of the Hat
about 1 to 1.5 hours because nine rounds of half double crochet decreases need steady stitch counting to shape the dome
Making the Brim
about 45 minutes to an hour because five rounds of increases work up quickly once the crown is done

Looking after it

  • Hand wash the finished hat in cool water with a gentle soap, since the granny square seams and color-changed rounds hold their shape best without a washing machine's agitation.
  • Dry it flat, reshaping the brim and crown by hand while damp, and store it stuffed with a dish towel or tissue paper so the dome doesn't collapse.
FAQs

Asked on the glider

the ones that come up on the glider

Do all six granny squares need to be exactly the same size?

Yes, close to it. Each one should measure between 3 and 3.5 inches so the headband forms an even circle before you move on to closing the crown.

Why do I work through the front loop of one square and the back loop of the other when joining?

That half-and-half loop technique is what makes the seam between squares lie flat and nearly invisible, instead of leaving a ridge where the two pieces meet.

Why do I turn the headband inside out before closing the top?

Working the crown decreases from the inside gives you a cleaner finished surface on the outside once you flip the hat back, which matters here since the half double crochet decreases create visible texture, not just shaping.

Can I skip the middle string left in each square?

No, leave it. That center string is your reference right at the start of Closing the Top, where you insert the hook just before it to find your starting point.

What happens if my brim comes out too tight or too loose?

Check your square size first, since the brim's stitch count is built entirely off the 84 stitches from the six joined squares. If the fit is off, it usually traces back to squares that weren't quite 3 to 3.5 inches.

Do I need a different hook for the squares versus the rest of the hat?

Not necessarily, just whatever hook suits your yarn and keeps your squares landing in that 3 to 3.5 inch range. Some crocheters size down slightly for the decrease rounds to keep the crown from flaring, but that's a personal tension choice.