Intermediate 4-6 hours DK yarn

Worked on the glider, counted out loud —

Toe-up crochet socks with a ribbed cuff

Toe-up crochet socks for confident beginners, worked in DK yarn. About 4-6 hours from magic ring to ribbed cuff.

Jump to the rounds

What this one is

You know the evening I mean: feet cold under the blanket, something on in the background, and a small project close at hand that actually finishes. These socks are for that. They're for the person who wants real, wearable warmth by the end of one sitting, and for the friend or parent on your gift list who'd rather have something made for their exact foot than one more store-bought pair.

Your hands start at a magic ring, build the toe out in four quick rounds, sail through the foot, then turn a proper heel with short rows and decreases before settling into a ribbed cuff worked in front and back post stitches. Plan on an evening or two, roughly four to six hours total, with the heel turn asking for your fuller attention and the ribbing rounds happy to go by while you half-watch something.

Try it another way

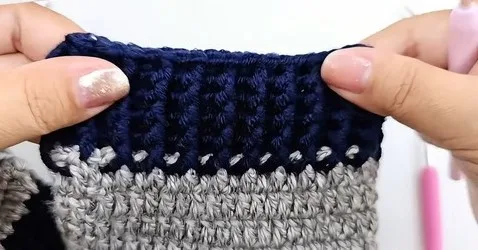
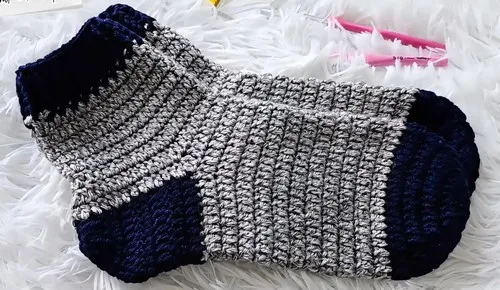
The whole structure here is built to flex with your foot size, so start by simply adding or skipping rounds in the foot section before you reach the heel until the length matches the wearer's foot. For a smaller foot, work fewer rounds after the toe's 40-stitch round; for a longer one, add a few more before you attach yarn for the heel. Yarn choice matters too: this pattern calls for sport or DK weight close to a #3, so a slightly fuzzy DK will give a softer, cabin-sock feel, while a smoother DK cotton-blend makes a lighter sock for layering under boots. For color, try a solid through the toe and foot with a contrasting shade introduced right at the cuff's ribbing rounds, since front post and back post stitches show off a color change nicely with their raised texture. You could also make the ribbing extra tall by repeating rounds 11-15 an extra time or two if you want a cuff that folds over. And because the heel and cuff are worked as distinct stages, this pattern is a natural one to make as a mismatched or two-color gift pair without any real change to the stitch counts.
The rounds, in full

Written out, round by round

Intermediate4-6 hours3.50 mmDK

Bring to the porch

Everything this one takes, in the order you will reach for it.

  • Sport or DK weight yarn (closer to a #3 weight is recommended)
  • 3.50 mm hook (main body)
  • 3.00 mm hook (cuff)
  • Stitch marker
  • Scissors

Optional

  • 2.00 mm hook (elastic edge)

Heel

Attach yarn to the 20th stitch. Work rows on 20 stitches.

  1. Rounds 1–4Chain 2, work 1 dc in each stitch (20 dc). Turn.
  2. Round 5Chain 2, 4 dc, 5 decreases (dc2tog), 5 dc. Turn (15 sts).(15)
  3. Round 6Chain 2, 2 dc, 4 decreases, 4 dc. Turn (11 sts).(11)
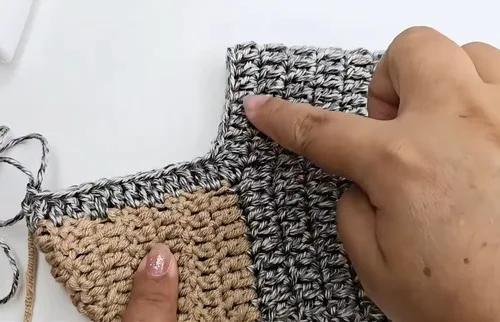
  4. Round 7Chain 2, 1 dc, 3 decreases, 4 dc. Slip stitch to close (8 sts). Fold heel with wrong sides out, slip stitch sides together to close.

Cuff and Ankle

  1. Round 1Attach yarn at heel edge. Work 2 dc in each side row (14 each side), 1 dc across top 20 stitches.Total 48 stitches. Slip stitch to join.
  2. Round 2Switch to 3.00 mm hook. Work decreases at each side of top of foot. Total 44 stitches. Slip stitch to join.
  3. Rounds 3–10Chain 2, 1 dc in each stitch around (44 dc). Repeat for 8 rounds.
  4. Rounds 11–15Work 1 front post dc, 1 back post dc around to create ribbing. Repeat for 5 rounds.

Optional Elastic Edge: With 2.00 mm hook, work slip stitches into the back of each post for a tighter finish.

Toe

  1. Round 1Make a magic ring, chain 2 (not counted), work 13 double crochet into the ring, slip stitch to join (13 dc).(13)
  2. Round 2Chain 2, work 2 dc in each stitch around, slip stitch to join (26 dc).(26)
  3. Round 3Chain 2, 1 dc in next stitch, 2 dc in next stitch repeat, slip stitch to join (39 dc).(39)
  4. Round 4Chain 2, work 1 dc in next 38 stitches, make 2 dc in last stitch, slip stitch to join (40 dc).(40)
  5. Round 5Chain 2, work 1 dc in each of 40 stitches, slip stitch to join. Fasten off.

Foot

  1. Round 1Work 1 dc in each stitch (40 dc per round).Repeat rounds until foot measures correct length according to chart: 20–23 cm: 8 rounds; 23–25 cm: 9 rounds; 25–27 cm: 10 rounds; 27–29 cm: 11 rounds; 30–31 cm: 12 rounds. Slip stitch, fasten off.(40)

Putting it together

Step 1

Cut yarn and weave in ends.

Step 2

Enjoy your new handmade crochet socks.

Marlene's notes

Note 01

The heel is worked flat in turned rows on 20 stitches, not in the round like the toe and foot, so keep an eye on which side you're on when you chain 2 and turn.

Note 02

A stitch marker earns its keep here for tracking the start of your rounds through the toe's increase rounds and again once you're back to working in the round after the heel.

Note 03

The three hook size changes are part of the shaping, not optional, since the smaller 2.00 mm hook at the elastic edge is what keeps the cuff opening snug rather than loose.

Porch photos

Before you sit down

  • Check you've got sport or DK weight yarn on hand, closer to a #3 weight, in enough quantity for a full pair, since this pattern doesn't taper off gently if you run short mid-cuff.
  • Have all three hooks ready before you start: 3.50 mm for the main body, 3.00 mm for the cuff, and 2.00 mm for the elastic edge, so you're not hunting for the right size mid-round.
  • Work a small test round of double crochet with your 3.50 mm hook first to see if your 13-stitch magic ring toe sits flat, since a floppy or cupped toe usually means a hook or tension adjustment before you commit to the whole sock.
  • Read through the Heel section once before you begin it, particularly the row where you attach yarn to the 20th stitch and work flat rows, since that's the one place the pattern shifts from working in the round to working in turned rows.

How the hours go

Toe
about 30-40 minutes because it's only 4 rounds but each one changes stitch count, from 13 up to 40, so it pays to count carefully
Heel
about 45-60 minutes because turning a heel in flat rows with decreases and a fold-and-seam finish is the fiddliest part of the whole sock
Cuff and Ankle
about 2-3 hours because it runs 15 rounds total across two hook changes, with rounds 11-15 worked entirely in front post and back post stitches for the ribbing

Looking after it

  • Hand wash your finished socks in cool water with a gentle wool or fiber wash, then lay them flat to dry rather than hanging, since a DK weight yarn holds water and can stretch out of shape under its own wet weight.
  • Once dry, reshape the ribbed cuff gently with your hands to encourage the front post and back post texture to sit properly, then store the pair flat or loosely folded rather than balled up at the ankle.
FAQs

Asked on the glider

the ones that come up on the glider

Can I make these socks bigger for an adult with wide feet?

Yes, the foot section is worked to whatever length you need before the heel starts, so simply work more rounds there. The toe and heel stitch counts stay the same; you're only adjusting length, not width, through the foot rounds.

Why does the heel use turned rows instead of working in the round?

The heel is shaped with short rows and decreases on just 20 stitches, which is easier to control when you can see both sides as you turn. Once it's folded and slip stitched closed, you're back to working in the round for the cuff.

Do I really need three different hook sizes?

Yes, each size does a specific job here: 3.50 mm for the main sock body, 3.00 mm to tighten the ankle decrease round, and 2.00 mm for the elastic edge. Skipping the smaller hooks usually means a looser cuff that won't stay up.

What does the front post double crochet ribbing actually do?

Rounds 11 through 15 alternate front post and back post double crochet stitches, which creates a stretchy ribbed texture similar to knit ribbing. It's what lets the cuff hug the ankle instead of sitting stiff and tube-shaped.

How long does one sock realistically take to finish?

Between the toe, heel, and cuff and ankle sections, you're looking at roughly 4 to 6 hours total for one sock. The heel turn and the ribbing rounds are the two stages that take the most focused time.

Is this pattern suitable if I've never turned a crochet heel before?

It's a good first heel to try since the row counts are short, only 4 rows of double crochet before the shaping starts, and the decreases are spelled out row by row. Just read through the whole heel section once before you begin so the fold-and-seam step at the end makes sense.