Intermediate 5-7 hours DK yarn

Worked on the glider, counted out loud —

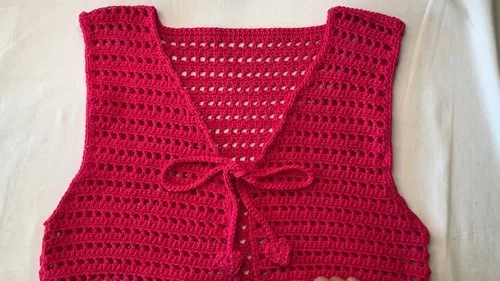
Sweetheart crochet vest with a customizable V-neck

A four-piece cotton vest with V-neck shaping and a heart strap. Suits confident beginners with about 5-7 hours to give it.

Jump to the rounds

What this one is

You know that vest you keep meaning to throw over a plain tank when the light turns gold and you want to look like you tried without actually trying. This one's for that. It's for the person who likes their handmade pieces to fit like they mean it, with a V-neck that shows a little collarbone and a strap detail that says someone made this on purpose.

Your hands will spend most of their time in a steady double crochet and chain-one rhythm across the back panel, then split into mirrored shaping for the two front panels. There's a real decrease sequence to focus on for the armholes and neckline, so this isn't mindless television crochet the whole way through. Give it a few sittings; most makers land somewhere around five to seven hours total.

Try it another way

The easiest place to play is color. Because the back panel is one continuous piece worked in a repeat, you can stripe it every few rows, or keep the back solid and save a contrast color for the heart strap so it reads as a deliberate accent. Since the pattern scales from your own bust measurement rather than a fixed size, you can make this in whatever cotton weight you like as long as you keep a 4 mm hook and recheck your row gauge; a smoother cotton blend will show the front loop single crochet texture more clearly than a highly plied one. If you want a cropped look, stop the front panels' shoulder-width rows short of the 3 inches the original leaves, or extend past it for more coverage. You can also skip the strap's slip-stitched thickening step for a lighter, thinner tie, or double it up for something sturdier if you plan to wear the vest over bare shoulders. For a completely different feel, work the whole vest in a single solid color and let the sweetheart V-neck and mirrored decreases be the only detail doing the talking.
The rounds, in full

Written out, round by round

Intermediate5-7 hours4 mmDK

Bring to the porch

Everything this one takes, in the order you will reach for it.

  • Rainbow six-ply 100% cotton yarn
  • 4 mm crochet hook
  • Tape measure
  • Scissors
  • Yarn needle

Back Panel

Foundation: Start with a foundation chainless single crochet, using at least half of your bust measurement; the stitch pattern is a multiple of 2 + 1, or any odd number; for reference, the creator's vest is 19 inches wide with 81 stitches.

  1. Row 1Double crochet, chain one, skip one stitch, repeat.
  2. Row 2Chain one, turn, single crochet in the first stitch, then front loop single crochet for the rest.Repeat rows 1 and 2 for the stitch pattern; the creator made nine rows before starting the decrease.Decrease Row (single crochet row): Skip the first stitch and underwork the last stitch in the single crochet row.Decrease Row (double crochet row): Chain two (doesn't count as a stitch), skip one, and double crochet in the next stitch, underworking the last stitch; the creator decreased for eight rows, resulting in a 2-inch armhole.Continue the stitch pattern without decreasing after the armhole decrease.Leave the last two rows for later, matching the stitch count to the front panels.

Heart Strap

  1. Round 1Make a magic ring and work three double crochets, three half double crochets, chain one, one double crochet, chain one, three half double crochets, three double crochets, chain one, and slip stitch into the ring.Chain 14-15 inches for the strap (add 2 inches if doubling).

First Front Panel

Foundation: Divide the back panel stitches in half (the creator used 39 stitches); start with a foundation row of single crochet.

Continue the stitch pattern, making the same number of rows before the decrease as the back panel.

Decrease for the armhole on one side.

After the armhole decrease, begin decreasing for the V-neck on the same side; the creator decreased for 16 rows for the V-neck.

Continue without decreasing to achieve the desired shoulder width (the creator left 3 inches).

Second Front Panel

Repeat the process for the first front panel, but mirror the decreases.

Decrease for the armhole on the opposite side.

Decrease for the V-neck on the opposite side.

Putting it together

Step 1

Complete the last two rows of the back panel, matching the stitch count to the front panels.

Step 2

Sew the shoulder and side seams, with the right sides facing each other.

Step 3

Single crochet around the armholes to create a neat border.

Step 4

Single crochet along the sides and neckline.

Step 5

Attach the strap to the vest and slip stitch back along the chain for a thicker strap, if desired.

Step 6

Weave in all ends.

Marlene's notes

Note 01

Use a 4 mm hook throughout and check your row gauge against the back panel's nine rows before the decrease, since a too-loose tension will throw off your final width.

Note 02

Keep the front loop single crochet rows consistent on every panel; working into the wrong loop even once will show as a texture break across the front of the vest.

Note 03

Because the two front panels mirror each other, work them side by side rather than one after the other so you catch a decrease worked on the wrong side early.

Before you sit down

  • Measure at least half your bust measurement before you chain your foundation row, since the back panel's stitch count depends entirely on that number.
  • Confirm your stitch pattern lands on a multiple of 2 plus 1 (or any odd number) so the double crochet and chain-one repeat comes out even on both edges.
  • Set aside a few stitch markers for the armhole and V-neck decrease rows on both front panels, since you'll be tracking two mirrored shaping sequences at once.
  • Read through the First Front Panel decrease sequence before you start it, since the armhole decrease begins before the sixteen rows of V-neck shaping, and the order matters.

How the hours go

Back Panel
about 2-2.5 hours because it carries the longest stretch of repeated stitch pattern rows, including the nine-row setup and the eight-row armhole decrease sequence
First and Second Front Panels
about 2-3 hours combined because of the armhole and sixteen-row V-neck decrease shaping on each mirrored side
Heart Strap and assembly
about 45 minutes to an hour because the strap is just one round plus a chain, but seaming and the armhole and neckline border take a careful hand

Looking after it

  • Hand wash the finished vest in cool water since it's a 100% cotton yarn, and lay it flat on a towel to dry rather than hanging it, so the panels don't stretch out of shape under their own weight.
  • Once dry, reshape the neckline and armhole borders gently with your fingers and store the vest folded rather than on a hanger to keep the shoulder width from drooping over time.
FAQs

Asked on the glider

the ones that come up on the glider

How do I know how many stitches to start with?

Take at least half of your bust measurement and chain that many stitches, rounding to an odd number or a multiple of 2 plus 1 so the stitch pattern repeats evenly. The creator's own vest came out to 81 stitches for a 19 inch width, which you can use as a rough reference point.

Can I make the V-neck deeper or shallower?

Yes, the V-neck decrease is worked over sixteen rows in the original, so working fewer rows gives you a shallower neckline and more rows gives you a deeper one. Just make sure both front panels use the same row count so the two sides stay symmetrical.

Do the two front panels really need to mirror each other?

Yes, the second front panel repeats the first panel's process but decreases on the opposite side for both the armhole and the V-neck. Working them as true mirror images is what makes the finished neckline sit straight down the center front.

What if my gauge doesn't match the creator's?

Since the whole vest is built from your own bust measurement rather than a fixed pattern size, gauge differences mostly affect how much yarn you use rather than whether the vest will fit. Just keep your stitch pattern consistent across all four pieces so the panels join up cleanly.

Is the heart strap necessary, or can I leave it off?

The strap is what gives the vest its sweetheart detail at the front, but the assembly notes mention slip-stitching back along the chain for a thicker strap only if desired. You can leave it as a thinner tie or substitute a length of ribbon if you'd rather skip that step entirely.

Why does the pattern call for front loop single crochet on the return rows?

Working into the front loop only leaves the back loop free, which creates a subtle ridged texture across the panel that plain single crochet wouldn't give you. It also makes the decrease rows easier to spot since the ridge pattern breaks where shaping starts.