Intermediate 4-6 hours Worsted yarn

Worked on the glider, counted out loud —

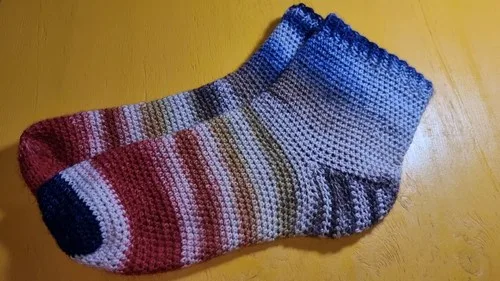
Colorful crochet wool socks you can make in a weekend

Beginner-friendly crochet wool socks worked toe-up in about 4-6 hours. Warm, colorful, and easy to fit.

Jump to the rounds

What this one is

You know that stretch of cool weather when your feet get cold before the rest of you notices winter has arrived. That's who these socks are for -- the person who wants something warm underfoot that didn't come off a store shelf, made in a wool-polyamide blend that holds up to actual wear. They're a good project if you've done a few crochet pieces already and want to try shaping a heel and toe instead of just working straight rows.

Your hands will move through several distinct sections here: a toe worked flat then joined, a foot/instep section, a heel shaped with double and triple decreases that then connects back into the leg, an ankle/leg section, and a ribbed cuff built from alternating front and back half relief stitches. This pattern is written for a men's size 43 foot. With a 2mm hook and fine wool blend, expect to sit with this one for a few sessions rather than finish it in one go -- the small hook size means more stitches per inch, so patience pays off.
The rounds, in full

Written out, round by round

Intermediate4-6 hours2 mmWorsted

Bring to the porch

Everything this one takes, in the order you will reach for it.

Yarn

  • 75% wool and 25% polyamide

Hook

  • 2mm crochet hook

Tools

  • 1 stitch marker

Toe Section (Base)

Start Make 1 slip knot, chain 20 + 2 extra chains (the starting chain should measure the width of your toes).

  1. Round 1Mark second-to-last chain. Make 2 more chains. 1 single crochet (sc) at marker, then 1 sc in each chain (20 sts).Continue with half double crochet (hdc) on the other side (20 sts).Join with a slip stitch (sl st).Total Stitches: 40 (20 sc + 20 hdc)(20)
  2. Round 2Chain 2 (counts as first stitch). 1 hdc in each stitch + 1 increase (inc) in the desired stitch. Join with 1 sl st.

Total Stitches: 41

  1. Round 3Chain 2 (counts as first stitch). 1 hdc in each stitch without increasing. Join with 1 sl st.Total Stitches: 41 Rows 4 & 5: Repeat Row 2 (Round 4: 42 sts) and Row 3 (Round 5: 42 sts). Total Stitches: 42

Foot/Instep Section

  1. Rounds 6–11Chain 2 at the start of each round. 1 sc in each stitch. Join with 1 sl st. Total Stitches: 42
  2. Rounds 12–15Increases Chain 2. 1 sc in each stitch + 1 increase where desired. Join with 1 sl st.Total Stitches: 46 (43, 44, 45, 46)
  3. Rounds 16–38Chain 2 (counts as first stitch). 1 sc in each stitch. Join with 1 sl st. Total Stitches: 46

Heel Section

End of Round 38: Chain 1 and cut yarn.

Divide fabric in half and mark the join.

Join yarn with a knot to begin the heel.

  1. Round 1Chain 2 (counts as first stitch). 1 hdc in each stitch until mark (23 stitches total).(23)
  2. Round 2Chain 2 and turn. Mark the middle. 1 hdc in each stitch + 1 double decrease (dc dec) at center.

Total Stitches: 22

  1. Round 3Chain 2 and turn. 1 hdc in each stitch + 1 dc dec at center. Total Stitches: 21Rows 4-13 (Decreases): Repeat instructions from Row 3 until 11 stitches remain in Row 13.

Adjusting the Sock (Connecting Heel)

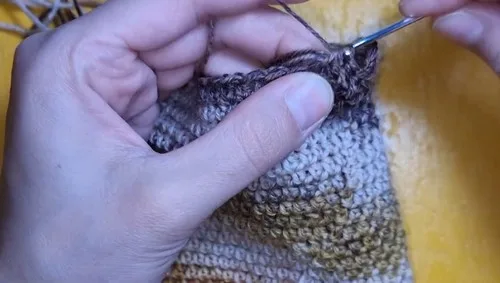
  1. Connecting RowChain 2 and turn. Work 1 hdc to the last two stitches on the heel. Make 1 triple decrease (tr dec). Work 1 hdc in each stitch to the second-to-last stitch. Make 1 tr dec. Work 1 hdc in each stitch to the center. Make 1 dc dec in the center. Work 1 hdc in each stitch to the end. Join with 1 sl st in the chain of the lower row.

Ankle/Leg Section

  1. Rounds 1–6Chain 2. 1 hdc in each stitch of the lower row. Join with 1 sl st. Repeat for 6 rows.

Total Stitches: 57

  1. Rounds 7–11Decreases Chain 2. 1 hdc in each stitch + 1 dc dec where desired. Join with 1 sl st.Total Stitches: 52 (56, 55, 54, 53, 52)
  2. Rounds 12–17Chain 2. 1 hdc in each stitch. Join with 1 sl st. Total Stitches: 52
  3. Round 18Chain 2. 1 dc in each stitch + 1 dc dec where desired. Join with 1 sl st. Total Stitches: 51
  4. Rounds 19–21Chain 2. 1 sc in each stitch. Join with 1 sl st. Total Stitches: 51

Cuff/Edge of Sock (Ribbing)

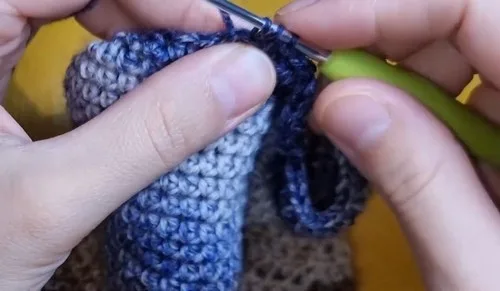
  1. Rows 1–5Make 1 chain. Work the following pattern for 5 rows: 1 half relief stitch in front, 1 half relief stitch in back. Repeat. Join with 1 sl st in the chains.
  2. Rows 6–10Make 1 chain. Repeat the relief stitch pattern for another 5 rows.Finish and secure yarn.

Marlene's notes

Note 01

A 2mm hook is small and will feel slow at first if you're used to worsted-weight projects with larger hooks, but it's what gives this sock its firm, durable fabric.

Note 02

Keep your single stitch marker handy through the whole piece -- it moves from marking a chain in the toe section to marking the heel's center point, so don't set it aside for good after round one.

Note 03

The heel is worked separately from the main tube after you divide the fabric in half and cut yarn, so rejoin carefully with a knot at the marked point before starting the heel rows, then reconnect it to the leg using the tr dec / dc dec connecting row.

Note 04

This pattern is written for a men's size 43 foot -- use that as your finished-size reference if you need to adjust stitch counts for a different size.

Porch photos

Before you sit down

  • Check that your wool-polyamide blend yarn amount will comfortably cover all sections plus a heel that's worked separately from the rest -- socks eat more yardage than they look like they should.
  • Have your stitch marker ready before round one of the toe section, since you'll need it immediately to mark the second-to-last chain.
  • Work a small swatch in hdc with your 2mm hook first to see how tightly your tension sits, since sock fit depends on this more than most projects -- this pattern is written for a men's size 43 foot.
  • Read through the Heel Section and the Adjusting the Sock (Connecting Heel) section once before you start them -- the center dc dec and the two tr decs happen close together, and it helps to know where they land before your hook does.

How the hours go

Toe Section (Base)
about 30-45 minutes because it's only 3 rounds but includes joining sc and hdc halves plus an early increase round
Heel Section
about 45-60 minutes because of the concentrated shaping -- two tr decs and a center dc dec packed into 3 short rows
Ankle/Leg and Foot/Instep Sections
about 2.5-3.5 hours because the ankle's decrease and hold rounds plus the foot's increase and repeat rounds add up in stitch count and repetition
Adjusting the Sock (Connecting Heel)
about 10-15 minutes because it's a single connecting row that joins the heel back into the tube using two tr decs and a center dc dec
Cuff/Edge of Sock (Ribbing)
about 45-60 minutes because working alternating front and back half relief stitches across two sets of 5 rows takes extra care and dexterity

Looking after it

  • Hand wash your finished socks in cool water with a wool-safe detergent, since the 75% wool content can felt or shrink under heat and agitation -- skip the washing machine.
  • Lay them flat to dry and reshape gently while damp, easing the heel and toe back into their curves; store them folded rather than hung so the ribbed cuff section doesn't stretch out of shape over time.
FAQs

Asked on the glider

the ones that come up on the glider

What hook size does this pattern use?

You'll work the whole sock with a 2mm crochet hook. It's small, which is part of why the fabric ends up firm enough to wear as actual socks rather than slippers.

Do I need more than one stitch marker?

One stitch marker is all the materials list calls for. You'll move it as you go -- first to mark a chain in the toe section, later to mark the center point in the heel.

How long does a pair actually take to finish?

Between the toe, foot, heel, ankle, and cuff sections, plan on roughly 4-6 hours total. The cuff's relief-stitch rounds and the foot section together take up the bulk of that time.

Why does the heel get worked separately from the rest of the sock?

the end of round 38 you cut the yarn, divide the fabric in half, and rejoin with a knot specifically to work the heel on its own. This lets the double and triple decreases shape the heel cup without fighting the surrounding rounds, and a separate connecting row then joins it back into the leg.

What does the alternating relief stitch actually look like?

Working one half relief stitch in front and one in back, repeated across two sets of 5 rows, creates a ribbed texture similar to knit ribbing. It's what gives the Cuff/Edge of Sock (Ribbing) section its stretch around the leg.

Is this really suitable for beginners despite the shaping?

It leans intermediate because of the tr dec, dc dec, and relief stitches, but if you've crocheted a few projects with basic increases and decreases already, you'll be able to follow the round-by-round shaping without much trouble.