Intermediate 4-6 hours Worsted yarn

Worked on the glider, counted out loud —

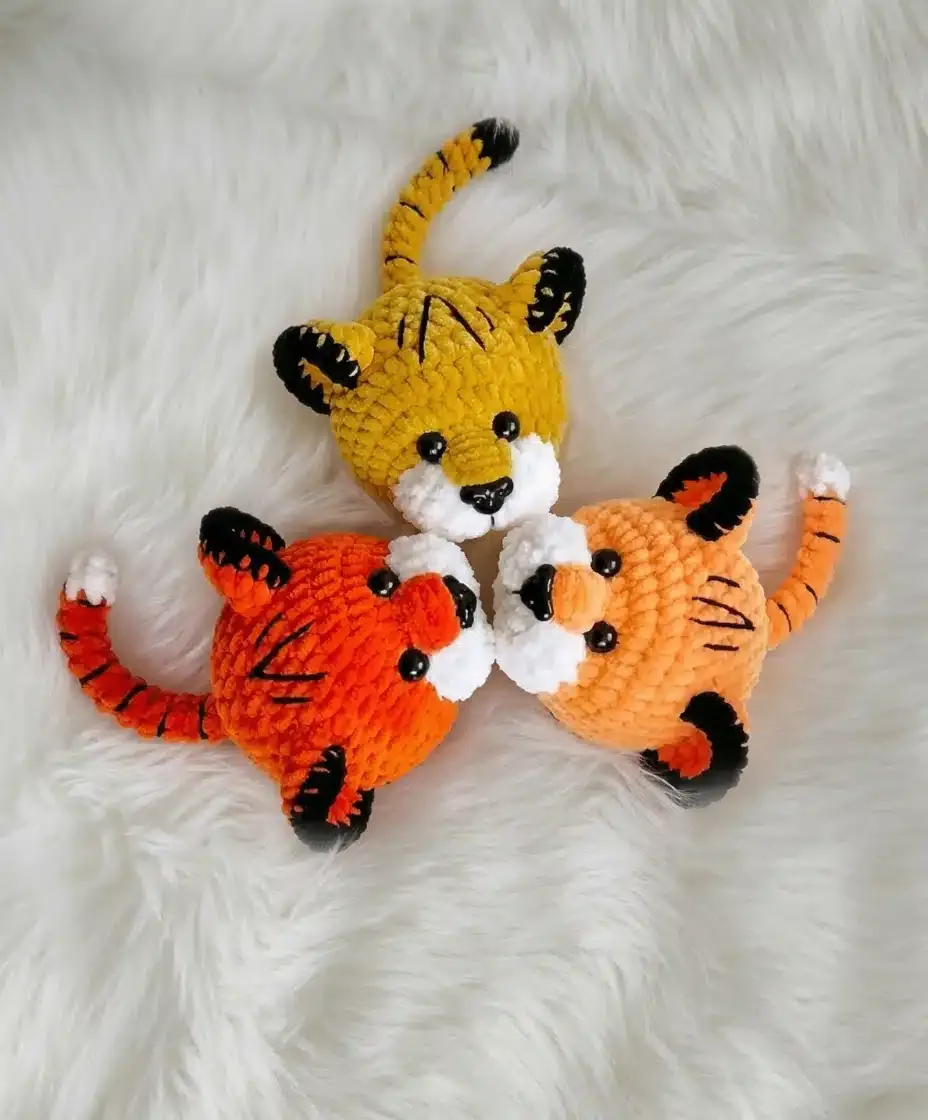
Little tiger amigurumi ball crochet pattern

A beginner-friendly tiger ball amigurumi in worsted yarn, made in about 4-6 hours over a quiet evening or two.

Jump to the rounds

What this one is

This is the kind of project you pull out when you want something small and cheerful to show for your time. You've got a plastic play ball tucked in your stash, three colors of yarn you've been meaning to use, and maybe a little one who's asked for a tiger. It's a friendly build for anyone who's made a handful of amigurumi before and wants a project with real personality at the end of it.

Your hands spend most of the time in single crochet, working the head and body as one continuous spiral before turning to the flat, back-and-forth ears and that sweet curled tail. Between the twelve rounds of the body, the four rows for each ear, and the striped tail, you're looking at somewhere around four to six hours total, plus a little extra for the sculpting and stuffing at the end.

Try it another way

Once you've made one tiger ball, it's easy to make it your own. Swap the plastic play ball for a slightly larger or smaller one and your whole piece scales up or down without changing a single stitch count. Try the main color in a soft gray or golden yellow instead of bright orange, and let the contrast color carry more of the face for a completely different animal feel while keeping the same twelve-round head and body shape. You can also play with where the accent color shows up: instead of saving black just for the two-round tail stripe, work it into a few rounds on the ears too, so the stripes echo each other across the piece. If you like the four small beads suggested for the feet, add them to give the finished ball a bit of weight and help it stand upright on a shelf rather than roll. And if you're making these as a set, keep a little notebook of which rounds you changed color on each one — with only twelve rounds in the body and four in the ears, it's easy to lose track of which variation belongs to which tiger once you've made a few.
The rounds, in full

Written out, round by round

Intermediate4-6 hours5.0 mmWorsted

Bring to the porch

Everything this one takes, in the order you will reach for it.

Super bulky (or chunky) yarn in

  • Main color (e.g., bright orange)
  • Contrast color (e.g., cream or white)
  • Accent color (e.g., black)
  • 5.0mm crochet hook (or size suitable for your yarn to achieve a dense fabric)
  • 8-10mm safety eyes
  • Small plastic play ball (approx. 5-6 cm diameter)
  • Polyester fiberfill stuffing
  • Tapestry needle
  • Scissors
  • Stitch marker
  • Strong thread for sculpting and attaching beads
  • 4 small beads for feet (optional, to help it stand)

Head and Body

We’ll start with the head (muzzle area) and then transition into the body. This is one continuous piece!

Using contrast color yarn (e.g., cream/white):

  1. Round 17 sc in MR (7)
  2. Round 2Inc in each st around (14)
  3. Round 3(Sc, inc)*7 (21)
  4. Rounds 4–5Sc in each st around (21) Work 2 rounds total. Now, for the magic moment! Change to your main color yarn (e.g., orange). You can simply tie a knot and continue crocheting, or use a seamless color change technique if you prefer.

Using main color yarn (e.g., orange):

  1. Round 66 sc, (inc)*9, 6 sc (30)
  2. Round 7(4 sc, inc)*6 (36)
  3. Rounds 8–13Sc in each st around (36) Work 6 rounds total. At this point, gently stuff the muzzle area with fiberfill. Then, carefully insert your plastic play ball into the body. Continue stuffing firmly around the ball to shape your tiger.
  4. Round 14(4 sc, dec)*6 (30)
  5. Round 15(3 sc, dec)*6 (24)
  6. Round 16(2 sc, dec)*6 (18)
  7. Round 17(Sc, dec)*6 (12)
  8. Round 18(Dec)*6 (6)Keep a long tail for closing and sewing later. Your tiger’s body is looking wonderfully round and cuddly!

Ears (Make 2)

We’ll work these in rows, turning at the end of each. This creates a lovely flat shape.

Using main color yarn (e.g., orange):

  1. Round 1Ch 2, 4 sc in 2nd ch from hook. Ch 1, turn (4)
  2. Round 2Inc in each st around. Ch 1, turn (8)
  3. Round 3(Sc, inc)*4. Ch 1, turn (12)

Now, let’s add a little accent color to the tip of the ear! Change to your accent color yarn (e.g., black).

Using accent color yarn (e.g., black):

  1. Round 4Sc in each st around. Ch 1, turn (12)Fasten off, leaving a long tail for sewing. Your ears are wonderfully shaped and ready to be attached!

Tail

We’ll continue directly from the body, working into the remaining 6 stitches. The first part is worked in the front loops only to create a subtle bend.

Using main color yarn (e.g., orange):

  1. Rounds 19–31Sc in FLO in each st around (6) Work 13 rounds total. Now, for a little stripe on the tail! Change to your accent color yarn (e.g., black or white). Continue working through both loops.

Using accent color yarn (e.g., black/white):

  1. Rounds 32–33Sc in each st around (6) Work 2 rounds total. Fasten off and weave in ends. Isn’t that tail just the sweetest little curl?

Putting it together

Step 1

Now for the fun part – bringing your tiger amigurumi ball crochet to life with all its charming details!

Step 2

Facial Sculpting (Optional but Recommended): Thread your tapestry needle with a long piece of strong thread (matching your main body color).

Step 3

Eyes: Insert your needle into the back of the head, bringing it out where you want the inner corner of the first eye to be. Insert the needle back into the outer corner of the first eye, and bring it out at the inner corner of the second eye. Go back into the outer corner of the second eye, and out through the back of the head. Pull gently on the thread ends to create slight indentations for the eyes. Knot securely at the back and hide the ends.

Step 4

Mouth: From the back of the head, bring your needle out on one side of where the mouth will be, just below the muzzle. Go across to the other side of the mouth, then back into the back of the head. Pull gently to create a slight “smile” indentation.

Step 5

Muzzle Definition: Bring your needle out from the back of the head at the top-center of the muzzle, above the mouth indentation. Go straight down through the muzzle to the center of the mouth indentation, and back out through the back of the head. Pull gently to define the center line of the muzzle. Knot securely and hide ends.

Step 6

Eyes and Nose: Insert your safety eyes into the sculpted indentations. If you prefer to embroider eyes or use half-bead eyes, now is the time to add them. For the nose, you can embroider a small triangle with black yarn or glue on a small felt nose. Embroider a small line from the nose down to the mouth indentation.

Step 7

Tiger Stripes: With black yarn and your tapestry needle, embroider small stripes around the body and head. Be creative! Short, curved lines work wonderfully to give that characteristic tiger look.

Step 8

Attach Ears: Fold each ear flat. Using the long tail you left, sew the ears to the top of the head. Position them between rounds 11 and 12, with approximately 6 stitches apart. The folded edge of the ear should sit along rounds 10-11, creating a slightly cupped shape. Secure tightly and weave in ends.

Step 9

Attach Feet (Optional): If you want your tiger to stand without rolling, use strong thread to sew 4 small beads to the bottom of the body, evenly spaced, to act as little feet.

Marlene's notes

Note 01

Keep your tension tight and even throughout, especially in the head and body, since a loose gauge will let the fiberfill show between stitches.

Note 02

Move your stitch marker up at the start of every round without fail — with continuous spirals and no slip stitch to mark the join, it's your only reliable way to track where each round begins.

Before you sit down

  • Lay out your three yarn colors — main, contrast, and accent — and confirm you have enough of each for twelve rounds of body, four rows of ear times two, and the striped tail.
  • Have your stitch marker ready before Round 1; you'll place it in the first stitch and move it up every round of the continuous spiral.
  • Work a small test swatch with your 5.0mm hook to check your fabric is dense enough that stuffing won't peek through.
  • Read through the tail section once before you start, since it shifts from front-loop-only stitches to working through both loops partway along.

How the hours go

Head and body
about 2-2.5 hours because it's twelve rounds worked in one continuous piece with several increase rounds to track
Ears and tail
about 1-1.5 hours because the ears are only four rows each but the tail's thirteen front-loop rounds plus two accent rounds take patience
Assembly and sculpting
about 1-2 hours because stuffing evenly, attaching safety eyes, and hand-sculpting the facial features with strong thread is fiddly, careful work

Looking after it

  • Because this is worked in yarn with polyester fiberfill inside, hand wash only in cool water if it ever needs freshening, and press out excess water gently rather than wringing.
  • Reshape the ears and tail while damp and let the whole piece air dry flat, away from direct heat, then store it somewhere it won't get squashed so the stuffing keeps its shape.
FAQs

Asked on the glider

the ones that come up on the glider

Can I make this without a plastic play ball?

The ball gives the head and body a firm, round core, so if you skip it you'll want to stuff extra firmly with fiberfill to get the same shape. It's worth using the ball if you have one, since it also helps the safety eyes sit at a consistent depth.

Why does my spiral look like it's spiraling instead of stacking in neat rounds?

That's normal for continuous single crochet amigurumi and it's exactly what the stitch marker is for. As long as your stitch counts match what's given at the end of each round, the slight spiral won't be visible once the piece is stuffed.

Do I need safety eyes, or can I embroider the eyes instead?

The pattern is written around 8-10mm safety eyes for a classic amigurumi look, and they're worth using if you can, since they attach securely for handling. If the toy is for a very young child, check local safety guidance on small parts before choosing eyes.

Can I skip the beads in the feet?

Yes, the beads are listed as optional and are only there to add a little weight so the ball stands rather than rolls. Leaving them out won't affect the stitch pattern at all.

How much yarn do I actually need for each color?

Amounts will depend on your gauge and the size of your play ball, but the main color covers the most ground across the body and ears, while the contrast and accent colors are used more sparingly. It's worth winding a small extra ball of each before you start so you're not caught short mid-round.