Beginner-Friendly 6-9 Hours Worsted yarn

Worked on the glider, counted out loud —

Tie-Front Crochet Cardigan: Easy Half Double Crochet Pattern

Make a stylish tie-front crochet cardigan with simple half double crochet stitches. Customizable, beginner-friendly, and perfect for outings all season lon

Jump to the rounds

Before you sit down

Chain a long foundation row and work half double crochet across to establish the width of the back panel.

Turn and continue in front loop only half double crochet, building up rows to create that signature ribbed texture.

Keep stitching flat rows until the back panel measures a full 15 inches tall from the foundation edge.

Measure in from each top edge and place stitch markers to map out where the two front panels will begin.

Work front loop only half double crochet up to the first marker to shape one side into a front panel.

Turn and repeat the front loop only rows on that panel until it also reaches 15 inches tall.

Finish, cut, and tie off that panel, then join fresh yarn on the opposite marked edge.

Mirror the same front loop only shaping and row count to complete the second front panel to match.

Position and slip stitch the front panels to the back panel up to the marked points to shape the armholes, leaving about nine inches open for the arm.

Work two rounds of half double crochet — first through both loops, then front loop only — around the entire body and sleeve edges, then slip stitch to join and tie off.

Attach yarn at the bottom corner and double crochet all the way around the cardigan edge, chaining long ties at the marked points and slip stitching back down each one to finish.

What this one is

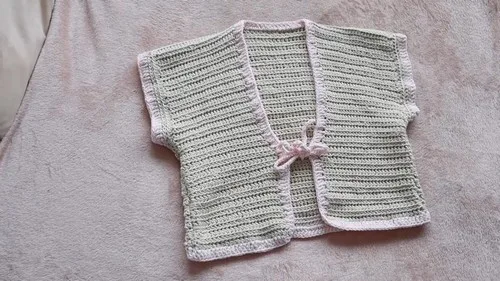
This tie-front cardigan is the kind of piece you'll reach for again and again — a long rectangular back panel and two front panels that come together into a relaxed, open-front silhouette perfect for coffee runs, weekend markets, or layering over a sundress. The front loop only half double crochet creates a beautifully textured, ribbed-like fabric that drapes softly instead of feeling stiff, making it flattering on nearly every body type. It's ideal for anyone who wants a handmade wardrobe staple that still feels current and wearable, not just decorative.

The magic of this pattern lies in its simplicity: you're working almost entirely in half double crochet with a front loop only twist that gives the fabric its signature texture without any complicated stitch combinations. Because the piece is built from a few large rectangular panels rather than dozens of shaped rounds, it's incredibly beginner-friendly while still feeling like a substantial, rewarding make. Expect to spend somewhere between six and nine hours total, depending on your stitching speed and how often you pause to measure your progress.

When it's finished, you'll have a soft, cotton cardigan measuring roughly 17 inches wide and 15 inches tall in its main panels, with a tie-front closure that lets you adjust the fit to your mood. The limestone cotton yarn gives it a clean, neutral look that pairs with everything from jeans to linen dresses, while the trim yarn adds a subtle finishing detail. It's a lovely handmade gift for a friend who loves effortless, put-together layers, or a treat-yourself project for your own closet.

Variations

This pattern is wonderfully easy to customize once you understand the basic panel construction. For a bold seasonal look, try working the main body in a deep rust or forest green cotton blend with a cream trim — 24/7 Cotton or We Crochet Dishie both work beautifully in this weight and hold their shape well for wearables. If you want a more delicate, warm-weather version, swap the cotton for a cotton-linen blend like Hobbii Rustic Cotton, which drapes even softer and breathes better for summer outings. For size adjustments, add or subtract in multiples of two chains from the original 69-chain foundation — adding 8-10 chains (roughly 2 inches) gives you a roomier fit through the back panel, while removing the same amount creates a more fitted, cropped silhouette; just remember to keep your front panel stitch marker measurements proportional, adjusting the 6.5-inch marks slightly wider or narrower to match. You could also lengthen the piece past 15 inches for a longer, duster-style cardigan — simply keep front loop only half double crocheting until you reach your desired length, then match the front panels accordingly. Color-block lovers could work the back panel in one shade and the two front panels in a coordinating contrast color, joined at the shoulder seams for a modern, asymmetrical look. For a cozy autumn variation, swap the trim yarn for a chunky mohair blend to add a soft, fuzzy border along the edges. And if you're making this as a gift, consider monogramming a small tapestry-needle embroidered initial near the tie for a personal touch that makes it feel extra special.

I adore this cardigan because it proves you don't need complicated stitches to make something that looks genuinely stylish. The front loop only half double crochet is one of my favorite techniques — it's just a small twist on a stitch you already know, but it transforms the fabric into something textured and structured that holds its shape beautifully as a cardigan. Measuring out the 6.5-inch sections for the front panels and marking them with stitch markers feels so satisfying, like you're sculpting the garment in real time instead of just following numbers blindly. I also love that this pattern uses simple rectangular panels — no complicated shaping, no counting increases — so you can crochet while watching TV or chatting with friends and still keep track easily. The tie-front detail is the cherry on top; it gives you a customizable, adjustable fit without buttons, zippers, or closures to fuss with. By the time you're attaching yarn for that second front panel, you'll already feel like a confident garment maker, and that confidence carries right into wearing it out the door.
Common mistakes

  • Working into both loops instead of the front loop onlyDouble-check each row that you're inserting your hook only under the front loop of the stitch below; this is what creates the ribbed texture, and accidentally working both loops will flatten the fabric and throw off your gauge.
  • Losing track of the correct starting chain count for turningAlways chain two before turning and treat it as your first half double crochet of the new row consistently; skipping this or adding extra chains will slowly shift your panel's width.
  • Misplacing the stitch markers for the front panel splitMeasure carefully from each top edge to the 6.5-inch mark (about 28 chains) before placing your stitch markers, and double check the middle section measures roughly 3.25 inches before you start splitting the panels.
  • Not measuring height accurately beforeLay your piece flat and use a tape measure rather than eyeballing it; the back panel needs to reach a true 15 inches before you begin the front panel sections, or your cardigan will end up uneven.
  • Forgetting to attach yarn correctlyWhen starting the second panel, join your yarn securely at the marked stitch with a slip knot and weave in the tail as you go so it doesn't come loose under the stress of wear.
  • Uneven tension between the two front panelsTry to crochet both front panels in the same sitting or take a short break between them so your tension stays consistent; wildly different tension will make the two sides hang unevenly once assembled.

The rounds, in full

Written out, round by round

Beginner-Friendly6-9 Hours4 mmWorsted

Materials

Everything this one takes, in the order you will reach for it.

  • Scissors
  • Tape measure
  • Stitch markers
  • Tapestry needle
  • 4mm hook
  • 250 grams of cotton yarn (main body, e.g., "Epic" in limestone color)
  • An extra 50-gram ball of yarn (trim)

keep this to hand

Abbreviations

US crochet terms, as used in this pattern.

  1. chchain
  2. ststitch
  3. sl stslip stitch
  4. hdchalf double crochet
  5. dcdouble crochet

Back Panel

Slip Knot & Chain: Create a slip knot and chain 69 (17 inches depending on desired width).

  1. Round 1(Half Double Crochet): Chain two extra, yarn over, and half double crochet into the third chain from the hook. Continue to the end.
  2. Round 2(Front Loop Only Half Double Crochet): Chain two, turn, and front loop only half double crochet to the end.Repeat Repeat: Continue front loop only half double crocheting until the piece reaches 15 inches in height.

Front Panels

  1. MarkingMeasure 6.5 inches from each top edge and mark with stitch markers (approximately 28 chains). Ensure the middle section is about 3.25 inches wide.
  2. First PanelChain two and front loop only half double crochet until the first stitch marker.
  3. LengthChain two, turn, and front loop only half double crochet until the panel reaches 15 inches (37 rows).
  4. Tie OffCut the yarn, chain one, and tie off.
  5. Second PanelAttach yarn on the other side and repeat steps 2 and 3 to create the second front panel.

Armholes

  1. PositioningAttach the front panels to the back panel, ensuring a snug fit around your arm. Nine inches is suggested but adjust as needed.
  2. Slip StitchSlip stitch the front and back panels together up to the marked points.
  3. SecureChain one, cut off the yarn, and repeat on the other side.

Body and Sleeve Edging

  1. Round 1(Half Double Crochet): Turn the piece right side out, insert the hook, chain two, and half double crochet around the entire edge.
  2. Round 2(Front Loop Only): Chain two, turn, and front loop only half double crochet around.
  3. FinishingSlip stitch to join, chain one, and tie off. Repeat for the other sleeve.

Trim and Ties

  1. Attaching YarnAttach yarn at the bottom corner.
  2. Double CrochetChain three and double crochet around the entire cardigan edge.
  3. Creating TiesAt the marked points (5 inches from the bottom), chain 13.5 inches for the tie.
  4. Slip Stitch BackSlip stitch back down the chain to create a sturdy tie.
  5. ContinueDouble crochet to the next marker and repeat steps 3 and 4 for the second tie.
  6. FinishingSlip stitch, chain one, and tie off. Weave in all ends.

Important notes

Note 01

💡 Use a 4mm hook consistently throughout the entire cardigan — swapping hook sizes mid-project, even slightly, can change your gauge enough to throw off the final 17-inch width.

Note 02

💡 Keep a tape measure handy at all times since this pattern is measurement-driven rather than row-count-driven for the back panel; check your progress every few rows rather than waiting until the end.

Note 03

💡 Place your stitch markers at the 6.5-inch points before you start the front panel loops so you have a clear visual guide and don't accidentally crochet past the intended split.

Note 04

💡 Wind your 250-gram main color into a manageable cake or ball before starting so it feeds smoothly without tangling during the long straight rows of front loop only crochet.

Note 05

💡 Save your extra 50-gram trim yarn until the very end so you know exactly how much length you have left for edging the body and sleeves evenly.

Note 06

💡 Weave in all your ends with a tapestry needle along the edges of the panels rather than the front loop texture, so the ribbing stays clean and unobstructed.

FAQs

Asked on the glider

the ones that come up on the glider

Can I make this cardigan larger or smaller than the original size?

Yes, simply adjust your starting chain of 69 in increments of two and recalculate your stitch marker placement proportionally. Just remember that changing the chain count will also shift your final width and the position of the 6.5-inch front panel marks.

What yarn weight works best for this pattern?

This pattern uses worsted weight cotton yarn with a 4mm hook, which gives the fabric enough body to hold its shape as a garment. A cotton-acrylic blend in the same weight would also work well if you want a bit more stretch.

Why does the pattern specify front loop only half double crochet?

Working in the front loop only creates a subtle ribbed texture that adds structure and visual interest without adding bulk. It also gives the fabric a bit of horizontal stretch, which is helpful for a wearable piece like this cardigan.

How do I know where to split the piece into two front panels?

Measure 6.5 inches in from each top edge of your back panel and place a stitch marker at that point, which should land around 28 chains in. The remaining middle section should measure about 3.25 inches, which becomes the back of the neck area.

Do I need to block this cardigan after finishing it?

Light steam blocking is recommended for cotton yarn projects like this one to even out the stitches and help the front loop only texture lay flat and neat. Just be gentle with steam since cotton can lose some elasticity if over-blocked.