Intermediate 20-28 hours DK yarn

Worked on the glider, counted out loud —

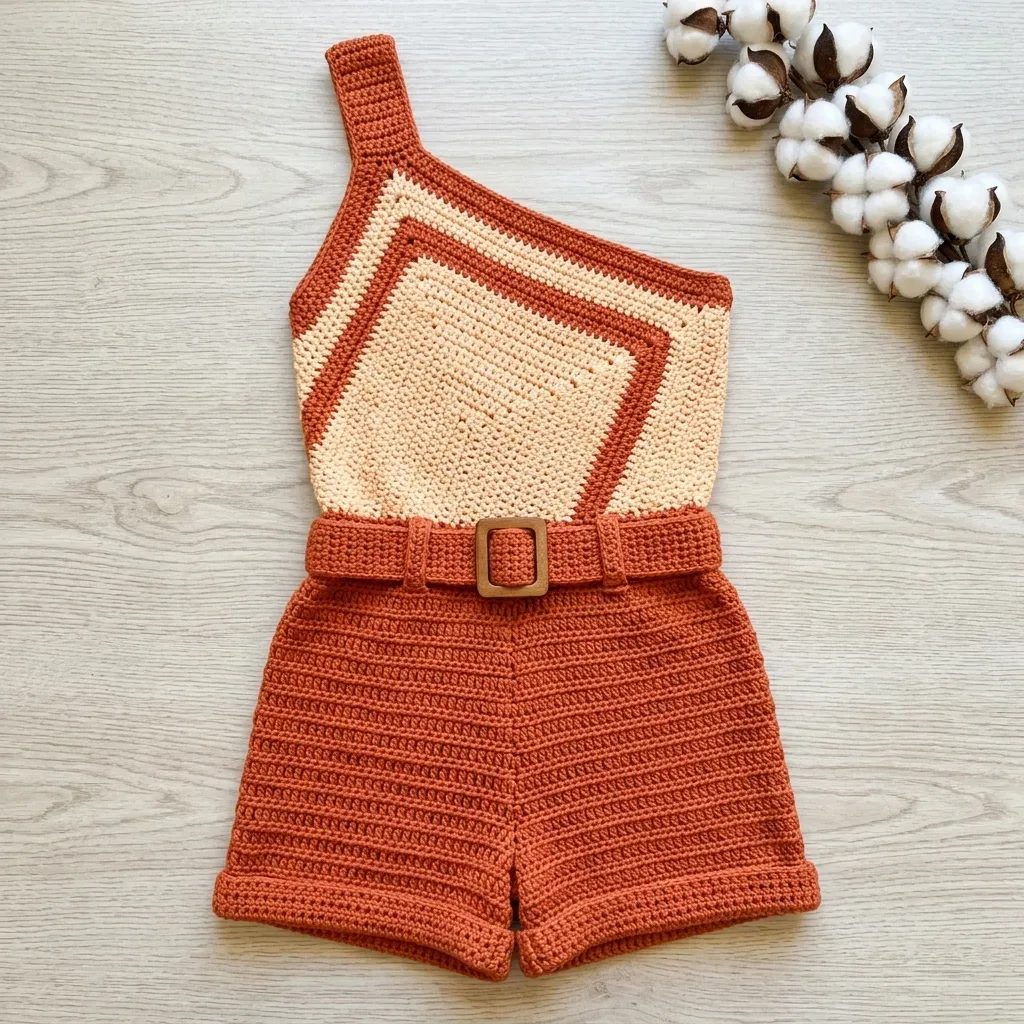
Terracotta diamond romper with a granny square bodice

A granny square bodice romper for intermediates comfortable seaming; about 20-28 hours from swatch to buckle.

Jump to the rounds

What this one is

You make this for the person who wants one good piece to wear when the evening cools down just enough for a layer with structure — a romper that reads finished, not homespun. It suits someone who already has a granny square or two under their belt and is ready to turn that square into the centerpiece of an actual garment, front and center on the bodice.

Your hands spend the first stretch building a single granny square from the center out, then shift to rows of straightforward single crochet for the bodice panels and shorts, and finish with whipstitch and mattress stitch to bring it all together. Between the square, the panels, and the seaming, plan on roughly 20 to 28 hours depending on your pace.

Try it another way

You can shift the palette by swapping which yarn plays lead: work the square's later rounds, 6 through 8, in your accent color instead of terracotta, so the outer border reads as the statement rather than the center. If you want a plainer bodice, skip the diamond placement note and center the square straight rather than on point for a more traditional look. For the shorts and Right Leg, staying with Yarn A keeps the piece reading as one cohesive garment, but working the shorts entirely in Yarn B turns the romper into a two-tone piece with the terracotta reserved for the bodice alone. If you are making this for warmer wear, consider a lighter DK cotton blend in place of the given fiber for more breathability, keeping the same G-6 hook and the 18-stitch-by-20-row gauge as your target. Finally, the wooden buckle is a functional closure as written, but a contrasting button or a leather toggle in the same 1.5 inch scale would swap the look without touching a single stitch count.

There is real satisfaction in watching one small ring of chain stitches grow into an 8-inch square that becomes the whole visual anchor of the bodice — you get the meditative rhythm of granny square rounds followed by the different, steadier rhythm of straight single crochet rows. The color sequence across the square's eight rounds, cream giving way to terracotta and back, teaches you to read your own work instead of just following a count. Then the construction shifts again: shoulder shaping on the front panel, whipstitching a diamond-set square onto a frame, mattress stitch up the sides, and a wooden buckle stitched on as a working closure. Four different skills, one wearable result.
The rounds, in full

Written out, round by round

Intermediate20-28 hours4.0 mmDK

Bring to the porch

Everything this one takes, in the order you will reach for it.

  • Option 1: Lion Brand 24/7 Cotton in Terracotta and Ecru. This 100% mercerized cotton holds shape beautifully and gives the romper a structured drape. You will need approximately 4 skeins Terracotta and 2 skeins Ecru.
  • Option 2: Paintbox Yarns Simply DK in Terracotta and Champagne White. This budget-friendly 100% acrylic option produces a smooth, even fabric. You will need approximately 5 skeins Terracotta and 3 skeins Champagne White.
  • Option 3: Scheepjes Catona held double in Ginger Gold and Old Lace. The excellent stitch definition showcases the granny motif perfectly. You will need approximately 10 balls Ginger Gold and 5 balls Old Lace.

Substitution Note

  • Choose any DK weight yarn with low stretch and good stitch definition. Avoid chenille, high-stretch blends, or heavily textured yarns. These will obscure the geometric motif and alter the drape.

Yarn

  • Yarn A (Terracotta): Approximately 620 yards of DK weight yarn
  • Yarn B (Cream): Approximately 280 yards of DK weight yarn

Hook

  • US size G-6 (4.0 mm)

Notions

  • Yarn needle
  • 4 stitch markers
  • Scissors
  • One square wooden buckle, approximately 1.5 inches wide
  • Sewing needle and coordinating thread for buckle attachment

Granny Square Front Panel

This square is worked in joined rounds from the center outward. The color changes create the colorblock effect. Color Sequence: Rounds 1 through 3 use Yarn B (Cream); Rounds 4 and 5 use Yarn A (Terracotta); Rounds 6 and 7 use Yarn B (Cream); Round 8 uses Yarn A (Terracotta).

  1. Round 1RS, Yarn B With Yarn B, ch 4. Join with sl st to form a ring. Ch 3 (counts as first dc here and throughout granny square). Work 2 dc into ring. Ch 2. (3 dc into ring, ch 2) 3 times. Join with sl st to top of beg ch-3. (4 groups of 3 dc, 4 corner ch-2 sps)
  2. Round 2Yarn B Sl st into next 2 dc and into corner ch-2 sp. Ch 3. Work 2 dc into same sp. Ch 1. (3 dc, ch 2, 3 dc) into next corner ch-2 sp. Ch 1. Rep from ( ) around, working (3 dc, ch 2, 3 dc) into each corner sp and ch 1 between each group. Join with sl st to top of beg ch-3. (8 groups of 3 dc, 4 corner ch-2 sps, 4 ch-1 sps on sides)
  3. Round 3Yarn B Sl st into next 2 dc and into corner ch-2 sp. Ch 3. Work 2 dc into same sp. Ch 2. Work 3 dc into same sp. Ch 1. Work 3 dc into next ch-1 sp. Ch 1. (3 dc, ch 2, 3 dc) into corner ch-2 sp. Ch 1. 3 dc into ch-1 sp. Ch 1. Rep from ( ) around. Join with sl st to top of beg ch-3. Fasten off Yarn B. (12 groups of 3 dc, 4 corner ch-2 sps, 8 ch-1 sps)
  4. Round 4Yarn A Join Yarn A into any corner ch-2 sp. Ch 3. Work 2 dc into same sp. Ch 2. Work 3 dc into same sp. (Ch 1. Work 3 dc into next ch-1 sp) twice. Ch 1. Rep (3 dc, ch 2, 3 dc) into each corner, with (ch 1, 3 dc) into each ch-1 sp on each side. Join. Fasten off Yarn A. (16 groups of 3 dc, 4 corner ch-2 sps, 12 ch-1 sps)
  5. Round 5Yarn A Join Yarn A into any corner ch-2 sp. Work same as Round 4, adding one additional (ch 1, 3 dc) group per side. Join. Fasten off Yarn A. (20 groups of 3 dc, 4 corner ch-2 sps, 16 ch-1 sps)
  6. Round 6Yarn B Join Yarn B and work same pattern, adding one additional (ch 1, 3 dc) group per side. Join. Fasten off Yarn B. (24 groups of 3 dc, 4 corner ch-2 sps, 20 ch-1 sps)
  7. Round 7Yarn B Repeat Round 6 structure, adding one additional group per side. Join. Fasten off Yarn B. (28 groups of 3 dc, 4 corner ch-2 sps, 24 ch-1 sps)
  8. Round 8Yarn A Join Yarn A and work same pattern, adding one additional group per side. Join. Fasten off Yarn A. (32 groups of 3 dc, 4 corner ch-2 sps, 28 ch-1 sps)Block the granny square to approximately 8 inches x 8 inches after completing Round 8. Set aside.

Bodice Front Panel Frame

This creates the structure that holds your granny square.

  1. Row 1(RS): Ch 37; Sc into 2nd ch from hook and each ch across. Ch 1, turn. (36 sc)
  2. Rows 2–10through 10: Sc across. Ch 1, turn. (36 sc each row)(36)
  3. Row 11Right shoulder edge shaping, RS Sc across first 24 sts. Leave remaining 12 sts unworked. Ch 1, turn. (24 sc)
  4. Row 12Sc across. Ch 1, turn. (24 sc)
  5. Row 13Sc2tog at beg of row. Sc across. Ch 1, turn. (23 sc)
  6. Row 14Sc across. Ch 1, turn. (23 sc)
  7. Row 15Sc2tog at beg of row. Sc across. Ch 1, turn. (22 sc)
  8. Row 16Sc across. Ch 1, turn. (22 sc)
  9. Row 17Sc2tog at beg of row. Sc across. Ch 1, turn. (21 sc)
  10. Row 18Sc across. Ch 1, turn. (21 sc)
  11. Row 19Sc2tog at beg of row. Sc across. Ch 1, turn. (20 sc)
  12. Rows 20–38through 38: Sc across. Ch 1, turn. (20 sc each row)Fasten off at end of Row 38.Strap Construction: With Yarn A, rejoin at the left edge at the height of Row 10, working upward from the top of the panel.(20)
  13. Strap Row 1(Strap Row 1, RS): Sc across 6 sts at the top left corner. Ch 1, turn. (6 sc)
  14. Strap Rows 2-30through 30: Sc across. Ch 1, turn. (6 sc each row)Fasten off, leaving a 12 inch tail for seaming to back panel.(6)

Bodice Back Panel

  1. Row 1(RS): Ch 37; Sc into 2nd ch from hook and each ch across. Ch 1, turn. (36 sc)
  2. Rows 2–38Sc across. Ch 1, turn. (36 sc each row)Fasten off.(36)

Shorts

  1. Round 1Waistband Ch 126, join with sl st to form a ring, being careful not to twist; Ch 1; Sc into each ch around. Join with sl st to first sc. (126 sc)
  2. Rounds 2–4through 4 (Waistband): Ch 1. Sc into each st around. Join with sl st to first sc. (126 sc each round)(126)
  3. Round 5Shorts Body Ch 1. Sc BLO into each st around. Join with sl st to first sc. (126 sc)
  4. Rounds 6–24through 24 (Shorts Body): Ch 1. Sc BLO into each st around. Join with sl st to first sc. (126 sc each round)(126)
  5. Round 25Crotch Shaping and Leg Separation Ch 1. Sc BLO across first 63 sts. Ch 6 (crotch bridge). Sk next 63 sts. Join with sl st to first sc. (63 sc + 6 ch bridge)

Right Leg

  1. Round 1Ch 1. Sc into each of the 63 sts of the front half. Sc into each of 6 ch of crotch bridge.

Putting it together

Step 1

Center the blocked granny square onto the front bodice frame. Align the corners of the square with the horizontal and vertical midpoints of the frame so the square sits as a diamond. Pin in place.

Step 2

Using Yarn A and a yarn needle, whipstitch the granny square to the bodice frame along all four edges.

Step 3

Seam the front panel to the back panel along both side edges using mattress stitch, matching row for row from the waist up to the underarm point (Row 10 on the front).

Step 4

Seam the strap to the top back left corner by whipstitching securely.

Marlene's notes

Note 01

Keep your G-6 (4.0 mm) hook consistent across the granny square and both bodice panels, since a looser or tighter hook here will throw off how the square fits the frame.

Note 02

Follow the color sequence exactly as given, cream for Rounds 1 through 3, terracotta for 4 and 5, cream again for 6 and 7, terracotta for Round 8, fastening off at each color change so your joins stay clean.

Note 03

Block the granny square to approximately 8 inches by 8 inches before you center it on the bodice frame, since an unblocked square will not sit evenly as a diamond against the frame's edges.

Note 04

Skill Level: Intermediate. Comfortable with granny squares, joining pieces, working in the round, and basic seaming.

Note 05

Finished Measurements: Fits bust 32 to 34 inches, waist 26 to 28 inches, hip 34 to 36 inches. Total length from shoulder to hem is approximately 18 inches.

Note 06

Time Estimate: Approximately 20 to 28 hours depending on your pace.

Note 07

Gauge: 18 single crochet stitches x 20 rows = 4 inches x 4 inches worked in single crochet with a 4.0 mm hook after blocking. Gauge matters enormously for this garment; even one stitch difference per 4 inches will significantly alter the fit across the bodice and shorts circumference. Please swatch and adjust your hook size if needed.

Note 08

Gauge: One completed granny square panel through Round 8 measures approximately 8 inches x 8 inches after blocking.

Note 09

Substitution Note: Choose any DK weight yarn with low stretch and good stitch definition. Avoid chenille, high-stretch blends, or heavily textured yarns as these will obscure the geometric motif and alter the drape.

Before you sit down

  • Check that you have close to 620 yards of Yarn A and 280 yards of Yarn B on hand before you begin, since the square and both bodice panels all draw from the same skeins.
  • Swatch in single crochet with your G-6 hook and confirm you are getting 18 sc and 20 rows to 4 inches after blocking, since the bodice panels depend on that gauge for fit.
  • Set out your 4 stitch markers now so they are at hand for the shoulder shaping and any panel-matching you do while seaming.
  • Read through Round 1 of the granny square before you cast on, so the ring, the four corner ch-2 spaces, and the join are clear in your head before your first stitch.

How the hours go

Granny Square Front Panel
about 3-4 hours because of the eight rounds and three color changes to track
Bodice Front and Back Panels
about 8-10 hours because of the 38 rows per panel plus the shoulder shaping on the front
Assembly and seaming
about 4-6 hours because whipstitching the square in place and mattress-stitching both side seams row for row takes patience

Looking after it

  • Hand wash the finished romper in cool water with a gentle detergent, since DK weight fibers hold their shape best without agitation or a machine cycle.
  • Lay it flat on a towel to dry and reshape the granny square gently to its blocked 8-inch dimensions while damp, then store folded rather than hung so the shoulder straps do not stretch.
FAQs

Asked on the glider

the ones that come up on the glider

Do I need to know how to make a granny square before I start this pattern?

Yes, this pattern assumes you are comfortable working a granny square from the center ring out. If you have made even one before, the color sequence and corner increases here will feel familiar.

How much yarn do I actually need for the whole romper?

You will need approximately 620 yards of Yarn A in terracotta and 280 yards of Yarn B in cream. These amounts cover the granny square, both bodice panels, and the shorts.

What size does this pattern fit?

As written, it fits a bust of 32 to 34 inches, a waist of 26 to 28 inches, and a hip of 34 to 36 inches, with a total shoulder-to-hem length of about 18 inches.

Why does the granny square change color partway through?

The square is worked in a set sequence, cream for the first three rounds, terracotta for the next two, cream again, then terracotta for the final round. This gives the square its layered look before it ever reaches the bodice.

How do I attach the granny square to the bodice frame?

You center the blocked square on the front bodice frame so its corners line up with the frame's horizontal and vertical midpoints, pin it as a diamond, then whipstitch it in place along all four edges using Yarn A.

What is the wooden buckle for?

The buckle is sewn on with a sewing needle and coordinating thread as a functional closure detail, roughly 1.5 inches wide. It is attached by hand rather than crocheted in, so it can be positioned once the panels are seamed.