Advanced 35-53 hours DK yarn

Worked on the glider, counted out loud —

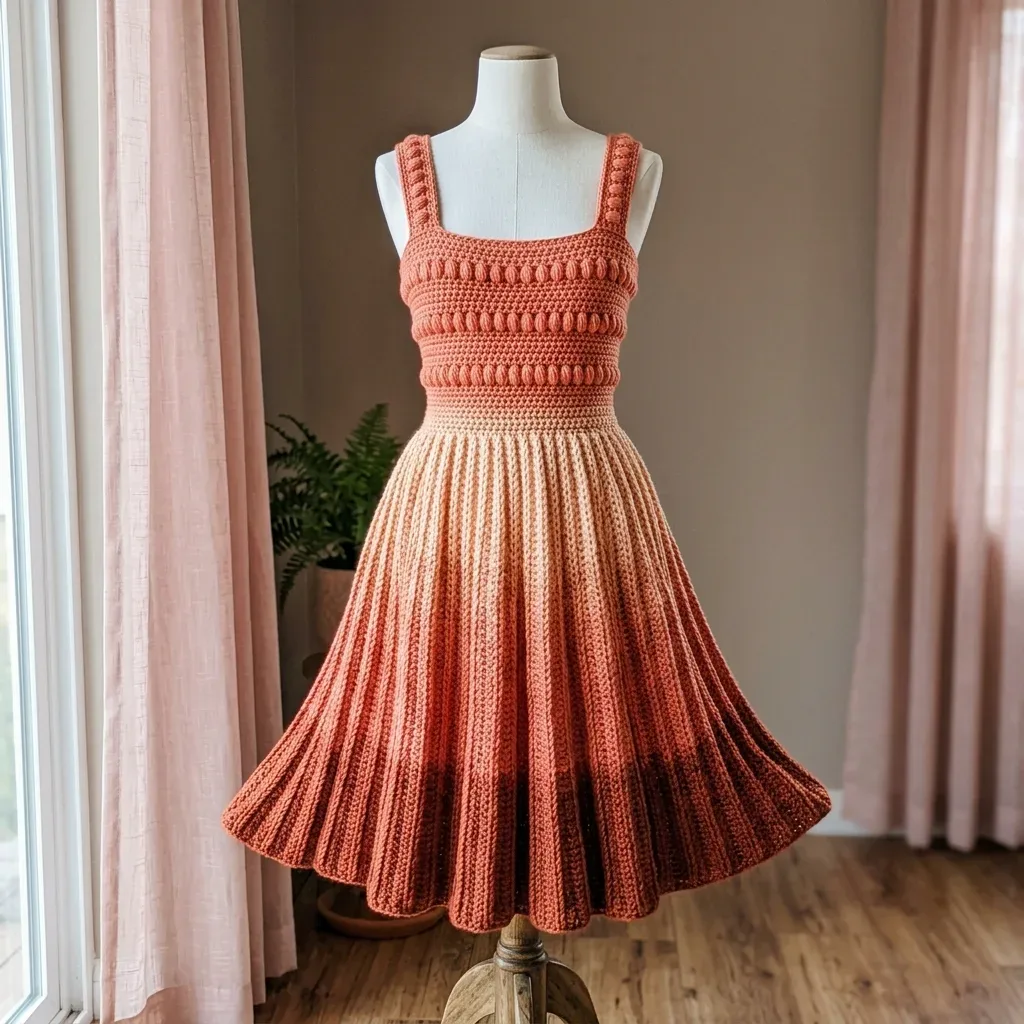
Sunset coral textured crochet dress with ribbed skirt

An advanced crochet dress with bobble bodice and ribbed circle skirt. Plan for 35-53 hours start to finish.

Jump to the rounds

What this one is

This is the dress you make for the evening you want to feel like a particular version of yourself: the one who moves into a room and lets the skirt do the talking. It suits anyone who likes a square neckline, a bit of structure through the bodice, and a hem that swings when they turn. You're not making a quick gift here. You're making the dress someone asks about.

Your hands will spend most of their time in two very different modes. First, close, careful bobble work across nineteen rows of bodice, five loops pulled through at a time, worked from the wrong side so the bumps pop forward. Then long, meditative stretches of single crochet through the back loop only, row after row, building a rectangle that becomes a full circle skirt. All told, you're looking at 35 to 53 hours, with the skirt alone taking up 20 to 30 of them.

Try it another way

The sizing here already runs S, M, and L across bust 34 to 42 inches and waist 28 to 36 inches, so start by picking the size whose numbers match you rather than adjusting rows on the fly. If you want a different mood, the ombre sequence is where to play: keep the coral-to-ivory-to-coral structure but swap in a different two-color pairing, since the skirt rectangle doesn't care which colors carry the gradient, only that you follow the same row-count shifts. You could also flip the balance and make Yarn B the dominant color with coral as the accent bands instead. For yarn, the pattern already names three DK options at different price points, and any smooth DK with good stitch definition will show off the bobble bands and ribbing columns the way this dress wants. If you're making this for a warmer occasion rather than an evening one, the square neckline and fitted bodice work just as well in a lighter, breathable DK cotton blend. Keep the hook at G-6 / 4.0 mm as your starting point regardless of yarn choice, then swatch to confirm you're still hitting 18 stitches and 20 rows in single crochet before you commit to a full rectangle.

What makes this dress worth the hours is the contrast between its two halves and how each rewards a different kind of attention. The bobble bands across the bodice panel demand precision: five yarn-overs in the same stitch, worked from the wrong side so they sit raised and round on the right side. Then the skirt hands you something almost meditative, sc-blo row after row until a flat rectangle gathers into a full circle with clean vertical ribbing columns running top to bottom. Add the ombre shift from deep coral through ivory and back to coral, and you get a piece where the techniques themselves create the visual drama, not embellishment layered on top. Finishing it feels less like completing a pattern and more like watching two different disciplines turn into one dress.

The rounds, in full

Written out, round by round

Advanced35-53 hours4.0 mmDK

Bring to the porch

Everything this one takes, in the order you will reach for it.

Yarn

  • Yarn A (Deep Coral / Terracotta): 800 (950, 1100) yards / 732 (869, 1006) meters of DK weight yarn
  • Yarn B (Ivory / Cream): 400 (475, 550) yards / 366 (434, 503) meters of DK weight yarn

Recommended yarns

  • Lion Brand Comfy Cotton Blend works beautifully for drape and stitch definition. Paintbox Yarns Simply DK is a budget-friendly option that shows the ribbing columns clearly. For a luxury version, We Are Knitters The Wool in Peruvian wool adds natural elasticity.
  • Choose a smooth DK weight yarn with good stitch definition. Avoid fuzzy, brushed, or bouclé textures since the bobble stitches and ribbing will get lost.

Tools

  • US Size G-6 / 4.0 mm crochet hook (adjust to meet gauge)
  • Tapestry needle
  • At least 8 stitch markers
  • Scissors
  • Blocking mats and rust-proof pins
  • Measuring tape

Section 1: Straps (Make 2)

Using Yarn A and G-6 hook, chain 9 (10, 11).

  1. Round 1(RS): Sc in 2nd ch from hook and in each ch across. Turn. (8, 9, 10 sc)
  2. Round 2Ch 1, sc-blo in each st across. Turn. (8, 9, 10 sc)
  3. Round 3Ch 1, sc-blo in each st across. Turn. (8, 9, 10 sc) Repeat Rows 2 and 3 until strap measures 4 in / 10 cm (4.5 in / 11.5 cm, 5 in / 13 cm) from beginning. Fasten off, leaving an 18 in / 46 cm tail for seaming. Set straps aside.

Section 2: Bodice Front Panel

Using Yarn A and G-6 hook, chain 78 (87, 96).

  1. Round 1(RS): Sc in 2nd ch from hook and in each ch across. Turn. (77, 86, 95 sc)
  2. Round 2(WS): Ch 1, sc in each st across. Turn. (77, 86, 95 sc)
  3. Round 3(RS): Ch 1, sc in each st across. Turn. (77, 86, 95 sc)
  4. Round 4WS, Bobble Row Ch 1, sc in first 2 sts. (Bo in next st, sc in next 2 sts) rep across, ending with sc in last 2 sts. Turn. (77, 86, 95 sts)
  5. Round 5(RS): Ch 1, sc in each st across. Turn. (77, 86, 95 sc)
  6. Round 6(WS): Ch 1, sc in each st across. Turn. (77, 86, 95 sc)
  7. Round 7(RS): Ch 1, sc in each st across. Turn. (77, 86, 95 sc)
  8. Round 8WS, Bobble Row Ch 1, sc in first 2 sts. (Bo in next st, sc in next 2 sts) rep across, ending with sc in last 2 sts. Turn. (77, 86, 95 sts)
  9. Round 9(RS): Ch 1, sc in each st across. Turn. (77, 86, 95 sc)
  10. Round 10(WS): Ch 1, sc in each st across. Turn. (77, 86, 95 sc)
  11. Round 11through 16: Rep Rows 9 and 10 three more times. (77, 86, 95 sc)

Waist Shaping Rows:

  1. Round 17(RS): Ch 1, sc2tog, sc across to last 2 sts, sc2tog. Turn. (75, 84, 93 sc)
  2. Round 18(WS): Ch 1, sc in each st across. Turn. (75, 84, 93 sc)
  3. Round 19(RS): Ch 1, sc2tog, sc across to last 2 sts, sc2tog. Turn. (73, 82, 91 sc)
  4. Round 20(WS): Ch 1, sc in each st across. Turn. (73, 82, 91 sc)
  5. Round 21(RS): Ch 1, sc2tog, sc across to last 2 sts, sc2tog. Turn. (71, 80, 89 sc)
  6. Round 22(WS): Ch 1, sc in each st across. Turn. (71, 80, 89 sc)
  7. Round 23(RS): Ch 1, sc2tog, sc across to last 2 sts, sc2tog. Turn. (69, 78, 87 sc)
  8. Round 24(WS): Ch 1, sc in each st across. Turn. (69, 78, 87 sc) Fasten off, leaving an 18 in / 46 cm tail for side seaming. Set aside.Checkpoint: Your front panel should measure approximately 5 in / 13 cm tall and 15.5 in / 39 cm wide at the narrowest point (Row 24).

Section 6: Skirt (Ribbed Rectangle)

The skirt is worked as a flat rectangle. The height becomes the skirt length, and the width becomes the circumference. This creates vertical ribbing columns.

Using 2 strands of Yarn A held together, chain 65 (70, 75).

  1. Round 1(RS): Sc in 2nd ch from hook and in each ch across. Turn. (64, 69, 74 sc)
  2. Round 2(WS): Ch 1, sc-blo in each st across. Turn. (64, 69, 74 sc)
  3. Round 3(RS): Ch 1, sc-blo in each st across. Turn. (64, 69, 74 sc) Repeat Rows 2 and 3, following the ombre color sequence in the Pattern Notes, until the skirt rectangle measures: S: 88 in / 224 cm wide (approximately 440 rows)M: 98 in / 249 cm wide (approximately 490 rows)L: 109 in / 277 cm wide (approximately 545 rows)Fasten off, leaving a 24 in / 61 cm tail.

Section 3: Bodice Back Panel

Work exactly as the Bodice Front Panel, Rows 1 through 24. At Row 24 you have (69, 78, 87 sc) . Fasten off, leaving an 18 in / 46 cm tail.

Section 7: Seaming and Gathering the Skirt

Hold the first and last row of the skirt rectangle together with RS facing inward. Using Yarn A and a tapestry needle, whipstitch the two short edges together along the full 64 (69, 74) stitch edge. This creates a tube. Turn RS out.

Running stitch gathering: Cut a 60 in / 152 cm length of Yarn A. Thread onto tapestry needle. Work a running stitch through every other stitch along the top edge of the skirt tube (the waist edge where ombre begins with deep coral). Gently pull to gather the top edge to match the waist circumference of the bodice (28, 32, 36 in). Distribute gathers evenly and knot temporarily.

Section 8: Attaching Skirt to Bodice

Place the bodice over the gathered skirt top edge with RS of both pieces facing outward. Align the gathered edge with the waist edge of the bodice.

Using Yarn A and G-6 hook, join yarn at the side seam of the bodice waist edge.

Joining round: Ch 1. Working through both the bodice waist edge and the gathered skirt top edge simultaneously, sc evenly around. Catch approximately every 3rd gathered stitch to maintain even distribution. Work 1 sc per stitch of the bodice waist edge. Join with sl st. (69, 78, 87 sc)

Fasten off and weave in end.

Section 9: Hem Edging

Using 2 strands of Yarn A held together, join with sl st to the hem edge at the seam.

Hem Rnd 1: Ch 1. Sc in each row-end st around the hem (approximately 440, 490, 545 sts). Join with sl st.

Hem Rnd 2: Ch 1. Sc in each st around. Join with sl st. Fasten off and weave in all ends.
Putting it together

Step 1

Wet blocking is essential for this dress. Submerge in cool water with gentle soap for at least 20 minutes. Gently press out excess water without wringing.

Step 2

Lay the dress flat on blocking mats. Spread the skirt into a full circle and pin the hem to maintain its shape. Pin the bodice to the correct measurements and the straps straight.

Step 3

Allow to dry completely, which may take 24 to 48 hours. Do not hang the wet dress since the weight will stretch the skirt unevenly.

Step 4

A light steam after wet blocking sets the bobble textures and ribbing columns beautifully.

Marlene's notes

Note 01

Every bobble in this pattern is worked from the wrong side on purpose, so the five-loop cluster pops outward on the right side; working one from the right side by habit will leave it sitting flat and recessed.

Note 02

The skirt is worked flat as a rectangle using two strands of Yarn A held together at the cast-on, so check your gauge swatch with the same double strand before you commit to around 440 rows for the size S width.

Note 03

Because the sc-blo ribbing gauge runs tighter than the plain single crochet gauge, keep your tension consistent across both sections or the seam between skirt panels will pucker.

Before you sit down

  • Confirm your yardage against your chosen size before you wind a single ball: 800, 950, or 1100 yards of Yarn A and 400, 475, or 550 yards of Yarn B, since running short mid-skirt means an awkward dye-lot hunt later.
  • Swatch both stitches separately. Single crochet should give you 18 stitches and 20 rows over 4 inches, and the sc-blo ribbing should give you 16 stitches and 20 rows over the same 4 inches. A single stitch off in either one can shift the finished dress by 2 to 3 inches.
  • Set out at least 8 stitch markers before you start, and plan where you'll use them for tracking the bobble repeats in the bodice and for the gathering and seaming stages later.
  • Read through Row 4 of the Bodice Front Panel before casting on anything, since that bobble row sets the rhythm (sc 2, bobble, sc 2) you'll be repeating for the rest of the bodice.

How the hours go

Bodice (front and back panels plus straps)
about 12 to 18 hours because the bobble bands across 19 rows need careful, even tension to pop correctly
Skirt rectangle
about 20 to 30 hours because the ribbed rectangle runs roughly 440 rows at size S and every row is worked through the back loop only
Seaming, gathering, and finishing
about 3 to 5 hours because attaching the gathered skirt to the bodice and working the hem edging both need patience to keep the ribbing columns straight

Looking after it

  • Hand wash in cool water with a gentle soap for at least 20 minutes, then press out excess water without wringing, since twisting a DK cotton or wool blend can distort the bobble bands and the ribbing columns.
  • Dry the dress flat on blocking mats with the skirt spread into its full circle and pinned at the hem, never on a hanger, since the wet weight of the skirt will stretch unevenly if left hanging for the 24 to 48 hours it needs to dry.
FAQs

Asked on the glider

the ones that come up on the glider

Can I make this dress in a different yarn weight?

The pattern is written for DK weight with gauges of 18 stitches and 20 rows for single crochet and 16 stitches and 20 rows for the sc-blo ribbing. If you swap weights, you'll need to swatch both stitches again and recalculate the rectangle width and row counts for the skirt.

Why are the bobbles worked from the wrong side?

Working the bobble on the wrong side pushes the raised cluster through to the right side, where it sits round and pronounced. Working it from the right side instead flattens the bump against the fabric.

How many rows is the skirt rectangle really?

size S it runs approximately 440 rows to reach the 88 inch width, with M and L needing proportionally more. It's worked flat in sc-blo ribbing, then gathered and seamed into the circle skirt.

What happens if my gauge is off by one stitch?

The pattern notes are blunt about this: a difference of even one stitch per 4 inches can shift the finished dress by 2 to 3 inches. Swatch both the plain single crochet and the sc-blo ribbing before casting on the real pieces.

Do I need stitch markers for this pattern?

Yes, at least 8 are called for, and you'll want them ready for tracking bobble repeats across the bodice panel and for managing the gathering and seaming stages between skirt and bodice.

How long should I budget for the whole dress?

Plan for 35 to 53 hours total: 12 to 18 for the bodice, 20 to 30 for the skirt, and 3 to 5 for assembly and finishing. The skirt's row count is the main reason it takes the longest.