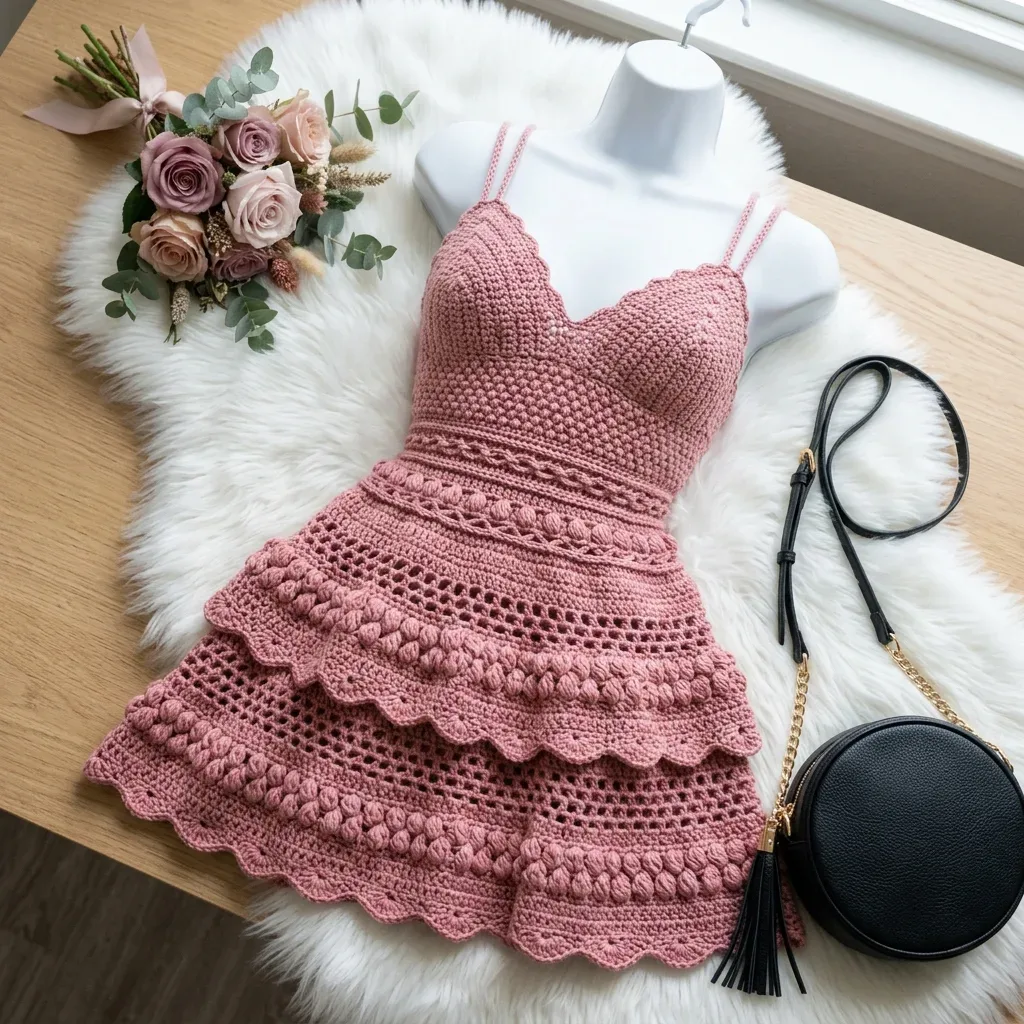
Right Bodice Cup
Foundation: Ch 17.
- Round 1(RS): Sc in 2nd ch from hook and in each ch across. Turn. (16 sc)
- Round 2(WS): Ch 1. Sc in first st. Inc in next st. Sc across to last 2 sts. Inc in next st. Sc in last st. Turn. (18 sc)
- Round 3(RS): Ch 1. Sc2tog over first 2 sts (V-neck inner edge decrease). Sc across to last 2 sts. Inc in next st. Sc in last st. Turn. (18 sc)
- Round 4(WS): Ch 1. Sc in first st. Inc in next st. Sc across to last 3 sts. Sc2tog. Sc in last st. Turn. (18 sc)
- Round 5(RS): Ch 1. Sc2tog over first 2 sts. Sc across to last 2 sts. Inc in next st. Sc in last st. Turn. (18 sc)
- Round 6(WS): Ch 1. Sc in first st. Inc in next st. Sc across to last 3 sts. Sc2tog. Sc in last st. Turn. (18 sc)
- Round 7(RS): Ch 1. Sc2tog over first 2 sts. Sc across to last 2 sts. Inc in next st. Sc in last st. Turn. (18 sc)
- Round 8(WS): Ch 1. Sc across all sts. Turn. (18 sc)
- Round 9(RS): Ch 1. Sc2tog over first 2 sts. Sc to end. Turn. (17 sc)
- Round 10(RS): Ch 1. Sc2tog over first 2 sts. Sc to end. Turn. (16 sc)
- Round 11(RS): Ch 1. Sc2tog over first 2 sts. Sc to end. Turn. (15 sc)
- Round 12(RS): Ch 1. Sc2tog over first 2 sts. Sc to end. Turn. (14 sc) Fasten off. The V-neck inner edge is the diagonal edge created by the decreases.
Left Bodice Cup
Foundation: Ch 17.
- Round 1(RS): Sc in 2nd ch from hook and in each ch across. Turn. (16 sc)
- Round 2(WS): Ch 1. Sc in first st. Inc in next st. Sc across to last 2 sts. Inc in next st. Sc in last st. Turn. (18 sc)
- Round 3(RS): Ch 1. Sc in first st. Inc in next st. Sc across to last 3 sts. Sc2tog. Sc in last st. Turn. (18 sc)
- Round 4(WS): Ch 1. Sc in first st. Sc2tog. Sc across to last 2 sts. Inc in next st. Sc in last st. Turn. (18 sc)
- Round 5(RS): Ch 1. Sc in first st. Inc in next st. Sc across to last 3 sts. Sc2tog. Sc in last st. Turn. (18 sc)
- Round 6(WS): Ch 1. Sc in first st. Sc2tog. Sc across to last 2 sts. Inc in next st. Sc in last st. Turn. (18 sc)
- Round 7(RS): Ch 1. Sc in first st. Inc in next st. Sc across to last 3 sts. Sc2tog. Sc in last st. Turn. (18 sc)
- Round 8(WS): Ch 1. Sc across all sts. Turn. (18 sc)
- Round 9(RS): Ch 1. Sc across to last 2 sts. Sc2tog. Turn. (17 sc)
- Round 10(RS): Ch 1. Sc across to last 2 sts. Sc2tog. Turn. (16 sc)
- Round 11(RS): Ch 1. Sc across to last 2 sts. Sc2tog. Turn. (15 sc)
- Round 12(RS): Ch 1. Sc across to last 2 sts. Sc2tog. Turn. (14 sc) Do not fasten off. You will use this working yarn to join the cups.
Bodice Torso in the Round
Setup Rnd: Starting at center front V-point (sl st join), work as follows: Sc across the lower edge of right cup foundation chain: 16 sc
Sc 4 sts across right underarm (work into row ends): 4 sc Sc across left cup foundation chain: 16 sc Sc 4 sts across left underarm: 4 sc
Join with sl st to first sc. Do not turn. (40 sc)
Place markers at each of the 2 underarm points.
- Round 1Ch 1. Sc in each st around. Join. (40 sc)
- Round 2Ch 1. Sc in each st around. Join. (40 sc)
- Round 3(WS bobble rnd, turn work so WS faces you): Ch 1. (Bo in next st, sc in next st) around. Join. (20 bo, 20 sc = 40 sts)Turn back to RS facing.
- Round 4Ch 1. Sc in each st around. Join. (40 sc)
- Round 5Mesh rnd Ch 4 (counts as dc, ch 1). Skip 1 st. (Dc in next st, ch 1, skip 1 st) 19 times. Join with sl st to 3rd ch of beg ch-4. (20 dc, 20 ch-1 sp)
- Round 6Ch 1. Sc in each dc and each ch-sp around. Join. (40 sc)
- Round 7Ch 1. Sc around, working 4 evenly spaced increases. Join. (44 sc)
- Round 8Ch 1. Sc in each st around. Join. (44 sc)
- Round 9WS bobble rnd Turn. Ch 1. (Bo in next st, sc in next st) around. Join. (22 bo, 22 sc = 44 sts)Turn back to RS.
- Round 10Ch 1. Sc in each st around. Join. (44 sc)
- Round 11Ch 4. Skip 1. (Dc in next st, ch 1, skip 1) 21 times. Join to 3rd ch of beg ch-4. (22 dc, 22 ch-1 sp)
- Round 12Ch 1. Sc in each dc and ch-sp around. Join. (44 sc)
- Round 13Ch 1. Sc around, working 4 evenly spaced increases as before. Join. (48 sc)
- Round 14Ch 1. Sc in each st around. Join. (48 sc) Checkpoint: The bodice should measure approximately 6 inches from the top of the cups to the current working round.
Waist Band
These 4 rounds create a slightly tighter waist definition.
- Round 15Ch 1. Working in bl only, sc in each st around. Join. (48 sc)
- Round 16Ch 1. Working in bl only, sc in each st around. Join. (48 sc)
- Round 17Ch 1. Sc in each st around (both loops). Join. (48 sc)
- Round 18Ch 1. Sc in each st around. Join. (48 sc)
Hip Yoke
The hip yoke transitions from waist to skirt tiers, expanding from 48 sts to 72 sts.
- Round 19Ch 1. Sc around, inc 4 evenly spaced. Join. (52 sc)
- Round 20Ch 1. Sc in each st around. Join. (52 sc)
- Round 21Ch 1. Sc around, inc 4 evenly spaced. Join. (56 sc)
- Round 22Ch 1. Sc in each st around. Join. (56 sc)
- Round 23Ch 1. Sc around, inc 4 evenly spaced. Join. (60 sc)
- Round 24Ch 1. Sc in each st around. Join. (60 sc)
- Round 25Ch 1. Sc around, inc 6 evenly spaced. Join. (66 sc)
- Round 26Ch 1. Sc in each st around. Join. (66 sc)
- Round 27Ch 1. Sc around, inc 6 evenly spaced. Join. (72 sc)
- Round 28Ch 1. Sc in each st around. Join. (72 sc)
- Round 29Bobble trim ridge Turn work WS facing. Ch 1. (Bo in next st, sc in next st) around. Join. (36 bo, 36 sc = 72 sts)Turn RS facing.
- Round 30Ch 1. Sc in each st around. Join. (72 sc)
Join Cups
With RS facing and working yarn attached at end of left cup Row 12, ch 2 (this creates a small chain bridge at center front bottom of V-neck). Join with sl st to the first stitch of Row 12 on right cup. (28 sts across both cups plus 2 ch bridge = 30 working positions)
Tier One
Tier One Rnd 1 (ruffle foundation): Ch 1. Inc in every st around. Join. (144 sc)
Tier One Rnd 2: Ch 1. Sc in each st around. Join. (144 sc)
Tier One Rnd 3 (mesh): Ch 4. Skip 1. (Dc in next st, ch 1, skip 1) 71 times. Join to 3rd ch of beg ch-4. (72 dc, 72 ch-1 sp)
Tier One Rnd 4: Ch 1. Sc in each dc and each ch-sp around. Join. (144 sc)
Tier One Rnd 5 (WS bobble): Turn WS facing. Ch 1. (Bo in next st, sc in next st) around. Join. (72 bo, 72 sc = 144 sts)
Turn RS facing.
Tier One Rnd 6: Ch 1. Sc in each st around. Join. (144 sc)
Tier One Rnd 7: Ch 1. Sc in each st around. Join. (144 sc)
Tier One Rnd 8 (mesh): Ch 4. Skip 1. (Dc in next st, ch 1, skip 1) 71 times. Join. (72 dc, 72 ch-1 sp)
Tier One Rnd 9: Ch 1. Sc in each dc and each ch-sp around. Join. (144 sc)
Tier One Rnd 10 (WS bobble): Turn WS facing. Ch 1. (Bo in next st, sc in next st) around. Join. (72 bo, 72 sc = 144 sts)
Turn RS facing.
Tier One Rnd 11: Ch 1. Sc in each st around. Join. (144 sc)
Tier One Rnd 12: Ch 1. Sc in each st around. Join. (144 sc)
Tier One Rnd 13 (scallop edging): Ch 1. Sl st in first st. (Skip 2 sts, 5 dc in next st, skip 2 sts, sl st in next st) 24 times. Join. (24 scallop shells)
Fasten off. Weave in ends.
Tier Two
Attach yarn with sl st in any back loop of Rnd 30.
Tier Two Rnd 1 (ruffle foundation): Ch 1. Working in bl of each st of Rnd 30, inc in every st around. Join. (144 sc)
Tier Two Rnd 2: Ch 1. Sc in each st around. Join. (144 sc)
Tier Two Rnd 3: Ch 1. Sc around, inc 1 in every 12th st (12 increases total). Join. (156 sc)
Tier Two Rnd 4 (mesh): Ch 4. Skip 1. (Dc in next st, ch 1, skip 1) 77 times. Join to 3rd ch of beg ch-4. (78 dc, 78 ch-1 sp)
Tier Two Rnd 5: Ch 1. Sc in each dc and each ch-sp around. Join. (156 sc)
Tier Two Rnd 6 (WS bobble): Turn WS facing. Ch 1. (Bo in next st, sc in next st) around. Join. (78 bo, 78 sc = 156 sts)
Turn RS facing.
Tier Two Rnd 7: Ch 1. Sc in each st around. Join. (156 sc)
Tier Two Rnd 8: Ch 1. Sc in each st around. Join. (156 sc)
Tier Two Rnd 9 (mesh): Ch 4. Skip 1. (Dc in next st, ch 1, skip 1) 77 times. Join. (78 dc, 78 ch-1 sp)
Tier Two Rnd 10: Ch 1. Sc in each dc and each ch-sp around. Join. (156 sc)
Tier Two Rnd 11 (WS bobble): Turn WS. Ch 1. (Bo in next st, sc in next st) around. Join. (78 bo, 78 sc = 156 sts)
Turn RS.
Tier Two Rnd 12: Ch 1. Sc in each st around. Join. (156 sc)
Tier Two Rnd 13 (scallop edging): Ch 1. Sl st in first st. (Skip 2 sts, 5 dc in next st, skip 2 sts, sl st in next st) 26 times. Join. (26 scallop shells)
Fasten off. Weave in ends.
Tier Three
Attach yarn with sl st in any back loop of Rnd 27.
Tier Three Rnd 1 (ruffle foundation): Ch 1. Working in bl of each st of Rnd 27, inc in every st around. Join. (144 sc)
Tier Three Rnd 2: Ch 1. Sc in each st around. Join. (144 sc)
Tier Three Rnd 3: Ch 1. Sc around, inc 1 in every 8th st (18 increases total). Join. (162 sc)
Tier Three Rnd 4: Ch 1. Sc around, inc 1 in every 9th st (18 increases total). Join. (180 sc)
Tier Three Rnd 5 (mesh): Ch 4. Skip 1. (Dc in next st, ch 1, skip 1) 89 times. Join to 3rd ch of beg ch-4. (90 dc, 90 ch-1 sp)
Tier Three Rnd 6: Ch 1. Sc in each dc and ch-sp around. Join. (180 sc)
Tier Three Rnd 7 (WS bobble): Turn WS. Ch 1. (Bo in next st, sc in next st) around. Join. (90 bo, 90 sc = 180 sts)
Turn RS.
Tier Three Rnd 8: Ch 1. Sc in each st around. Join. (180 sc)
Tier Three Rnd 9: Ch 1. Sc in each st around. Join. (180 sc)
Tier Three Rnd 10 (mesh): Ch 4. Skip 1. (Dc in next st, ch 1, skip 1) 89 times. Join. (90 dc, 90 ch-1 sp)
Tier Three Rnd 11: Ch 1. Sc in each dc and ch-sp around. Join. (180 sc)
Tier Three Rnd 12 (WS bobble): Turn WS. Ch 1. (Bo in next st, sc in next st) around. Join. (90 bo, 90 sc = 180 sts)
Turn RS.
Tier Three Rnd 13: Ch 1. Sc in each st around. Join. (180 sc)
Tier Three Rnd 14 (scallop edging): Ch 1. Sl st in first st. (Skip 2 sts, 5 dc in next st, skip 2 sts, sl st in next st) 30 times. Join. (30 scallop shells)
Fasten off. Weave in ends.
Straps (Make 4 Cords Total)
Each strap consists of 2 cords positioned side by side for the double spaghetti strap look.
Strap Cord: Ch 50 (adjust for desired strap length).
Sl st back into each ch all the way to the beginning. (50 sl sts)
Fasten off leaving a 12 inch tail for sewing.
Strap Placement:
Position 2 cords side by side on each shoulder, spacing them approximately 0.5 inch apart. Attach front ends to the top edge of the bodice cups, approximately 1.5 inches from center V-point. Attach back ends to the straight upper back edge at matching positions. Use yarn needle and the long tails to sew cords securely through multiple stitches. Knot securely on WS. Weave in all ends.
Back Bodice Edging
With RS facing, attach yarn at top right back corner.
Back Edging Rnd: Ch 1. Sc evenly across entire top back edge. Fasten off. Weave in end.