Intermediate Several evenings (approximately 12-16 hours total) DK yarn

Worked on the glider, counted out loud —

Sunset ombre palazzo jumpsuit crochet pattern

An advanced-intermediate shell-stitch palazzo jumpsuit in ombre tones. Fitted bodice, flared legs, granny square accent. Several

Jump to the rounds

What this one is

You know that feeling when you want to walk into a room and have the fabric move before you do? That's this jumpsuit. It's for the crocheter who's ready to stop making flat things and start making a garment with real shape to it: a fitted bodice up top, a dramatic flare below, and crossback straps that catch the light. If you've sewn pieces together before and you're not afraid of a V-neck, you've got the hands for this.

Your hands will do a little of everything here: hdc rows with waist and bust shaping, a granny square worked in rounds, and page after page of shell stitch fans that build the palazzo flare one color change at a time. Between the bodice panels, the leg shaping, and the seaming, expect this to live in your lap for several evenings rather than one sitting.

Try it another way

The ombre sequence is the heart of this piece, but you can run it the other way, starting pale at the hip and deepening to terracotta at the hem, just by reversing the order you introduce Colors A through E. If you want less contrast, pick two adjacent colors from the list, say Color B and Color C, and alternate them through the leg rounds instead of working all five. For yarn, the pattern calls for a DK weight with at least 50 percent natural or modal fiber for drape; Comfy Cotton Blend or WeCrochet Dishie both work, but if you want crisper, less drapey legs, a sturdier cotton DK will hold the shell fans more structured and architectural. You could also make the granny square in a single contrast color instead of the two-color D and E version, which gives the hip accent more punch against the ombre. For a different use, a shorter version that stops the leg shaping early would turn this into a cropped jumpsuit, though you'd need to recalculate where the color changes land. If the fitted V-neck bodice feels like a lot, focus your first attempt on the legs and bodice separately before committing to the full seam-together.

There's real satisfaction in watching a flat piece become a fitted bodice through nothing but hdc2tog decreases on the waist rows and careful increases through the bust shaping. Then you get to the legs, where that 5-dc shell stitch opens up into fans wide enough to swing when you walk, and the color changes every eight rounds carry you from deep terracotta to pale cream without a single hard line. The granny square is the quiet technical flex in the corner, worked clean in three rounds with Colors D and E. And the crossback straps, the V-neck divide, the shoulder seams: each one is a small construction puzzle that makes the finished piece feel engineered, not just stitched.

The rounds, in full

Written out, round by round

IntermediateSeveral evenings (approximately 12-16 hours total)4.00 mmDK

Bring to the porch

Everything this one takes, in the order you will reach for it.

  • Color A (Terracotta/deep rust red): 600 yards / 549 m
  • Color B (Salmon/brick orange): 400 yards / 366 m
  • Color C (Peach/light coral): 350 yards / 320 m
  • Color D (Golden yellow/warm apricot): 350 yards / 320 m
  • Color E (Cream/pale champagne): 400 yards / 366 m

Total yardage

  • approximately 2100 yards / 1920 m
  • Lion Brand Comfy Cotton Blend works beautifully here. It’s 52% cotton and 48% modal with excellent stitch definition and gorgeous drape for those palazzo legs.
  • Paintbox Yarns Simply DK is another solid choice. It’s 100% acrylic, machine washable, and comes in a broad palette perfect for matching the ombre sequence.
  • WeCrochet Dishie gives the bodice excellent body and crisp stitch definition while staying breathable.
  • When substituting, look for any DK weight yarn with at least 50% natural or modal fiber for best drape in the legs. Avoid very elastic yarns like high nylon or wool blends since they may pull the shell stitch closed and reduce the flare.
  • US size G-6 / 4.00 mm hook for bodice and hip yoke
  • US size H-8 / 5.00 mm hook for palazzo legs
  • Tapestry needle
  • 8 stitch markers
  • Scissors
  • Blocking mats and rustproof pins
  • Measuring tape

Granny Square

  1. Round 1With Color D, make a magic ring. Ch 3 (counts as dc), 2 dc in ring, ch 2, (3 dc in ring, ch 2) 3 times, sl st to top of beginning ch-3 to join. (4 clusters of 3 dc, 4 ch-2 corner spaces)
  2. Round 2Sl st to ch-2 sp, ch 3, 2 dc in same sp, ch 1, (3 dc, ch 2, 3 dc) in next ch-2 sp, ch 1, rep around, 3 dc in first sp, ch 2, sl st to join. Fasten off D. Join Color E.
  3. Round 3Sl st to ch-2 corner sp, ch 3, 2 dc in same sp, ch 1, 3 dc in ch-1 sp, ch 1, (3 dc, ch 2, 3 dc) in corner ch-2 sp, ch 1, 3 dc in ch-1 sp, ch 1, rep around, sl st to join, fasten off. (12 clusters of 3 dc total, 4 ch-2 corner spaces)

Finished square measures approximately 3.5 inches / 9 cm.

Waist Shaping (Rows 1-4)

  1. Round 1Ch 2, turn, hdc2tog, hdc to last 2 sts, hdc2tog. Turn. (75 hdc)
  2. Round 2Ch 2, turn, hdc2tog, hdc to last 2 sts, hdc2tog. Turn. (73 hdc)
  3. Round 3Ch 2, turn, hdc2tog, hdc to last 2 sts, hdc2tog. Turn. (71 hdc)
  4. Round 4Ch 2, turn, hdc2tog, hdc to last 2 sts, hdc2tog. Turn. (69 hdc)
  5. Rounds 5–6Ch 2, turn, hdc in each st across. (69 hdc)

Waist Shaping (Rows 1-4)

  1. Round 1Ch 2, turn, hdc2tog, hdc to last 2 sts, hdc2tog. (75 hdc)
  2. Round 2Ch 2, turn, hdc2tog, hdc to last 2 sts, hdc2tog. (73 hdc)
  3. Round 3Ch 2, turn, hdc2tog, hdc to last 2 sts, hdc2tog. (71 hdc)
  4. Round 4Ch 2, turn, hdc2tog, hdc to last 2 sts, hdc2tog. (69 hdc)
  5. Rounds 5–6Ch 2, turn, hdc in each st across. (69 hdc)

Color Sequence for Each Leg

Rows Foundation to 8: Color E (Cream)

Rows 9-16: Color D (Golden yellow)

Rows 17-24: Color C (Peach)

Rows 25-32: Color B (Salmon)

  1. Rounds 33–44Color A (Terracotta) Using Color E and H-8 hook, ch 265. Foundation Row (WS): Sc in 2nd ch from hook, (sk 2 ch, shell in next ch, sk 2 ch, sc in next ch) rep across, ending sc in last ch. Turn. (44 shells, 45 sc = 264 working sts in pattern)
  2. Round 1(RS): Ch 3, turn. 2 dc in first sc (half shell), (sc in center dc of shell, shell in sc) rep across, ending 3 dc in last sc. Turn. (264 sts)
  3. Round 2(WS): Ch 1, turn. Sc in first dc, (shell in sc, sc in center dc of shell) rep across, sc in top of turning ch. Turn. (264 sts)Repeat Rows 1 and 2 for shell pattern throughout.

Section 8: Crossback Straps

Using Color A and G-6 hook, make a foundation chain approximately 24 inches / 61 cm long (approximately 110 ch).

  1. Round 1Sc in 2nd ch from hook, sc in each ch across. Fasten off. (109 sc) Thread each strap from the front shoulder position, cross it at the back, and attach to the opposite back shoulder position using the tapestry needle and long tails. Straps should lie flat and cross in the center of the back below the neckline.

Optional: Fold the strip in half lengthwise and slip stitch the long edges together for a double-layer strap with more body.

Bust Shaping (Rows 7-10)

  1. Round 7Ch 2, turn, 2 hdc in first st, hdc to last st, 2 hdc in last st. (71 hdc)
  2. Round 8Ch 2, turn, 2 hdc in first st, hdc to last st, 2 hdc in last st. (73 hdc)
  3. Round 9Ch 2, turn, 2 hdc in first st, hdc to last st, 2 hdc in last st. (75 hdc)
  4. Round 10Ch 2, turn, 2 hdc in first st, hdc to last st, 2 hdc in last st. (77 hdc)Step by step: Ch 2, turn, hdc in each st across. (77 hdc).
  5. Rounds 11–14Ch 2, turn, hdc in each st across. (77 hdc) Checkpoint: After Row 14, the bodice front should measure approximately 5.5 inches / 14 cm tall from the foundation row.

Divide for V-Neck

  1. Round 15(RS): Ch 2, turn, hdc across first 38 sts. Turn, leaving remaining 39 sts unworked for right shoulder. (38 hdc, left side)

Right Bodice Front Panel

Rejoin Color A to the remaining 39 sts at Row 15 (begin at center front, working outward toward right shoulder).

  1. Round 15Right (RS): Ch 2, hdc2tog (at neck edge, center front side), hdc to end. (38 hdc)
  2. Round 16Ch 2, turn, hdc to last 2 sts, hdc2tog. (37 hdc)
  3. Round 17Ch 2, turn, hdc2tog, hdc to end. (36 hdc)
  4. Round 18Ch 2, turn, hdc to last 2 sts, hdc2tog. (35 hdc)
  5. Round 19Ch 2, turn, hdc in each st across. (35 hdc)
  6. Round 20Ch 2, turn, hdc to last 2 sts, hdc2tog. (34 hdc)
  7. Round 21Ch 2, turn, hdc in each st across. (34 hdc)
  8. Round 22Ch 2, turn, hdc to last 2 sts, hdc2tog. (33 hdc)
  9. Rounds 23–26Ch 2, turn, hdc in each st across. (33 hdc)

Back Neck Divide

  1. Round 15Ch 2, turn, hdc across 33 sts. Turn. Leave remaining 44 sts unworked. (33 hdc, left back)

Right Back Panel

Rejoin Color A at the remaining 44 sts of Row 15. Skip the center 11 sts for the back neck opening (mark these with a stitch marker), then work across the final 33 sts.

  1. Round 15Right: Ch 2, hdc in each of 33 sts. (33 hdc)
  2. Rounds 16–26Ch 2, turn, hdc in each st across. (33 hdc)
  3. Round 27Strap Ch 2, turn, hdc across first 6 sts. (6 hdc)
  4. Rounds 28–42Ch 2, turn, hdc in each of 6 sts. (6 hdc) Fasten off with 12 inch / 30 cm tail. Important: The center 11 sts left unworked at Row 15 form the upper back opening. Seam the left front strap to the right back panel strap, and the right front strap to the left back panel strap, crossing them to form the X crossback detail.

Left Bodice Front Panel

  1. Round 16Ch 2, turn, hdc2tog (at neck edge), hdc to end. (37 hdc)
  2. Round 17Ch 2, turn, hdc to last 2 sts, hdc2tog (at neck edge). (36 hdc)
  3. Round 18Ch 2, turn, hdc2tog, hdc to end. (35 hdc)
  4. Round 19Ch 2, turn, hdc in each st across. (35 hdc)
  5. Round 20Ch 2, turn, hdc2tog, hdc to end. (34 hdc)
  6. Round 21Ch 2, turn, hdc in each st across. (34 hdc)
  7. Round 22Ch 2, turn, hdc2tog, hdc to end. (33 hdc)
  8. Rounds 23–26Ch 2, turn, hdc in each st across. (33 hdc)

Left Back Panel

  1. Rounds 16–26Ch 2, turn, hdc in each st across. (33 hdc)
  2. Round 27Strap Ch 2, turn, hdc across last 6 sts. (6 hdc)
  3. Rounds 28–42Ch 2, turn, hdc in each of 6 sts. (6 hdc) Fasten off with 12 inch / 30 cm tail.

Left Shoulder Strap

  1. Round 27Ch 2, turn, hdc across 6 sts only. (6 hdc) Leave remaining sts unworked.
  2. Rounds 28–42Ch 2, turn, hdc in each of 6 sts. Repeat for 15 rows total. (6 hdc per row) Fasten off, leaving a 12 inch / 30 cm tail for seaming.

Right Shoulder Strap

  1. Round 27Ch 2, turn, skip to last 6 sts of the row. Work hdc in each of last 6 sts. (6 hdc)
  2. Rounds 28–42Ch 2, turn, hdc in each of 6 sts. (6 hdc per row) Fasten off, leaving 12 inch / 30 cm tail.

Leg Shaping

The leg tapers from 44 shells at the hem to 30 shells at the hip over 44 rows. Decrease rows occur at Rows 3, 6, 9, 12, 15, 18, 21, 24, 27, 30, 33, 36, 39, and 42.

Decrease Method: On RS rows, ch 3, turn, work to within the last full shell, skip that shell and its adjacent sc, 3 dc in final sc. Each decrease row removes 1 shell from each edge (6 sts total).

Stitch counts after decrease rows: After Row 3: 258 sts, 43 shells After Row 6: 252 sts, 42 shells After Row 9: 246 sts, 41 shells

After Row 12: 240 sts, 40 shells After Row 15: 234 sts, 39 shells After Row 18: 228 sts, 38 shells After Row 21: 222 sts, 37 shells

After Row 24: 216 sts, 36 shells After Row 27: 210 sts, 35 shells After Row 30: 204 sts, 34 shells After Row 33: 198 sts, 33 shells

After Row 36: 192 sts, 32 shells After Row 39: 186 sts, 31 shells After Row 42: 180 sts, 30 shells

  1. Rounds 43–44Work even in shell pattern. (180 sts, 30 shells) Fasten off, leaving a 24 inch / 61 cm tail for seaming.Checkpoint: Each finished leg piece should measure approximately 44 inches / 112 cm wide at the foundation row, tapering to approximately 22.5 inches / 57 cm wide at Row 44. Length from hem to top edge should measure approximately 22 inches / 56 cm.
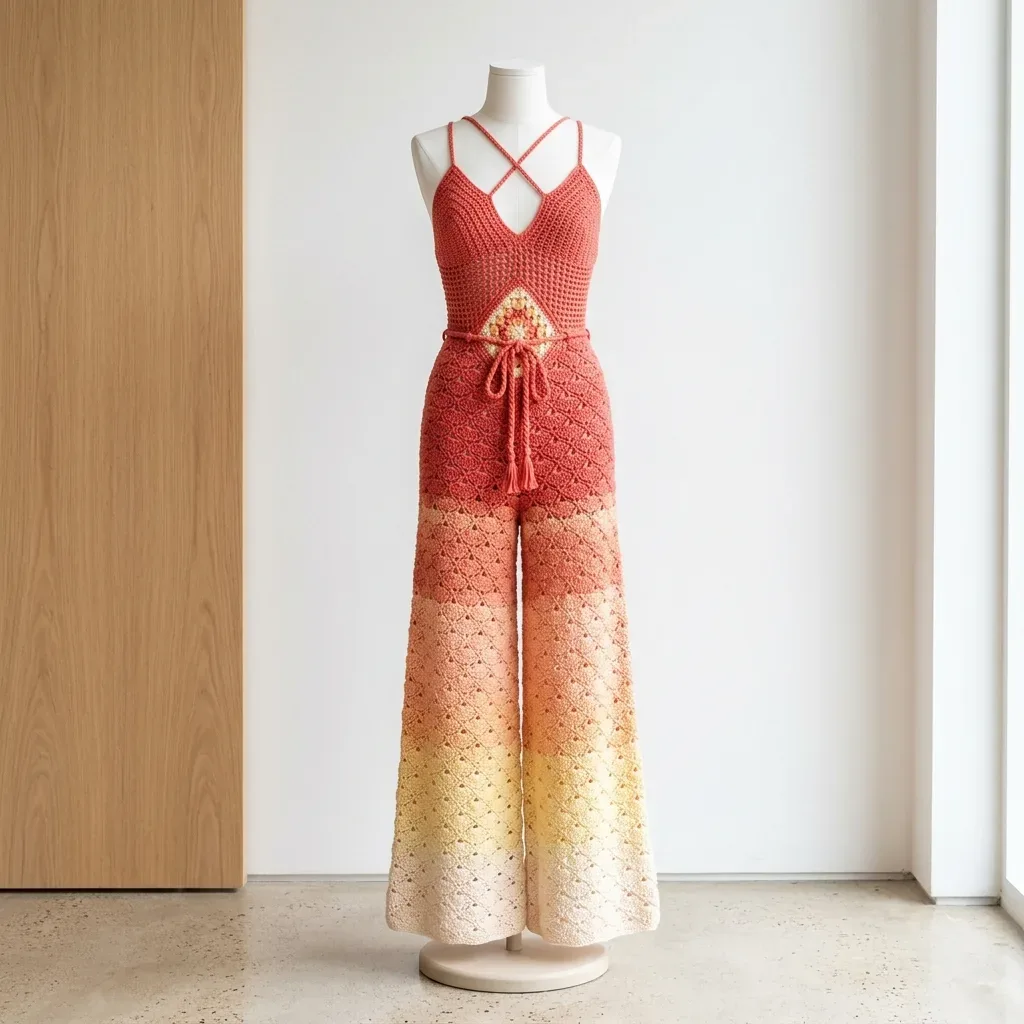
Putting it together

Step 1

Weave in all ends securely, especially at color change points in the palazzo legs.

Step 2

Wet blocking: Submerge the entire assembled jumpsuit in cool water. Gently press out excess water (do not wring). Lay flat on blocking mats. Use rustproof pins to pin the palazzo legs to the stated dimensions, spreading the shell stitch fans open to their full width. Pin the bodice to measured dimensions. Allow to dry completely (12 to 24 hours).

Step 3

Wet blocking is especially important for opening the shell stitch repeat and setting the ombre gradient beautifully.

Step 4

Steam blocking (for acrylic yarns): Use a steam iron held 1 inch / 2.5 cm above the surface. Never press directly onto acrylic with a hot iron.

Step 5

After blocking, attach the granny square, belt, and straps if not already done.

Marlene's notes

Note 01

Color changes in the legs happen every eight rounds; weave in those ends as you go rather than saving them all for the finishing step, since tangled ends in shell stitch are a particular headache to untangle later.

Note 02

If you substitute yarn, avoid anything heavy on nylon or wool blend elasticity, since a stretchy fiber will pull the shell stitch closed and flatten the flare you're working toward.

Before you sit down

  • Count your yardage against the five colors before you wind a single ball; the ombre sequence only reads right if each color has its full yardage to work with.
  • Read through the shell stitch counting note before Row 1 of the legs, since a full shell counts as 6 stitches and a half shell at the edge counts as 3, and that math matters for every row after the foundation.
  • Place your 8 stitch markers somewhere you can reach them fast, you'll want them at the waist shaping rows and again when you divide for the V-neck.
  • Swatch the shell stitch pattern in your chosen yarn before committing to the H-8 hook for the legs, so you can see whether your fiber opens the fans the way the pattern wants.

How the hours go

Bodice (bust and waist shaping, V-neck divide, panels)
about 4-5 hours because there are nine rounds of shaping across the front panels plus the back neck divide and shoulder straps to track
Granny square and crossback strap assembly
about 1-2 hours because the square is only three rounds but the straps need careful seaming to sit evenly across the back
Palazzo legs with color sequence
about 6-8 hours because the shell stitch repeats across many rounds and each color change needs a clean join and end to weave in

Looking after it

  • Hand wash in cool water given the cotton, modal, and acrylic blends in the materials list, and press out excess water rather than wringing, since wringing can distort the shell stitch fans.
  • Lay flat to dry and reshape the shell stitch while damp, pinning the legs open to their full flare on blocking mats, then store the finished jumpsuit folded flat rather than hung, so the bodice shaping doesn't stretch out of shape over time.
FAQs

Asked on the glider

the ones that come up on the glider

Why does the shell stitch count seem off when I check my rows?

Remember that a full shell counts as 6 stitches total, the 5 dc plus the sc, while the half shells at each edge only count as 3 stitches. Once you count that way the row totals will match up correctly.

Do I need all 8 stitch markers at once?

No, you'll use them at different stages, mainly through the waist and bust shaping rows and again at the V-neck and back neck divides. Keeping a small stash on hand means you're never scrambling mid-row.

What happens if I run short on one color?

Check your yardage against the materials list before you start, since Colors A through E each have a stated yardage and the ombre sequence relies on having enough of each to complete its rounds. Running short mid-leg would force an uneven color break that disrupts the gradient.

Is the granny square functional or just decorative?

It reads as an accent detail worked in Colors D and E, finished at about 3.5 inches across. It's a nice technical palate cleanser between the bodice shaping and the long shell stitch leg rounds.