Intermediate 4-6 hours Chenille yarn

Worked on the glider, counted out loud —

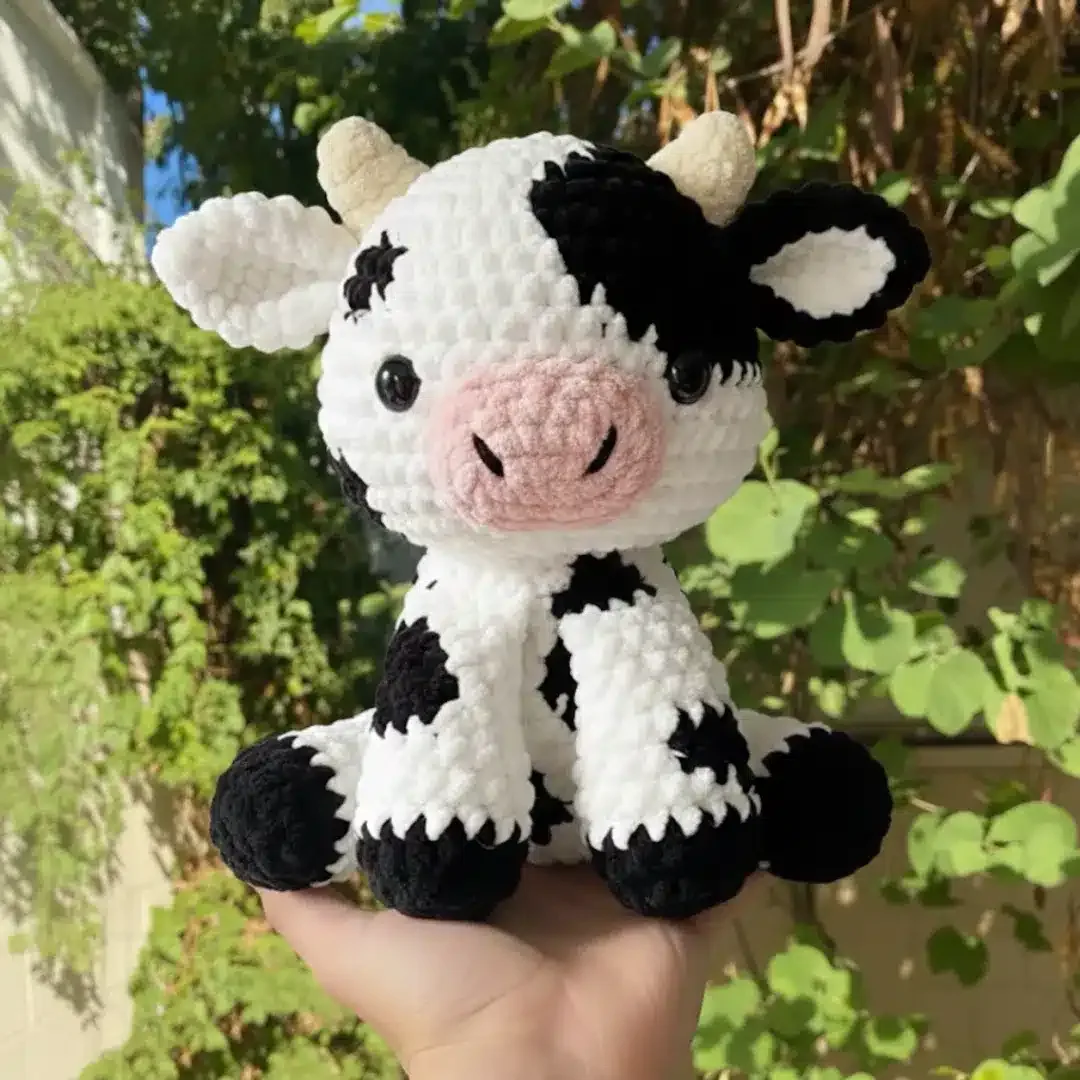
Spotted dairy cow amigurumi crochet pattern

An easy 8-inch spotted cow amigurumi with surface-crochet spots. A relaxed weekend make for confident beginners.

Jump to the rounds

What this one is

This one's for a quiet stretch of couch time, when you want something soft to show for it by the end of the night. It suits the crocheter who's already made a few amigurumi and is ready to stretch into color work and a bit of embroidery. If you've got a farm-loving kid, or you just have a soft spot for a cow with a good face, this pattern is built with you in mind.

Your hands will spend most of their time in continuous rounds, building up that classic amigurumi dome shape for the head, then shifting gears for small parts like the ears, horns, and tail. Between the color changes for the legs and the surface crochet spots, expect this to fill an evening or two rather than a single sitting.

Try it another way

There's real satisfaction in watching a plain white head turn into something with a face and a personality, and that happens here through a few specific moves. You'll practice clean invisible decreases as the head rounds taper, work confident color changes between black and white on the front and back legs, and then get to play with surface crochet to lay the black spots wherever you like across the body. The nose placement between rounds 11-14 is its own small satisfying puzzle, pinning it until it sits centered and prominent before you commit with the needle. None of it is technically hard, but each piece asks for a little more attention than a basic sphere, which is exactly what makes the finished cow feel earned rather than assembled on autopilot.
The rounds, in full

Written out, round by round

Intermediate4-6 hours5 mmChenille

Bring to the porch

Everything this one takes, in the order you will reach for it.

Yarn

  • Chenille yarn (or similar weight): approximately 100g in white or cream, for the main body
  • Chenille yarn (or similar weight): approximately 50g in black, for the spots and hooves
  • Chenille yarn (or similar weight): a small amount in pink, for the nose
  • Crochet Hook: 5mm

Safety Eyes

  • 12-15mm in black
  • Toy stuffing (polyester fiberfill)
  • Yarn needle and pins for assembly
  • Stitch markers to track rounds

1. HEAD – White/Cream

  1. Round 1Start 6sc into magic ring – 6sts
  2. Round 2Inc in all 6sts – 12sts
  3. Round 3(Sc, inc in next st) x6 – 18sts
  4. Round 4(Sc2, inc in next st) x6 – 24sts
  5. Round 5(Sc3, inc in next st) x6 – 30sts
  6. Round 6(Sc4, inc in next st) x6 – 36sts
  7. Round 7(Sc5, inc in next st) x6 – 42sts
  8. Rounds 8–13Sc in all stitches – 42sts (6 rounds)
  9. Round 14(Sc5, dec) x6 – 36sts
  10. Round 15(Sc4, dec) x6 – 30sts Eye Placement: Place safety eyes between rounds 9 and 10, approximately 7-8 stitches apart.
  11. Round 16(Sc3, dec) x6 – 24sts
  12. Round 17(Sc2, dec) x6 – 18sts Fasten off and leave long tail for sewing. Stuff the head firmly but keep it rounded and smooth.

2. EARS – White/Cream

Make 2

  1. Round 1Start 4sc into magic ring – 4sts
  2. Round 2(Sc, inc in next st) x2 – 6sts
  3. Round 3(Sc, inc in next st) x3 – 9sts
  4. Round 4(Sc2, inc in next st) x3 – 12sts
  5. Round 5(Sc3, inc in next st) x3 – 15sts
  6. Round 6Sc in all stitches – 15sts
  7. Round 7(Sc3, dec) x3 – 12sts
  8. Round 8(Sc, dec) x4 – 8sts Flatten opening and sc 4sts across. Fasten off and leave long tail for sewing.

Note: Do NOT curl the ears like the Highland Cow. Keep them flat for the dairy cow look.

3. HORNS – Cream/White

Make 2

  1. Round 1Start 6sc into magic ring – 6sts
  2. Round 2Sc in all stitches – 6sts
  3. Round 3(Sc2, inc) x2 – 8sts
  4. Round 4Inc, sc in next 6sts, inc – 10sts
  5. Round 5Inc, sc in next 8sts, inc – 12sts Fasten off, leave long tail for sewing. Stuff the horns lightly.

4. NOSE/SNOUT – Pink

Ch6

  1. Round 1Sc in second chain from hook and in next 3sts, sc3 in last st. Working on opposite side, sc in next 3sts and inc in last st – 12sts
  2. Round 2Inc, sc in next 3sts, (inc) x3, sc in next 3sts, (inc) x2 – 18sts
  3. Round 3Sc, inc, sc in next 3sts, (sc, inc) x3, sc in next 3sts, (sc, inc) x2 – 24sts Fasten off and leave long tail for sewing. Do not stuff – keep it relatively flat but with definition.Nose Details (optional): With black yarn, embroider two small nostrils on the pink nose using straight stitches.

5. BODY – White/Cream

  1. Round 1Start 6sc into magic ring – 6sts
  2. Round 2Inc in all 6sts – 12sts
  3. Round 3(Sc, inc in next st) x6 – 18sts
  4. Round 4(Sc2, inc in next st) x6 – 24sts
  5. Round 5(Sc3, inc in next st) x6 – 30sts
  6. Round 6(Sc4, inc in next st) x6 – 36sts
  7. Rounds 7–10Sc in all stitches – 36sts (4 rounds)
  8. Round 11(Sc4, dec) x6 – 30sts
  9. Rounds 12–13Sc in all stitches – 30sts (2 rounds)
  10. Round 14(Sc8, dec) x3 – 27sts
  11. Round 15(Sc7, dec) x3 – 24sts
  12. Round 16(Sc2, dec) x6 – 18sts Fasten off, leave long tail for sewing. Stuff the body firmly.

6. FRONT LEGS – Black then White

Make 2 Ch4

  1. Round 1Sc in second chain from hook and in next st, sc3 in last st. Working on opposite side, sc in next st and inc in last st – 8sts
  2. Round 2Inc, sc in next st, (inc) x3, sc in next st, (inc) x2 – 14sts
  3. Round 3FLO Sc in all stitches – 14sts Change to White/Cream
  4. Rounds 4–5Sc in all stitches – 14sts (2 rounds)
  5. Round 6(Sc5, dec) x2 – 12sts
  6. Round 7Sc in all stitches – 12sts
  7. Round 8(Sc4, dec) x2 – 10sts
  8. Rounds 9–10Sc in all stitches – 10sts (2 rounds) Add one extra sc. Stuff foot firmly and legs lightly. Flatten the opening and sc 5sts across. Fasten off and leave long tail for sewing.

7. BACK LEGS – Black then White

Make 2

  1. Round 1Start 6sc into magic ring – 6sts
  2. Round 2Inc in all 6sts – 12sts
  3. Round 3Sc3, (inc) x3, sc6 – 15sts
  4. Round 4FLO Sc in all stitches – 15sts Change to White/Cream
  5. Round 5Sc in all stitches – 15sts
  6. Round 6Sc3, (dec) x3, sc6 – 12sts
  7. Round 7Sc in all stitches – 12sts
  8. Round 8Sc4, (dec) x2, sc4 – 10sts
  9. Rounds 9–10Sc in all stitches – 10sts (2 rounds) Add one extra sc. Stuff foot firmly and legs lightly. Flatten opening and sc 5sts across. Fasten off and leave long tail for sewing.

8. TAIL – White with Black Tip

  1. Round 1With White, start 4sc into magic ring – 4sts
  2. Rounds 2–6Sc in all stitches – 4sts (5 rounds) Change to Black
  3. Rounds 7–8Sc in all stitches – 4sts (2 rounds) Fasten off and leave long tail for sewing. Do not stuff the tail – keep it flexible.Tail Tuft (Black): Cut 6-8 strands of black yarn, approximately 3 inches long. Thread them through the end of the tail and tie securely. Trim to desired length for a fluffy tail tuft.

Putting it together

Step 1

Attaching the Nose: Sew the pink nose onto the head between rounds 11-14, centered between the eyes. The nose should be prominent and well-defined, so pin it first to ensure proper placement before stitching securely.

Step 2

Securing the Eyes: If you haven't already inserted them, secure the safety eyes between rounds 9-10, approximately 7-8 stitches apart. They should sit above the nose to create an appealing expression.

Step 3

Positioning the Horns: Sew horns over rounds 4-7 of the head. There should be approximately 8-9 stitches visible between each horn on round 4 to ensure proper spacing.

Step 4

Adding the Ears: Position ears over rounds 8-11 of the head, slightly to the sides and angled outward. Remember not to curl them like Highland Cow ears – each ear should sit behind and slightly below each horn in a flat position.

Step 5

Joining Head to Body: Sew the head to the body securely using mattress stitch or whip stitch. Before fully closing the connection, add extra stuffing around the neck area to make it sturdy and help the head stay upright.

Step 6

Attaching Front Legs: Sew front legs to round 15 of the body, side by side. The feet should touch the ground when the cow is standing. You may need to angle the body slightly and shape it before sewing legs in place for stability.

Step 7

Positioning Back Legs: Sew back legs over rounds 5-9 of the body. Position your cow in a sitting pose with front legs standing, then place each back leg at the side and pin them in place. The tip of each back leg should just touch each front leg to create a balanced sitting position.

Step 8

Adding the Tail: Sew the tail over rounds 4-6 at the back of the body. Let it hang naturally to the side for a realistic appearance.

Step 9

Creating the Black Spots: The distinctive black spots are what transform this amigurumi into an adorable dairy cow. You'll use surface crochet technique to add irregular spots in various sizes across the head and body.

Step 10

Suggested Spot Placement: For the head, create a large spot covering approximately one third to half of the head on one side, extending over one eye. Add a small spot on the opposite side near the other ear for balance. On the body, place a large spot on the back covering rounds 7-9 on one side, and a medium spot on the side over rounds 10-12.

Step 11

Add optional facial details to bring extra personality to your cow. Embroider a small curved smile in black below the nose, and add 2-3 small straight stitches above each eye using black yarn for eyelashes. You can also lightly apply pink chalk or makeup to the cheeks for a rosy blush effect.

Step 12

Weave in all loose ends securely using your yarn needle, trim any excess yarn, and gently squeeze and mold the cow to shape it properly. Fluff the tail tuft to create volume, and ensure your cow sits or stands properly by adjusting the leg positions if needed.

Marlene's notes

Note 01

Use the 5mm hook throughout and keep an eye on tension with chenille yarn, which tends to stretch a little more than smoother fibers and can loosen your stitch definition if you crochet too tight or too loose.

Note 02

Move your stitch marker up every single round, especially through the head's 12 rounds and the back legs' 9 rounds, since continuous rounds with color changes are easy to lose track of.

Note 03

Stuff firmly but evenly as you close each piece, particularly the head and legs, so the invisible decreases at the top don't pucker from underfilled rounds beneath them.

Note 04

This pattern creates a finished amigurumi measuring approximately 20cm (8 inches) tall. It's adapted from a Highland Cow structure but transformed into a classic dairy cow with distinctive black spots.

Before you sit down

  • Weigh out your yarn first: about 100g of white or cream, 50g of black, and a small amount of pink, so you're not caught short mid-head.
  • Set a stitch marker before round 1 of the head and move it up every round; with 12 rounds of shaping it's easy to lose your place otherwise.
  • Read through the head's increase pattern once before you start (sc, sc2, sc3 building each round) so the rhythm of the shaping makes sense in your hands.
  • Check your hook against a 5mm gauge with your chenille yarn, since chenille can behave differently than a standard worsted-weight for tension.

How the hours go

Head, ears, horns and nose
about 90 minutes because the head alone runs 12 rounds of shaping plus separate small parts to track
Assembly, spots and face details
about 60-90 minutes because surface crochet spots, the pinned nose placement, and optional embroidered eyelashes and smile all take a steady hand

Looking after it

  • Hand wash your finished cow gently in cool water, since chenille yarn can shed or mat if machine washed or scrubbed roughly, then lay it flat to air dry rather than wringing it out.
  • Store your cow somewhere it can keep its shape, and give the tail tuft an occasional fluff with your fingers to keep the black tip looking full after handling or washing.
FAQs

Asked on the glider

the ones that come up on the glider

Can I use regular worsted yarn instead of chenille?

Yes, though the finished cow will lose some of the soft, plush texture chenille gives it. You may need to adjust your hook slightly since chenille and standard worsted can behave differently at the same hook size.

How do I keep track of all the rounds without losing my place?

Use a stitch marker and move it up at the start of every round, which matters most on longer pieces like the 12-round head and 9-round back legs. Some crocheters also like a written tally next to their pattern for extra security.

Where exactly does the nose go?

The nose is sewn onto the head between rounds 11-14, centered between the eyes. Pin it in place first and check it looks centered and prominent before you stitch it down securely.

Do I need to add the facial details like eyelashes and blush?

No, those are optional extras. The curved smile, straight-stitch eyelashes, and pink chalk blush are there if you want to add extra personality, but the cow is complete without them.

What size hook do I need for this pattern?

You'll want a 5mm hook for this pattern. Pair it with your chenille yarn and check your tension on the first few rounds of the head before committing to the full piece.

How much yarn should I have on hand before I start?

Plan for about 100g of white or cream for the main body, roughly 50g of black for the spots and hooves, and a small amount of pink for the nose. Weighing it out ahead of time means you won't run short partway through a piece.