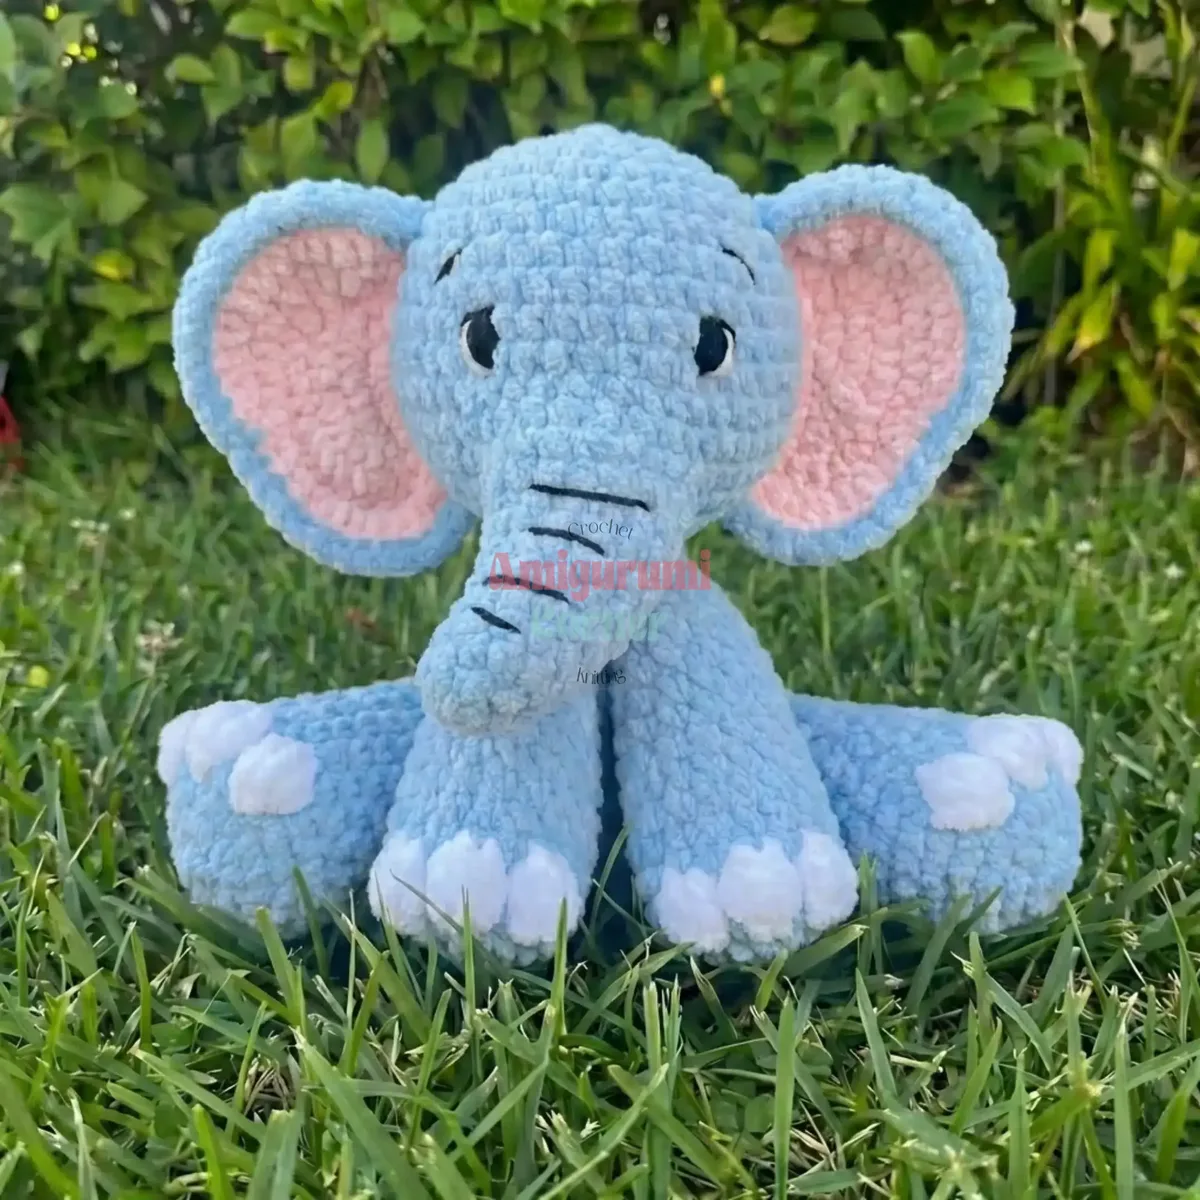
Intermediate 4-6 hours Bulky yarn

Worked on the glider, counted out loud —

A sitting elephant amigurumi pattern for confident beginners

An amigurumi sitting elephant for intermediate crocheters, bobble-stitch hands and feet, two sizes, about 4-6 hours to finish.

Jump to the rounds

What this one is

This sitting elephant is the kind of project you pull out on a quiet evening when you want your hands busy and your mind loose. It suits anyone who already knows their way around a magic ring and a basic decrease but hasn't tackled a bobble stitch or a multi-piece assembly before. The finished plushie sits back on its haunches with its trunk and ears in proportion, sized to comfort a child or sit happily on a shelf.

Your hands will move between two mindsets here: quick spiral rounds for the big shapes and slower, careful work when you get to the bobble stitches on the hands and feet or the two-color changes on the head. You'll work the body, head, legs, ears, and tail separately before sewing them together with a tapestry needle. Plan for a few sittings rather than one long stretch, somewhere in the four-to-six-hour range depending on which yarn weight you pick.

Try it another way

There's real satisfaction in watching this elephant grow from a handful of magic-ring stitches into something with actual personality. The bobble stitches on the hands and feet are the technical heart of the piece — you drop your main color, carry it behind the bobble, and work up to five loops without ever cutting your yarn, which gives you smooth, tidy color changes instead of woven-in ends. The BLO rounds that shape the head add a subtle ridge that makes the face read as a face. And because the whole pattern scales between chunky and super bulky yarn, you get to decide whether you're making a 9-inch companion or a 12-inch one from the same set of instructions.

The rounds, in full

Written out, round by round

Intermediate4-6 hours4.5 mmBulky

Bring to the porch

Everything this one takes, in the order you will reach for it.

For Small Elephant (9 inches)

  • 125g of main color chunky weight yarn (weight 6)
  • 13g of contrast color for ears
  • Small amounts of yarn for bow, tail detail, and toe accents
  • 4.5mm crochet hook
  • 16mm safety eyes
  • Fiberfill stuffing
  • Tapestry needle
  • Stitch marker
  • Scissors
  • Weight 4 yarn for face shaping and embroidering facial details

For Large Elephant (12 inches)

  • 287g of main color super bulky yarn
  • 25g of contrast color for ears
  • Small amounts of yarn for bow, tail detail, and toe accents
  • 7mm crochet hook
  • 18-20mm safety eyes
  • Fiberfill stuffing
  • Tapestry needle
  • Stitch marker
  • Scissors
  • Weight 4 yarn for face shaping and embroidering facial details

In Main Color

  1. Round 19 sc in mr (9)
  2. Round 2inc x 9 (18)

In the next round the bobble stitches will be made using white. The rest of the round is worked in main color.

  1. Round 3BLO 6 sc, BO, sc x 3, 6 sc (18)
  2. Rounds 4–7sc around (18) four rounds
  3. Round 84 sc, dec x 3 (15)
  4. Rounds 9–11sc around (15) three rounds
  5. Round 123 sc, dec x 3 (12)Stuff normally up to this point and lightly stuff the rest of the arms.
  6. Round 13sc around (12)
  7. Round 14sc, dec x 4 (8)
  8. Round 15sc around (8)

You may need to adjust your stitches to make sure the three bobbles line up at the front of the arm. The 4 sc closed should run parallel with the bobbles. Pinch and 4 sc closed. FO leaving a short tail. We will be crocheting these into the body later.

In Main Color

  1. Round 17 sc in mr (7)
  2. Round 2inc x 7 (14)
  3. Round 3sc, inc x 7 (21)

In the next round the bobble stitches will be made using white. The rest of the round is worked in main color.

  1. Round 4BLO 8 sc, BO, sc x 3, 7 sc (21)
  2. Rounds 5–7sc around (21) three rounds
  3. Round 85 sc, dec x 3 (18)
  4. Rounds 9–10sc around (18) two rounds
  5. Round 114 sc, dec x 3 (15)
  6. Rounds 12–13sc around (15) two rounds Stuff the feet and lightly stuff the rest of the leg.
  7. Round 143 sc, dec x 3 (12)
  8. Round 15sc around (12)

In Main Color

  1. Round 16 sc in mr (6)
  2. Round 2inc x 6 (12)
  3. Round 3sc, inc x 6 (18)
  4. Round 42 sc, inc x 6 (24)
  5. Round 53 sc, inc x 6 (30)
  6. Round 64 sc, inc x 6 (36)
  7. Rounds 7–10sc around (36) four rounds
  8. Round 117 sc, dec x 4 (32)
  9. Round 12sc around (32)
  10. Round 136 sc, dec x 4 (28)
  11. Round 14sc around (28)Start stuffing and continue as you go.
  12. Round 155 sc, dec x 4 (24)
  13. Round 164 sc, dec x 4 (20)
  14. Round 176 sc, 4 sc through the first arm and body, 4 sc through the second arm and body, 6 sc (20)

Be sure you crochet the arms into the body with the bobbles facing forwards.

  1. Round 188 sc, dec x 2 (18)
  2. Round 19sc around (18)

FO and leave a long tail for sewing.

In Main Color

  1. Round 16 sc in mr (6)
  2. Round 2inc x 6 (12)
  3. Round 3sc, inc x 6 (18)
  4. Round 42 sc, inc x 6 (24)
  5. Round 53 sc, inc x 6 (30)
  6. Round 64 sc, inc x 6 (36)
  7. Round 7sc around (36)
  8. Round 85 sc, inc x 6 (42)
  9. Rounds 9–12sc around (42) four rounds
  10. Round 1311 sc, inc x 3, 14 sc, inc x 3, 11 sc (48)
  11. Round 1420 sc, ch 6, skip 8 stitches, 20 sc (46)
  12. Round 1511 sc, dec x 3, 3 sc, 6 sc into ch, 3 sc, dec x 3, 11 sc (40)
  13. Round 168 sc, dec x 4 (36)
  14. Round 174 sc, dec x 6 (30)Start stuffing, continue as you go.
  15. Round 183 sc, dec x 6 (24)
  16. Round 192 sc, dec x 6 (18)
  17. Round 20sc, dec x 6 (12)
  18. Round 21dec x 6 (6)Finish stuffing, FO, and sew closed. Weave in ends.

In Main Color

Starting with a slip knot on your hook, start crocheting from the lower right corner of the hole.

  1. Round 16 sc, sc in left corner, 8 sc, sc in right corner (16)
  2. Round 2dec, 2 sc, dec, 10 sc (14)
  3. Rounds 3–4sc around (14) two rounds
  4. Round 5inc, sc, dec, sc, dec x 2, 4 sc, inc (13)Start stuffing lightly.
  5. Round 65 sc, dec, 5 sc, inc (13)
  6. Round 74 sc, dec x 2, 4 sc, inc (12)
  7. Round 84 sc, dec x 2, 3 sc, inc (11)
  8. Round 93 sc, dec x 2, 4 sc (9)Finish stuffing, go through the back loops to FO and weave in ends.

Main Pattern

  1. Round 14 sc in mr (4)Tighten mr but do not close. We will be working the ears in rows.
  2. Round 2ch 1, turn, inc x 4 (8)
  3. Round 3ch 1, turn, sc, inc x 4 (12)
  4. Round 4ch 1, turn, inc, 2 sc, hdc inc, hdc, sc, inc, 2 sc, dc inc, 2 sc (16)
  5. Round 5ch 1, turn, 2 sc, hdc, dc inc, hdc, 4 sc, hdc inc, 4 dc, sc, inc (19)
  6. Round 6ch 1, turn, slst, 2 sc, 4 hdc, hdc inc, 2 sc, 3 slst, sc, hdc, 3 dc in one st, hdc, sc, slst (22)
  7. Round 7ch 1, turn, slst, sc, hdc inc, dc inc, hdc inc, 2 sc, 4 sl st, inc, 2 hdc, hdc inc, 5 hdc, sc, slst (27)FO and weave in ends for contrast color pieces, continue to next instructions for main color pieces.

In Main Color

  1. Round 14 sc in mr (4)
  2. Rounds 2–4sc around (4)
  3. Round 5sc, inc x 2 (6)
  4. Rounds 6–8sc around (6) three rounds Do not stuff. Pinch shut and 3 sc closed. FO and leave a tail for sewing.

Main Pattern

  1. Round 1ch 9, starting in the 2nd ch from hook: 8 hdc down the ch (8)
  2. Rounds 2–3ch 1, turn, 8 hdc (8) two rows FO and weave in ends. Thread a long strand of yarn through the middle of the bow. Wrap the yarn around the middle multiple times to cinch it in and create the middle of the bow. Tie it off with the yarn tails, leaving a tail for sewing.

For Left Ear

Ch 1, turn, and place the contrast color piece on top of the main color piece. The flat side of the ear should be facing to your right. Crocheting through both layers to border the ear: inc, 6 sc, inc, 4 sc, inc, 7 sc, inc x 2, 4 sc, inc on corner, 13 sc along straight edge. FO and leave a tail for sewing.

For Right Ear

Place the contrast color piece on top of main color piece. The flat side of the ear should be facing to your left. Crocheting through both layers to border the ear: 13 sc along straight edge, inc on corner, 4 sc, inc x 2, 7 sc, inc, 4 sc, inc, 6 sc, inc on corner. FO and leave a tail for sewing.

For the tail detail

Using dark gray or contrast color, at R1, slst into tail, ch 6, slst back into the tail x 3. This should give you three loops. FO and weave in ends.

Putting it together

Step 1

Attaching the Body to Head:

Step 2

Sew the body to the head. You may want to add extra stuffing before closing off for a sturdy neck.

Step 3

Attaching the Legs:

Step 4

Sew the back legs to the sides of the body over R5-10. There should be about 15-16 stitches between them on the back of the body. Sew the inner part of the leg to the body so they stay in place.

Step 5

Attaching the Ears:

Step 6

The ears will be sewn from R6-16 on either side of the head. Fold the top of the ear down and sew them on starting between R8-9. Sew them up to R6 and then back down to R16. When sewing them down to R16, do so in a slight C curve. There should be about 16 stitches between them on the back of the head. You can shape the ears with your hands to help enhance the way they look by slightly bending them down and pushing them towards the face.

Step 7

Attaching the Tail:

Step 8

Sew the tail over R6 of the body, centered with the back.

Step 9

Adding Facial Details:

Step 10

Embroider eye details if desired, adding highlights or eyelashes. Embroider lines along the trunk to create texture and definition. Embroider eyebrows above the eyes for extra expression.

Step 11

Attaching the Bow (Optional):

Step 12

Sew the bow to the head, just in front of the top of the ear.

Marlene's notes

Note 01

Match your hook to your yarn weight from the start — a 7mm hook with super bulky yarn gets you the 12-inch elephant, while a 4.5mm hook with chunky yarn gets you the smaller 9-inch version, and mixing the two will throw off the pattern's round counts.

Note 02

Keep a stitch marker moving with you through every round; since this is worked in continuous spiral rounds rather than joined ones, it's easy to lose track of where a round starts, especially on the longer 16- and 18-round pieces.

Note 03

When you reach the bobble rounds for the hands and feet, don't cut your main color — carry it behind the bobble stitches so you can pick it back up cleanly without weaving in a fresh end each time.

Before you sit down

  • Weigh out your yarn before you cast on: 125g main plus 13g contrast for the chunky/9-inch version, or 287g main plus 25g contrast for the super bulky/12-inch version, along with the weight 4 yarn for face shaping.
  • Decide on your hook and yarn pairing first — 4.5mm with chunky yarn or 7mm with super bulky — and stick with it, since the two sizes aren't meant to be mixed mid-project.
  • Have your stitch marker ready to place at the start of every round; this pattern is worked in continuous spiral, so there's nothing else marking where a round begins.
  • Read through the bobble stitch instructions for the hands and feet before you get there, since the technique involves dropping and carrying your main color rather than cutting it, and it helps to know the sequence ahead of time.

How the hours go

Head and body
about 1.5-2 hours because these are the longest pieces, running 16 and 18 rounds with the added care of the BLO bobble rounds
Legs, hands, and feet
about 1-1.5 hours because the bobble stitches on the hands and feet need careful color carrying rather than a straight cut-and-join
Ears, tail, and assembly
about 1.5-2 hours because sewing the ears from R6-16 and the legs over R5-10 takes patience to keep everything sitting evenly

Looking after it

  • If your elephant needs a clean, hand wash it in cool water rather than tossing it in the machine — the fiberfill stuffing can shift and clump under agitation, and the safety eyes shouldn't be soaked repeatedly.
  • Lay it flat to dry and reshape the ears and trunk gently with your fingers while damp, especially around the bobble stitches on the hands and feet, which can flatten if the piece is squeezed hard while still wet.
FAQs

Asked on the glider

the ones that come up on the glider

Can I use a different yarn weight than the two listed?

The pattern is calibrated specifically for chunky yarn with a 4.5mm hook (about 9 inches) or super bulky yarn with a 7mm hook (about 12 inches). Using a different weight will change your finished size and may throw off how the bobble stitches on the hands and feet sit.

What are the bobble stitches actually for?

They form the hands and feet in a contrast color, built up to five loops on your hook before finishing the stitch, with the main color carried behind rather than cut. That's what lets you move between colors smoothly on those pieces.

How much contrast yarn do I need for the ears?

the chunky/4.5mm version you'll need 13g of contrast color for the ears, and for the super bulky/7mm version you'll need 25g. Both amounts are separate from the small quantities set aside for the bow, tail, and toe accents.

Where exactly do the legs attach?

The back legs are sewn to the sides of the body over rounds R5-10, leaving about 15-16 stitches between them across the back. You'll also sew the inner part of each leg to the body so it holds its sitting position.

How far down do the ears get sewn?

The ears are sewn from R6 to R16 on either side of the head, with the top folded down before you start stitching. That fold gives the ear some natural drape instead of sitting flat.

Do I really need a stitch marker for this?

Yes — everything is worked in continuous spiral rounds rather than joined rounds, so a marker at the start of each round is the only reliable way to track your place, particularly through the longer 16- and 18-round pieces.