Intermediate 10-16 hours DK yarn

Worked on the glider, counted out loud —

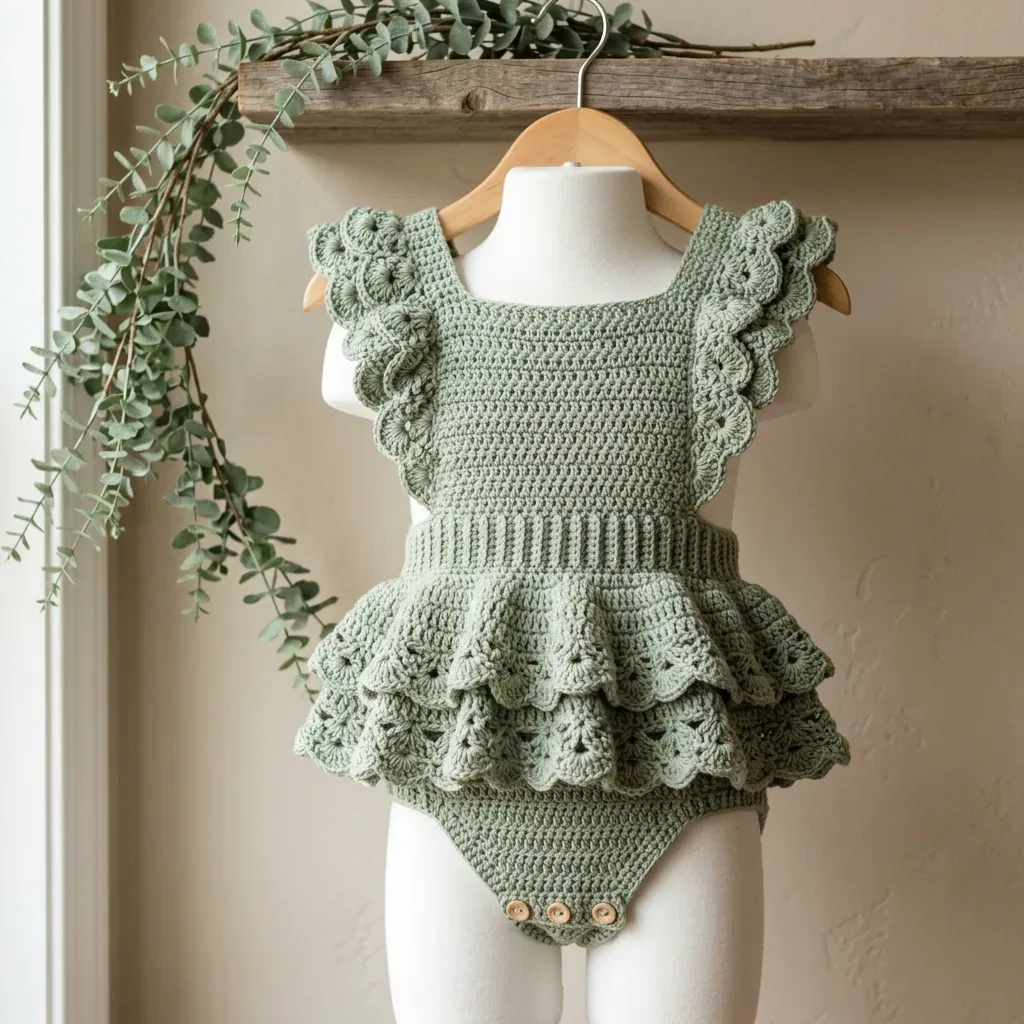
Sage green ruffle baby romper with floral sleeves

An intermediate romper with ruffle tiers and flower sleeves. Takes 10-16 hours. Good for sizes 3-18 months.

Jump to the rounds

What this one is

This one's for the baby who's about to grow out of everything you've made so far, and for you, settling into a project that asks for real attention. The sage green reads soft and a little sophisticated, not quite nursery-sweet, and it works for the kind of dressing-up photo you'll want to keep. It's built for a little person who's sitting up, kicking, reaching for things, and for the person who loves them enough to crochet a romper with three button closures just at the crotch.

Your hands start at the neckline and work down, building the bodice in sc before the back-loop ribbing cinches the waist, then the ruffle shells take over the skirt. You'll also make two small flat flowers for the sleeves, worked separately and set aside until the end. Set aside 10 to 16 hours total, and don't try to do it in one sitting. The armhole separation round and the ruffle attachment deserve fresh eyes, not tired ones.

The rounds, in full

Written out, round by round

Intermediate10-16 hours3.5 mmDK

Bring to the porch

Everything this one takes, in the order you will reach for it.

Yarn

  • DK weight (CYCA 3) in sage green
  • Size 1 (3-6 months): approximately 300 yards
  • Size 2 (6-12 months): approximately 350 yards
  • Size 3 (12-18 months): approximately 400 yards

Recommended yarns

  • Lion Brand Comfy Cotton Blend
  • Paintbox Yarns Cotton DK
  • WeCrochet Brava DK
  • Choose a smooth yarn with clear stitch definition. Avoid fuzzy or textured yarns because they will obscure your beautiful scallop shells and floral motifs. Cotton or cotton-blend yarns work best for baby garments since they breathe well and feel soft against delicate skin.

Hooks

  • US size E-4 / 3.5 mm (primary hook)
  • US size D-3 / 3.25 mm (for ribbing only)

Notions

  • 3 wooden buttons, approximately 5/8 inch diameter (for crotch closure)
  • 1 wooden button, approximately 5/8 inch diameter (for back neck closure)
  • At least 6 stitch markers
  • Tapestry needle
  • Scissors
  • Measuring tape

Optional

  • blocking mats and pins

Safety note

  • Do not use buttons larger than 3/4 inch for infant safety. Secure all buttons very firmly with multiple passes of thread.

Floral Sleeve Motif

This flat flower is worked separately and sewn to the top of each flutter sleeve. You will make 2 total.

To make one flower: Ch 4, sl st to form a ring.

  1. Round 1Ch 1, work 8 sc into ring, sl st to first sc. (8 sc)
  2. Round 2[Ch 3, sk 1 st, sl st into next st] 4 times. (4 ch-3 loops)
  3. Round 3Into each ch-3 loop work [sc, hdc, 3 dc, hdc, sc]. (4 petals) Fasten off leaving a 10 inch tail for sewing.

Back Panel (worked flat, RS facing)

Foundation chain: Ch 37 [41] {45}.

  1. Round 1(RS): Sc in second ch from hook and in each ch across. Turn. (36 [40] {44} sc)
  2. Round 2(WS): Ch 1, sc in each st across. Turn. (36 [40] {44} sc)
  3. Round 3(RS): Ch 1, sc in each st across. Turn. (36 [40] {44} sc) This short flat section creates the back neckline opening. After Row 3, do not fasten off.

Bodice Body Rounds

You are now working in joined rounds, RS facing, starting at the left back corner and working clockwise.

  1. Round 1Ch 1, sc around entire neckline, working sc across the back (36 [40] {44} sc), sc across the left shoulder strap chs (5 [5] {7} sc), sc across the front (36 [40] {44} sc), sc across the right shoulder strap chs (5 [5] {7} sc), sl st to first sc to join. (82 [90] {102} sc)
  2. Round 2Ch 1, [sc to 1 st before corner marker, inc, sm, inc] 4 times, sc to end, sl st to join. (90 [98] {110} sc)
  3. Round 3Ch 1, sc in each st around, sl st to join. (90 [98] {110} sc)
  4. Round 4Ch 1, [sc to 1 st before corner marker, inc, sm, inc] 4 times, sc to end, sl st to join. (98 [106] {118} sc)
  5. Round 5Ch 1, sc in each st around, sl st to join. (98 [106] {118} sc)
  6. Round 6Ch 1, [sc to 1 st before corner marker, inc, sm, inc] 4 times, sc to end, sl st to join. (106 [114] {126} sc)
  7. Round 7Ch 1, sc in each st around, sl st to join. (106 [114] {126} sc) For Size 3 only, work one additional increase round:
  8. Round 8Ch 1, [sc to 1 st before corner marker, inc, sm, inc] 4 times, sc to end, sl st to join. ({134} sc)
  9. Round 9Ch 1, sc in each st around, sl st to join. ({134} sc) Final stitch counts after all shaping rounds:Size 1: 106 sc Size 2: 114 sc Size 3: 134 sc

CHECKPOINT 1: The bodice yoke should measure approximately 2 inches from the neckline edge. The piece should lie flat without cupping or ruffling.

Section 2: Waistband

Switch to smaller hook (D-3 / 3.25 mm) for all waistband rounds.

The waistband is worked in back-loop-only single crochet. This creates the ribbed elastic appearance at the waist.

  1. Round 1Ch 1, sc in blo of each st around, sl st to first sc to join. (96 [104] {122} sc)
  2. Rounds 2–8Ch 1, sc in blo of each st around, sl st to first sc to join. (96 [104] {122} sc)

The waistband is 8 rounds of blo sc, producing approximately 1.5 inches of ribbed fabric.

Switch back to primary hook (E-4 / 3.5 mm) after Round 8.

CHECKPOINT 4: The waistband should measure exactly 1.5 inches tall and should have a visible horizontal ribbing texture.

Do not fasten off. Proceed to Section 3.

Front Diaper Panel

Pickup Row: With RS facing and primary hook, attach yarn to the first st of the front half of the lower ruffle increase round. Sc across 48 [52] {61} sts (the front half). Turn. (48 [52] {61} sc)

  1. Round 1(WS): Ch 1, sc2tog, sc to last 2 sts, sc2tog. Turn. (46 [50] {59} sc)
  2. Round 2(RS): Ch 1, sc2tog, sc to last 2 sts, sc2tog. Turn. (44 [48] {57} sc)
  3. Round 3Ch 1, sc2tog, sc to last 2 sts, sc2tog. Turn. (42 [46] {55} sc)
  4. Round 4Ch 1, sc2tog, sc to last 2 sts, sc2tog. Turn. (40 [44] {53} sc)
  5. Round 5Ch 1, sc2tog, sc to last 2 sts, sc2tog. Turn. (38 [42] {51} sc)
  6. Rounds 6–7Ch 1, sc in each st across. Turn. (38 [42] {51} sc)
  7. Round 8Ch 1, sc2tog, sc to last 2 sts, sc2tog. Turn. (36 [40] {49} sc)
  8. Round 9Ch 1, sc2tog, sc to last 2 sts, sc2tog. Turn. (34 [38] {47} sc)
  9. Round 10Ch 1, sc2tog, sc to last 2 sts, sc2tog. Turn. (32 [36] {45} sc) For Size 1 only, continue:
  10. Round 11Ch 1, sc2tog, sc to last 2 sts, sc2tog. Turn. (30 sc)
  11. Round 12Ch 1, sc2tog, sc to last 2 sts, sc2tog. Turn. (28 sc)
  12. Rounds 13–14Ch 1, sc in each st across. Turn. (28 sc) Continue decreasing and shaping according to your size until the diaper cover reaches 3 inches for Size 1, 3.5 inches for Size 2, or 4 inches for Size 3.Work 3 button loops along the front crotch edge by chaining 3-4 stitches and skipping stitches to create loops that fit your 5/8 inch buttons.Repeat the pickup and shaping process for the back diaper panel, then sew the side seams and attach buttons.

Putting it together

Step 1

Weave in all ends with your tapestry needle. Block the romper gently by pinning it flat and misting with water, or steam blocking carefully.

Step 2

Sew the back neck button securely at the center back opening. Sew the 3 crotch buttons to the back panel, aligning with the front button loops.

Step 3

Give all buttons a firm tug to test security before dressing baby.

Marlene's notes

Note 01

Place a marker at each of the 4 corners before Bodice Rnd 2, since the inc-sm-inc repeat happens at each marker and losing track there cascades into every following round.

Note 02

Use buttons no larger than 5/8 inch and secure each one with several passes of thread; the pattern specifically calls for firm attachment given the crotch and neck closures are a safety point.

Before you sit down

  • Check your yardage against your size: Size 1 needs about 300 yards, Size 2 about 350, Size 3 about 400, so buy a skein more than you think you'll need.
  • Set out at least 6 stitch markers before you begin the bodice rounds, since the increase rounds depend on tracking 4 corner markers at once.
  • Swatch in your main yarn with the E-4/3.5mm hook to check your sc fabric isn't too open; the shells and scallops only look crisp with a smooth, well-defined stitch.
  • Read through the Bodice Body Rounds once before you start Rnd 1, so the 'left back corner, clockwise' setup makes sense before your hook is in your hand.

How the hours go

Back Panel and Bodice Body Rounds
about 3-4 hours because you're working through 3 flat rows plus 9 rounds with repeated corner increases to track
Armhole separation and Waistband ribbing
about 2-3 hours because the underarm chaining and the back-loop-only ribbing both ask for careful, unhurried stitch placement
Front Diaper Panel, ruffle tiers, and Floral Sleeve Motifs
about 5-9 hours because the diaper panel runs 12 rounds, the shell-and-scallop ruffle takes patience tier by tier, and the 2 flowers each need 3 rounds plus sewing

Looking after it

  • Hand wash in cool water with a gentle detergent, since this is cotton or a cotton blend and machine agitation can rough up the scallop edges and flower petals.
  • Lay flat to dry on a towel, easing the ruffle tiers and petals back into shape by hand, then store folded rather than hung so the waistband ribbing doesn't stretch out.
FAQs

Asked on the glider

the ones that come up on the glider

Can I make this without separating out the floral sleeve motifs?

You could skip them entirely and leave the sleeve edges plain, since they're a separate attached piece rather than part of the sleeve construction itself. The romper will still function fully without them, you'll just lose the decorative detail at the shoulder.

What if I mess up the armhole separation round?

Undo back to the start of that round and recount your back and front section stitches before chaining across for the underarm. It's worth frogging this one rather than pushing forward, since a miscount here throws off the fit through the whole upper body.

Do I need the smaller D-3/3.25mm hook for the whole project?

No, that hook is only for the waistband ribbing rounds where the back-loop-only stitching creates the stretchy fit at the waist. Everything else uses your primary E-4/3.5mm hook.

How many stitch markers do I actually need?

The pattern asks for at least 6, and you'll use them to mark the 4 corners during the bodice increase rounds. Having a couple of spares on hand doesn't hurt if one slips off mid-round.

Is this a good first garment project?

It's built for intermediate crocheters who've already finished at least two garments, mainly because of the armhole separation and the multi-section assembly. If this is your first garment, a simpler bodysuit without the ruffle tiers might be a gentler start.

Why cotton instead of a fuzzy or textured yarn?

The pattern calls for a smooth yarn with clear stitch definition so the scallop shells and the flower petals actually show up. A fuzzy yarn would blur those details and make the ruffle tiers look muddled instead of crisp.