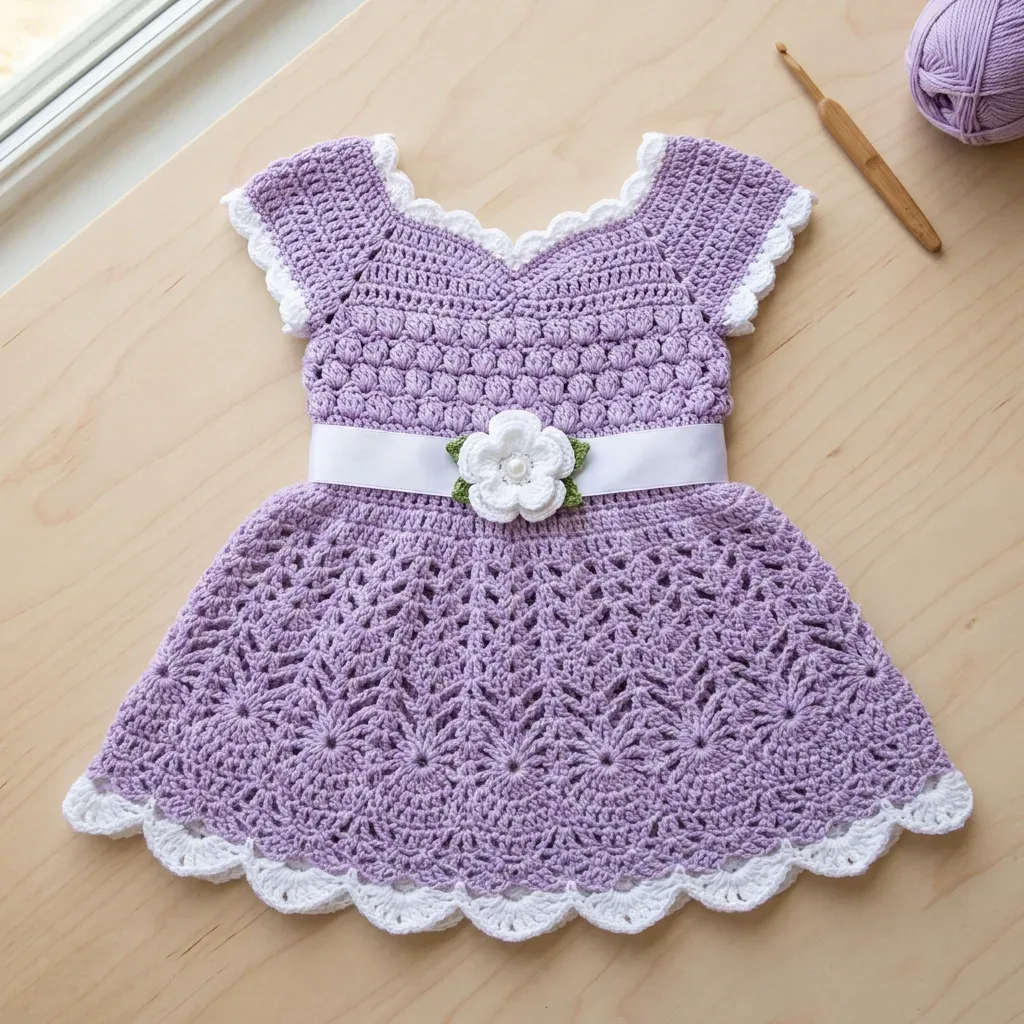
Crocheted Flower
- Round 1Using CC make a magic ring, ch 1, work 6 sc into ring, join with sl st to first sc. (6 sc)
- Round 2(Ch 3, 2 dc in same st, ch 3, sl st in same st, sl st in next st) 6 times. (6 petals)Fasten off, leaving a long tail. Sew pearl bead to center. Set aside for finishing.(6)
Section 1: Neckline Foundation
Using MC, ch 56, join with sl st to first ch to form a ring. Be careful not to twist.
The 56-chain foundation forms the neckline. It will be divided as follows: 10 stitches front right yoke, 8 stitches right sleeve, 20 stitches back yoke, 8 stitches left sleeve, 10 stitches front left yoke.
- Round 1Setup Ch 1, sc in each ch around, join with sl st to first sc. (56 sc) Place markers at the following positions: after stitch 10, after stitch 18, after stitch 38, after stitch 46. These are your raglan points.
- Round 2(Raglan Increase Round 1): Ch 1, sc in each st to 1 st before first marker, 2 sc in next st, move marker, 2 sc in next st, sc to 1 st before next marker, 2 sc in next st, move marker, 2 sc in next st, sc to 1 st before next marker, 2 sc in next st, move marker, 2 sc in next st, sc to 1 st before next marker, 2 sc in next st, move marker, 2 sc in next st, sc to end, join. (64 sc)Each raglan point gains 2 stitches per increase round, for a total of 8 stitches added per raglan round.
- Round 3Ch 1, sc in each st around, join. (64 sc)
- Round 4(Raglan Increase Round 2): Repeat Round 2 increase method. (72 sc)
- Round 5Ch 1, sc in each st around, join. (72 sc)
- Round 6(Raglan Increase Round 3): Repeat Round 2 increase method. (80 sc)
- Round 7Ch 1, sc in each st around, join. (80 sc)
- Round 8(Raglan Increase Round 4): Repeat Round 2 increase method. (88 sc)
- Round 9Ch 1, sc in each st around, join. (88 sc)
- Round 10(Raglan Increase Round 5): Repeat Round 2 increase method. (96 sc) After Round 10, the stitch distribution is: 20 stitches each front yoke section (40 front total), 18 stitches each sleeve section (36 sleeves total), 20 stitches back yoke. Check this before proceeding.Checkpoint: After Round 10, the neckline foundation and yoke increase section should measure approximately 2.5 inches / 6.5 cm from cast-on edge. You should have 96 stitches total.
Section 2: Bodice Yoke Puff Cluster Section
The puff cluster bodice begins now. The sleeves are not yet separated.
- Round 11(Begin Puff Cluster Pattern): Ch 1, (pc in next st, ch 1, sk 1 st) around, ending with sl st to top of first pc. (48 puff clusters, 48 ch-1 spaces = 96 stitch positions)
- Round 12Ch 1, sc in top of each pc and in each ch-1 sp around, join. (96 sc)Round 13: Ch 1, (pc in next st, ch 1, sk 1 st) around, join to top of first pc. (48 pc, 48 ch-1 spaces)
- Round 14Ch 1, sc in top of each pc and in each ch-1 sp around, join. (96 sc)Round 15: Ch 1, (pc in next st, ch 1, sk 1 st) around, join. (48 pc, 48 ch-1 spaces)
- Round 16Ch 1, sc in top of each pc and in each ch-1 sp around, join. (96 sc) Checkpoint: After Round 16, your bodice yoke should measure approximately 4.5 inches / 11.5 cm from the cast-on edge.
Section 3: Sleeve Separation
On the next round, you will skip the sleeve stitches and replace them with underarm chains.
- Round 17Sleeve Separation Ch 1, sc across first 20 sts (front), ch 4, skip the 18 sleeve stitches on the right side, pm in the first skipped st for sleeve pickup later, sc across next 20 sts (back), ch 4, skip the remaining 18 sleeve stitches on the left side, pm in the first skipped st, join with sl st to first sc. (40 sc across body + 4 ch + 4 ch = 48 working stitches)
- Round 18Ch 1, sc in each of the 20 front sts, sc in each of the 4 underarm chs, sc in each of the 20 back sts, sc in each of the 4 underarm chs, join. (48 sc)Checkpoint: After Round 18, the piece should measure approximately 5.5 inches / 14 cm from the cast-on edge. The chest circumference should be approximately 12 inches / 30.5 cm.
Section 4: Waist Band and Ribbon Eyelet
- Round 19Ch 1, sc in each st around, join. (48 sc)
- Round 20Eyelet Round for Ribbon Ch 3 (counts as first dc), sk 1, dc in next st, (ch 1, sk 1, dc in next st) around to last st, ch 1, join with sl st to top of beg ch-3. (24 dc, 24 ch-1 spaces = 48 stitch positions)
- Round 21Ch 1, sc in each dc and in each ch-1 sp around, join. (48 sc)
- Round 22Ch 1, sc in each st around, join. (48 sc) Checkpoint: After Round 22, the waist band section is complete. The piece should measure approximately 6.5 inches / 16.5 cm from the cast-on edge.
Section 5: Skirt Setup Increase Round
The skirt requires a stitch count divisible by 12. The current count is 48. You need more stitches for proper flare.
- Round 23Skirt Setup Ch 1, 2 sc in each st around, join. (96 sc) 96 divided by 12 = 8 fan repeats. Perfect.
Main Pattern
- Round 24(Fan Round 1): Ch 3 (counts as dc), 2 more dc in same st (beg half-fan), sk 2 sts, sc in next st, sk 2 sts, (fan in next st, sk 2 sts, sc in next st, sk 2 sts) 7 times, 2 dc in same st as beg ch-3 (complete beginning fan by adding 2 dc to the ch-3 dc), join with sl st to top of beg ch-3. (8 fans, 8 sc = 48 working sts)The beginning ch-3 and the 2 additional dc at the start, combined with the 2 dc added at the end into the base of the beg ch-3, form one complete beginning fan of 5 dc.
- Round 25(Transition Round): Ch 1, work sc in each dc and in each ch-1 sp of the previous round’s fans, and sc into each sc anchor. Each fan of 5 dc with 4 ch-1 sps = 9 positions. 8 fans x 9 = 72, plus 8 sc anchors = 80 sc, join. (80 sc)
- Round 26Revised Ch 1, (sc in next 4 sts, 2 sc in next st) 16 times, join. (96 sc)
- Round 27(Fan Round 2): Ch 3 (counts as first dc of beg fan), 2 dc in same st, sk 2, sc in next st, sk 2, (fan in next st, sk 2, sc in next st, sk 2) 7 times, 2 dc in base of beg ch-3, join. (8 fans, 8 sc = 48 working sts)
- Round 28(Transition Round): Ch 1, sc in each dc and in each ch-1 sp and in each sc anchor around, join. (80 sc)
- Round 29Increase Round Ch 1, (sc in next 4 sts, 2 sc in next st) 16 times, join. (96 sc)
- Round 30(Fan Round 3): Ch 3, 2 dc in same st, sk 2, sc in next st, sk 2, (fan in next st, sk 2, sc in next st, sk 2) 7 times, 2 dc in base of beg ch-3, join. (8 fans, 8 sc = 48 working sts)
- Round 31(Transition Round): Ch 1, sc in each position as established, join. (80 sc)
- Round 32Increase Round Ch 1, (sc in next 4 sts, 2 sc in next st) 16 times, join. (96 sc)
- Round 33(Fan Round 4): Ch 3, 2 dc in same st, sk 2, sc in next st, sk 2, (fan in next st, sk 2, sc in next st, sk 2) 7 times, 2 dc in base of beg ch-3, join. (8 fans, 8 sc = 48 working sts)
- Round 34(Transition Round): Ch 1, sc in each position as established, join. (80 sc)
- Round 35Increase Round Ch 1, (sc in next 4 sts, 2 sc in next st) 16 times, join. (96 sc)
- Round 36(Fan Round 5, Final Fan Round): Ch 3, 2 dc in same st, sk 2, sc in next st, sk 2, (fan in next st, sk 2, sc in next st, sk 2) 7 times, 2 dc in base of beg ch-3, join. (8 fans, 8 sc = 48 working sts)Checkpoint: After Round 36, the skirt should measure approximately 7 inches / 18 cm from the waist band. Total dress length from cast-on should be approximately 13.5 to 14 inches / 34 to 35.5 cm.
Section 7: Hem Scallop Edging
Work the hem edging using CC.
Join CC with sl st to the top of any dc in the final fan round.
- Round 37Hem Edging Ch 1, sc in each dc and each ch-1 sp and each sc anchor position around, join with sl st. (80 sc)
- Round 38(Scallop Round): Sl st into first sc, (ch 3, 4 dc in same sc, sk 2 sc, sl st in next sc) around, join. Work approximately 27 scallops by working sk 2 for most repeats and sk 1 between 2 repeats as needed to keep edging flat and even. Fasten off CC.
Puff Cluster (pc)
This creates that beautiful textured bodice. Here is exactly how to work it: Step 1: Yarn over, insert hook into indicated stitch or space.
Step 2: Yarn over, pull up a loop to approximately 1/2 inch / 1.3 cm tall. You now have 3 loops on hook.
Step 3: Yarn over, insert hook into same stitch or space.
Step 4: Yarn over, pull up a loop to same height. You now have 5 loops on hook.
Step 5: Yarn over, insert hook into same stitch or space.
Step 6: Yarn over, pull up a loop to same height. You now have 7 loops on hook.
Step 7: Yarn over, draw through all 7 loops on hook. Puff cluster made.
Step 8: Chain 1 to close. This closing chain counts as the top of the puff cluster.
Fan Shell (fan)
In the indicated stitch or space, work: (dc, ch 1, dc, ch 1, dc, ch 1, dc, ch 1, dc). This creates 5 double crochets with 4 chain-1 spaces between them, forming a fan shape.
Scallop Edging
Step 1: Slip stitch into first stitch.
Step 2: Chain 3, work 4 dc into same stitch. You now have 5 dc total in that stitch.
Step 3: Skip 2 stitches.
Step 4: Slip stitch into next stitch.
Step 5: Repeat steps 2 through 4 across or around.
Section 8: Sleeve Edging
- Round 1Return to the marked sleeve stitches. There are 18 held stitches plus 4 underarm chain stitches, totaling 22 stitches around each sleeve opening.
- Round 2Join MC with sl st to first marked sleeve stitch.
- Round 3Sleeve Edging Round 1: Ch 1, sc in each of the 18 sleeve sts, sc in each of the 4 underarm chs, join. (22 sc)Join CC.
- Round 4Sleeve Edging Round 2 (Scallop): (Ch 3, 4 dc in same st, sk 2, sl st in next st) around, adjusting end to meet evenly, join. Fasten off CC.Repeat for second sleeve.(4)
Section 9: Neckline Scallop Edging
- Round 1Join CC at back of neckline with sl st.
- Round 2Neckline Edging Round (Ch 3, 4 dc in same st, sk 2 sts of the foundation neckline edge, sl st in next st) around, adjusting as needed for even scallops, join. Fasten off CC.(4)
- Round 3Work into the underside of the foundation chain or into Round 1 of sc, whichever provides the cleanest result. The neckline has 56 foundation stitches divided by 3 = approximately 18 scallops.
Section 10: Waist Ribbon and Flower
Thread the satin ribbon through the ch-1 eyelet spaces of Round 20, weaving in and out through all 24 ch-1 spaces around the waist. Center the ribbon so equal lengths hang at the front center. Tie in a bow or secure with a knot.
Attach the completed crocheted flower to the ribbon at the front center using the yarn tail threaded through a yarn needle. The flower sits centered on the ribbon.
Sew the pearl bead to the center of the flower using sewing thread and needle.