Intermediate 15-20 Hours Worsted yarn

Worked on the glider, counted out loud —

Sage Green Boho Tiered Crochet Dress Pattern

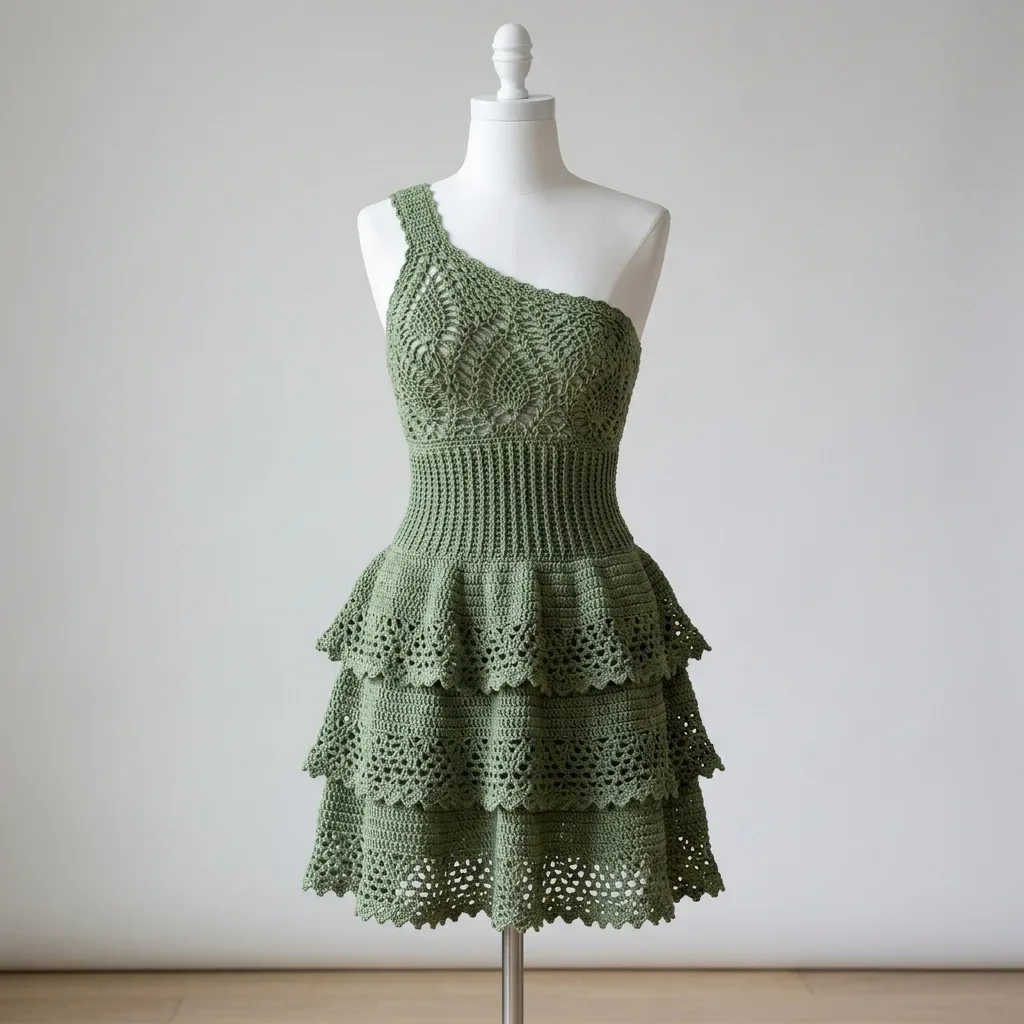
Crochet a stunning sage green tiered boho dress with pineapple lace bodice, ribbed waist, and picot-scallop hems. Free intermediate pattern with sizing notes.

Jump to the rounds

Before you sit down

Crochet the front bust panel flat, building the pineapple lace shells that shape the fitted bodice.

Work the back bodice panel flat to match the front, preparing both pieces for joining.

Seam or join the front and back bodice panels together at the sides before moving to the waist.

Pick up stitches from the waistband and begin Tier 1, shaping the hip flare in joined rounds.

Continue Tier 1 with the lace body repeats, then finish the hem with picot-scallop trim.

Pick up stitches for Tier 2 and Tier 3 in turn, widening each layer before adding their scalloped hems.

Crochet the diagonal shoulder strap separately, block all pieces, then seam the strap onto the bodice.

What this one is

This sage green tiered dress is the kind of piece you'll want to wear the moment the last stitch is woven in. A fitted bodice starring a gorgeous pineapple lace motif at the bust flows into a stretchy ribbed waistband, then cascades into three progressively wider tiers, each finished with a delicate picot-scallop hem. It's perfect for the crocheter who wants a genuine statement wearable — something that feels handmade in the best possible boutique sense, not homespun.

You'll be working pineapple stitch shells, joined-round skirt construction, flat bodice panels, BLO ribbing for the waistband, and a separately crocheted diagonal shoulder strap that gets seamed on at the end. This is an intermediate to advanced project — you should already be comfortable reading lace charts, working in the round, and shaping with decreases. Between swatching, blocking each section, and seaming, expect this to be a true multi-session project rather than a weekend whip-up.

When it's finished, you'll have a one-shoulder mini dress sized for a women's Small/Medium (32-34 inch bust, 26-28 inch waist) with a soft, drapey hand thanks to mercerized cotton yarn. The tiered silhouette and pineapple lace bodice give it that romantic, vintage-boutique feel, making it just as lovely for a summer wedding guest look as it is for a beach vacation photo. It's also a genuinely special handmade gift for anyone who loves elevated, one-of-a-kind wearables.

Variations

This pattern is begging to be made in more than one colorway. Try a warm terracotta or rust cotton for a desert-boho feel, or go dreamy with a dusty lavender or blush pink using the same 24/7 Cotton or Cascade Ultra Pima Cotton bases. For a beachy summer version, work the three tiers in an ombre progression — sage at the bodice fading into a pale seafoam by the final tier — using leftover skeins from your stash. If you want more drama, lengthen each tier by adding one or two extra rounds of the lace body repeat before starting the picot-scallop trim, keeping the 14-stitch pineapple repeat intact so the pattern stays balanced. Sizing up or down: since gauge is so critical here (16 sc = 4 inches at G-6), you can shift the fit by adjusting hook size slightly — try an H-8/5.0mm for a size larger or an F-5/3.75mm for a size smaller in the bodice sections, always swatching the pineapple repeat first since it's sensitive to tension changes. For yarn substitutions, any smooth worsted cotton or cotton-blend with good stitch definition works — Paintbox Simply DK Cotton is a nice lighter-weight option but needs a gauge swatch since it runs slightly thinner than standard worsted. If cotton isn't your budget, a cotton-acrylic blend like Bernat Maker Home Dec gives similar drape at a lower price point, though it won't have quite the same crisp lace definition. For a cooler-weather version, add long sleeves crocheted separately in the same ribbing pattern as the waistband, seamed in at the shoulder strap line.
Common mistakes

  • Skipping the gauge swatch before starting the pineapple lace bodice.Because this is a fitted garment, gauge differences compound quickly across the bust panel. Work a swatch with at least one full pineapple repeat (14 stitches, 8 rows) and measure it against the 3.5 x 3 inch target before casting on the real panel.
  • Losing track of chain-1 spaces within the pineapple base shell.Each pineapple base shell is (dc, ch 1) 4 times plus one more dc — six total elements. Place a stitch marker in the very first dc of each shell so you can quickly count back and confirm you haven't dropped or added a chain space.
  • Working the ribbed waistband in regular sc instead of back loop only (BLO).The stretch that makes this waistband functional comes entirely from working BLO. If your ribbing feels stiff or doesn't have any give, rip back and confirm you're only catching the back loop of each stitch, not both loops.
  • Joining skirt tiers unevenly, causing the hip flare to twist.When picking up stitches to start each new tier, use stitch markers at consistent intervals (front center, back center, and both side seams) to ensure your increases for the flare are evenly distributed around the round rather than clustered on one side.
  • Seaming the diagonal shoulder strap at the wrong angle or tension.Since the strap is made separately, pin it in place on your body or a dress form before seaming to check the diagonal angle looks right, and use a mattress stitch with matching yarn so the seam blends invisibly into the bodice edge.

The rounds, in full

Written out, round by round

Intermediate15-20 Hours4.0 mmWorsted

Materials

Everything this one takes, in the order you will reach for it.

Yarn

  • Worsted weight cotton or cotton blend yarn, approximately 1,400 to 1,600 yards total . A smooth, mercerized cotton gives the crispest stitch definition for the lace sections. You want sage green throughout, which is that beautiful muted grey-toned medium green.

Recommended yarn options

  • Lion Brand 24/7 Cotton in Sage (8 to 9 skeins)
  • Cascade Ultra Pima Cotton in sage or moss colorway (7 to 8 skeins)
  • Paintbox Yarns Simply DK Cotton (8 to 10 balls, requires gauge swatch as it runs slightly lighter)

Hooks

  • US size G-6 / 4.0 mm for the lace bodice and tiers
  • US size F-5 / 3.75 mm for the ribbed waistband and strap

Additional supplies

  • At least 6 stitch markers
  • Tapestry needle for weaving ends
  • Blocking mats and rust-proof T-pins
  • Spray bottle or sink for wet blocking

keep this to hand

Abbreviations

US crochet terms, as used in this pattern.

  1. begbeginning
  2. BLOback loop only (insert hook through only the back loop of the stitch instead of both loops)
  3. chchain
  4. ch-spchain space (the gap created by a chain in the previous row)
  5. dcdouble crochet (yarn over, insert hook, pull up loop, yarn over and pull through 2 loops twice)
  6. hdchalf double crochet
  7. incincrease (work 2 stitches into 1 stitch)
  8. pmplace marker
  9. remremaining
  10. reprepeat
  11. rndround
  12. RSright side
  13. scsingle crochet (insert hook, pull up loop, yarn over and pull through both loops)
  14. sc2togsingle crochet two together (a decrease that combines 2 stitches into 1)
  15. skskip
  16. sl stslip stitch
  17. spspace
  18. st(s)stitch(es)
  19. t-chturning chain
  20. trtreble crochet (yarn over twice, insert hook, pull up loop, yarn over and pull through 2 loops three times)
  21. WSwrong side
  22. yoyarn over

Section 1: Front Bust Pineapple Panel

The front bust panel is worked flat in rows. It spans approximately half the total bodice circumference and measures approximately 16 inches wide and 6 inches tall.

Foundation Chain: Ch 72.

  1. Round 1(RS): Dc in 4th ch from hook (counts as 2 dc). Dc in each ch across. Turn. (70 dc)
  2. Round 2(WS): Ch 1. Sc in each st across. Turn. (70 sc)
  3. Round 3(RS): Ch 3 (counts as dc). Dc in next 6 sts. [Sk 2 sts, work Pineapple Base Shell in next st, sk 2 sts, dc in next st] 4 times working across the center 56 stitches, then dc in rem 6 sts, dc in top of t-ch. Turn. (70 sts and ch-sps)Each Pineapple Base Shell plus the single dc separator uses 14 stitches. The 4 pineapple units are centered across the middle 56 stitches, leaving 7 stitches on each side as plain dc borders.(70)
  4. Round 4(WS): Ch 1. Sc in first dc. Sc in each dc across border sts. In each pineapple shell: sc in first ch-1 sp, (ch 3, sc in next ch-1 sp) 4 times. Sc in dc separator between pineapples. Sc in each dc across opposite border. Sc in top of t-ch. Turn.
  5. Round 5(RS): Ch 3 (counts as dc). Dc in next 6 sts. [Sk sc, work 4 dc in first arch of pineapple, (sc, ch 3, sc) in next arch, 4 dc in next arch, (sc, ch 3, sc) in next arch, 4 dc in next arch, sk sc, dc in separator sc] rep across 4 pineapples. Dc in last 6 sts. Dc in top of t-ch. Turn.
  6. Round 6through 12: Continue the pineapple motif in the established pattern, working sc into dc groups of previous rows and (ch 3, sc) into arch spaces, progressively narrowing each pineapple. Each odd row works from RS. Each even row works from WS. By Row 12, each pineapple is reduced to a single ch-3 arch at the tip.
  7. Round 13Ch 1. Sc in each st and 1 sc in each ch-sp across, working sc2tog at the top of each pineapple tip to close the pineapple. (70 sc)
  8. Round 14Ch 3 (counts as dc). Dc in each st across. Turn. (70 dc)
  9. Round 15Ch 1. Sc in each st across. Do not turn. Do not fasten off. Checkpoint: Your piece should measure approximately 16 inches wide and 6 inches tall. The 4 pineapple motifs should be clearly visible with crisp definition.

Section 4: Waistband (Ribbed Section)

Switch to F-5 / 3.75 mm hook . This tighter hook creates the fitted ribbed waistband appearance.

  1. Round 1Ch 1 (does not count as st). Working in BLO, sc in each st around. Join with sl st to first sc. (144 sc)
  2. Round 2through 4: Repeat Round 1. Working in BLO, sc in each st around. Join. (144 sc each round)(144)
  3. Round 5(decrease round): Ch 1. [Sc BLO in next 16 sts, sc2tog BLO] 8 times around. Join. (136 sc)
  4. Round 6through 8: Ch 1. Sc BLO in each st around. Join. (136 sc)
  5. Round 9(decrease round): Ch 1. [Sc BLO in next 15 sts, sc2tog BLO] 8 times around. Join. (128 sc)
  6. Round 10through 12: Ch 1. Sc BLO in each st around. Join. (128 sc)
  7. Round 13(decrease round): Ch 1. [Sc BLO in next 14 sts, sc2tog BLO] 8 times around. Join. (120 sc)
  8. Round 14through 16: Ch 1. Sc BLO in each st around. Join. (120 sc) Switch back to G-6 / 4.0 mm hook for all remaining sections.

Checkpoint: The waistband should measure approximately 3 inches from the bottom of the bodice join. The waist circumference at the narrowest point should be approximately 24 inches.

Section 5: Tier 1 Setup and Skirt Hip Flare

This section transitions from the waistband to the first skirt tier with substantial increases for the flare.

  1. Round 1(hip increase round): Ch 3 (counts as dc). Dc in same st (inc). [Dc in next 2 sts, 2 dc in next st] 39 times around. Dc in last st. Join with sl st to top of beg ch-3. (160 dc)
  2. Round 2Ch 3 (counts as dc). Dc in each st around. Join. (160 dc)
  3. Round 3(increase round): Ch 3. Dc in same st. [Dc in next 3 sts, 2 dc in next st] 39 times. Dc in last st. Join. (199 dc)
  4. Round 4Ch 3. Dc in each st around. Join. (199 dc)
  5. Round 5(increase to 210): Ch 3. Dc in same st. [Dc in next 18 sts, 2 dc in next st] 11 times. Dc in rem sts. Join. (210 dc)
  6. Round 6Ch 3. Dc in each st around. Join. (210 dc)

Section 6: Tier 1 Lace Body

  1. Round 1(lace setup): Ch 4 (counts as dc plus ch-1 sp). Sk 1 st. [Dc in next st, ch 1, sk 1 st] around. Join with sl st to 3rd ch of beg ch-4. (105 dc and 105 ch-1 sps)
  2. Round 2Ch 5 (counts as dc plus ch-2 sp). [Sk 1 ch-sp, dc in next dc, ch 2] around. Join to 3rd ch of beg ch-5. (105 dc and 105 ch-2 sps)
  3. Round 3Ch 3. 2 dc in first ch-2 sp. [Sc in next dc, 5 dc in next ch-2 sp] 52 times. Sc in last dc. 2 dc in starting sp (to complete the shell). Join. (53 shells)(53)
  4. Round 4Ch 1. Sc in first dc (top of shell). [Ch 3, sk 4 dc, sc in sc between shells, ch 3, sk 0, sc in center dc of next shell] around. Join.
  5. Round 5Ch 3. [4 dc in ch-3 sp, sc in sc, 4 dc in next ch-3 sp, sc in sc] around. Join.
  6. Round 6Ch 1. Sc in first sc. [Ch 5, sc in next sc] around. Join. (210 working positions)

Tier 1 Picot-Scallop Edging:

  1. Round 7(edging): Ch 1. Working into the ch-5 arches: [sc in arch, ch 2, 3 dc in arch, picot, 3 dc in arch, ch 2, sc in arch] 35 times around. Join.Do not fasten off. Proceed to Tier 2 pickup.

Checkpoint: Tier 1 should measure approximately 4 inches from the hip flare join to the picot-scallop hem with 35 complete scallops.

Section 9: One Shoulder Strap

The strap is a narrow flat strip worked in sc, approximately 13 stitches wide and 14 inches long.

Foundation Chain: Ch 14.

  1. Round 1Sc in 2nd ch from hook. Sc in each ch across. Turn. (13 sc)
  2. Round 2through desired length: Ch 1. Sc in each st across. Turn. (13 sc) Continue until the strap measures 14 inches or the exact length needed to bridge from the front top edge to the back top edge across the wearer’s shoulder. Fasten off.Strap attachment: Pin the strap to the front top left corner of the bodice and to the back top left corner. Seam in place with mattress stitch or sl st seam.Neckline and Armhole Edging (optional): With G-6 hook and RS facing, join yarn at the top right corner of the front bodice. Work 1 round of sc evenly around the entire neckline and armhole opening. Join with sl st. Fasten off.

Section 2: Back Bodice Panel

Work same as Section 1, Rows 1 through 15, but omit the pineapple motif. Replace pineapple rows with plain dc rows and sc rows alternating, maintaining the same 70-stitch count throughout.

After Row 15, do not fasten off.

Section 7: Tier 2 Pickup and Lace Body

Tier 2 is worked as a separate piece and joined to the dress.

  1. Round 1Tier 2 Foundation: Ch 253. Join with sl st to first ch to form a ring (being careful not to twist). (252 ch forming a ring)
  2. Round 2Tier 2, Round 1: Ch 3 (counts as dc). Dc in each ch around. Join. (252 dc)
  3. Round 3Tier 2, Round 2: Ch 5. [Sk 1 st, dc in next st, ch 2] 125 times. Sk 1 st. Join to 3rd ch of beg ch-5. (126 dc and 126 ch-2 sps)(126)
  4. Round 4Tier 2, Round 3: Ch 3. 2 dc in first ch-2 sp. [Sc in next dc, 5 dc in next ch-2 sp] 62 times. Sc in last dc. 2 dc in starting sp. Join. (252 positions)(5)
  5. Round 5Tier 2, Round 4: Ch 1. Sc in dc. [Ch 3, sc in sc, ch 3, sc in center dc of shell] 62 times. Ch 3, sc in last sc. Join. (252 positions)
  6. Round 6Tier 2, Round 5: Ch 3. [4 dc in ch-3 sp, sc in sc, 4 dc in ch-3 sp, sc in sc] around. Join.(4)
  7. Round 7Tier 2, Round 6: Ch 1. [Sc in sc, ch 5] 63 times. Join. (252 positions)
  8. Round 8Tier 2 Picot-Scallop Edging:
  9. Round 9Tier 2, Round 7: Ch 1. [Sc in arch, ch 2, 3 dc in arch, picot, 3 dc in arch, ch 2, sc in arch] 42 times around. Join. Fasten off. (42 scallops)(3)
  10. Round 10Attaching Tier 2: Align the top edge of Tier 2 approximately 1 to 1.5 inches above the top of Tier 1. Pin in place and use a slip stitch join through both layers.

Section 8: Tier 3 Pickup and Lace Body

  1. Round 1Tier 3 Foundation: Ch 295. Join to first ch with sl st (do not twist). (294 ch in ring)
  2. Round 2Tier 3, Round 1: Ch 3. Dc in each ch around. Join. (294 dc)
  3. Round 3Tier 3, Round 2: Ch 5. [Sk 1 st, dc in next st, ch 2] 146 times. Sk 1 st. Join to 3rd ch of beg ch-5. (147 dc and 147 ch-2 sps)(147)
  4. Round 4Tier 3, Round 3: Ch 3. 2 dc in first ch-2 sp. [Sc in next dc, 5 dc in next ch-2 sp] 72 times. Sc in last dc. 2 dc in starting sp. Join. (294 positions)(5)
  5. Round 5Tier 3, Round 4: Ch 1. [Sc in dc, ch 3, sc in sc, ch 3] 72 times. Sc in last dc. Join. (294 positions)
  6. Round 6Tier 3, Round 5: Ch 3. [4 dc in ch-3 sp, sc in sc, 4 dc in ch-3 sp, sc in sc] around. Join.(4)
  7. Round 7Tier 3, Round 6: Ch 1. [Sc in sc, ch 5] 49 times. Join.
  8. Round 8Tier 3 Picot-Scallop Edging:
  9. Round 9Tier 3, Round 7: Ch 1. [Sc in arch, ch 2, 3 dc in arch, picot, 3 dc in arch, ch 2, sc in arch] 49 times around. Join. Fasten off. (49 scallops)Attaching Tier 3: Attach approximately 0.5 to 1 inch below Tier 2’s attachment point.(3)

Assembly

Step 1

Proper blocking transforms this dress from handmade to professional quality.

Step 2

Wet block each tier separately before joining if possible. Soak in lukewarm water for 15 to 20 minutes. Gently squeeze out excess water without wringing. Lay flat on blocking mats and pin the picot-scallop edging to emphasize the points. Allow to dry completely before unpinning.

Step 3

Weave in all ends securely using your tapestry needle, working the tails through several stitches on the wrong side.

Step 4

If you want extra waistband support, thread the optional elastic through the inside of the ribbed section and secure at both ends.

Important notes

Note 01

💡 Block each section — the pineapple bust panel, the tiers, and the strap — individually before assembly, since blocking dramatically opens up the lace pattern and makes seaming far more accurate.

Note 02

💡 Use at least 6 stitch markers to track the beginning of rounds on the skirt tiers and to mark pineapple repeats within the bodice panel, since losing your place in lace is easy and time-consuming to fix.

Note 03

💡 Choose a mercerized cotton like 24/7 Cotton or Cascade Ultra Pima Cotton for the crispest stitch definition in the pineapple lace — fuzzier or looser-spun yarns will blur the delicate chain-1 spaces.

Note 04

💡 If substituting Paintbox Simply DK Cotton, work an extra-careful gauge swatch first since this yarn runs slightly lighter than standard worsted and may require going up a hook size.

Note 05

💡 Wet block the finished dress rather than steam blocking, since cotton holds a wet block beautifully and it's the gentlest way to even out the picot-scallop trim on all three tiers without risking scorched fibers.

FAQs

Asked on the glider

the ones that come up on the glider

Can a beginner make this pineapple lace dress?

This pattern is designed for intermediate to advanced crocheters who are already comfortable with lace charts, joined rounds, and shaping decreases. If you're newer to crochet, I'd recommend practicing the pineapple base shell on a small swatch first before committing to the full bodice panel.

How much yarn do I actually need for this dress?

Plan on 1,400 to 1,600 yards total of worsted weight cotton or cotton-blend yarn, which translates to roughly 8-9 skeins of 24/7 Cotton or 7-8 skeins of Cascade Ultra Pima Cotton. Always buy an extra skein if you're between sizes, since lace patterns can be yarn-hungry.

Why does this pattern use two different hook sizes?

The G-6/4.0mm hook is used for the lace bodice and tiers to keep the pineapple stitches open and drapey, while the smaller F-5/3.75mm hook creates a tighter, more elastic fabric for the ribbed waistband and strap. Using the smaller hook there is what gives the waistband its functional stretch.

Can I resize this dress for a different bust or waist measurement?

Yes, the pattern includes customization notes at the end for adjusting the size beyond the standard Small/Medium (32-34 inch bust, 26-28 inch waist). The pineapple repeat is 14 stitches wide, so any width adjustments to the bodice should be made in multiples of that repeat to keep the lace pattern balanced.

What makes the hem edges look so delicate and vintage?

Each of the three skirt tiers finishes with a picot-scallop trim, which is what gives the hemline that romantic, boutique-quality look. It's worked after the lace body of each tier is complete, so take your time on this step since it's the detail most people notice first.