Beginner-Friendly 1-2 Hours Fingering / Sport yarn

Worked on the glider, counted out loud —

Round Crochet Earrings Pattern: Easy Magic Ring Design

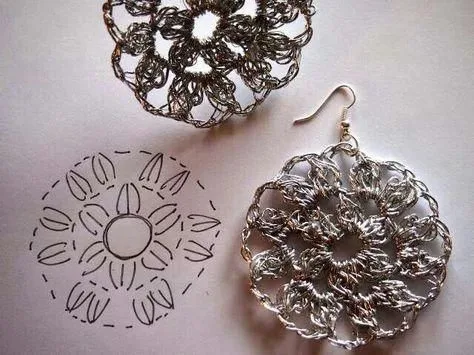
Make one-of-a-kind round crochet earrings with a simple magic ring base and lacy edging. A quick, lightweight accessory pattern anyone can crochet.

Jump to the rounds

Before you sit down

Start by making a magic ring and working your first round of stitches into it.

Pull the magic ring closed snugly to leave a neat, gap-free center.

Work the second round with evenly spaced increases so the piece grows into a flat, even circle.

Add the lacy detail round around the outer edge to give the earring texture and delicate movement.

Fasten off, leaving a long tail for weaving in and attaching the finding.

Weave in all loose ends securely so the lacy stitches stay put with wear.

Attach an earring finding through the top center point using a jump ring.

Repeat the entire process for the second earring to complete a matching pair.

What this one is

These round crochet earrings turn a handful of stitches into a genuinely eye-catching accessory. Starting from a simple magic ring, you'll build up two tidy rounds before finishing with a delicate lacy edge that gives the earrings movement and texture. They're perfect for crocheters who want a satisfying, giftable project that doesn't require a huge yarn stash or hours at the hook — just a spare evening and some pretty thread.

This pattern leans on core techniques every crocheter should have in their toolkit: the magic ring start, working increases in the round to keep your circle flat, and a lacy stitch combination for the final round that adds all the visual interest. It's approachable for confident beginners and a relaxing, meditative make for more experienced stitchers. Expect to spend well under an hour on a single earring once you're comfortable with the rhythm.

The finished earrings are small, round, and delightfully lightweight — no heavy metal or plastic tugging at your earlobes. The lacy round catches the light beautifully and gives each pair a handmade, artisan feel that's impossible to replicate with store-bought jewelry. Because no two crocheted pieces are ever quite identical, every pair you make is truly one of a kind, ready to wear yourself or wrap up as a heartfelt gift.

Variations

This little pattern is a playground for customization since the base — magic ring, second round, lacy edge — stays the same no matter how you dress it up. For a bohemian look, try a rust, mustard, or terracotta yarn with wooden or bone beads added into that final lacy round. Want something more vintage? Work the whole earring in cream or ecru sport-weight cotton, like 24/7 Cotton or DMC Petra, and thread a single pearl bead at the center before you start your magic ring. For a modern, elegant statement, hold a strand of metallic thread together with your main yarn on just the lacy round only — this keeps the sparkle concentrated at the edge instead of overwhelming the whole piece. If you want to change the size, add one extra increase round before the lacy edge to size up to a chunkier disc, or skip straight from the magic ring to the lacy round for a delicate, mini version — just keep your increase count even so the circle lies flat. Seasonal color palettes are an easy win too: try icy blues and silvery metallic thread for winter, soft pastels with tiny pearl-look beads for spring, or deep jewel tones with gold metallic thread for a dressier evening pair. You can also mix things up structurally by making a second, smaller circle and stacking it beneath the main earring with a jump ring for a layered dangle effect. Don't overlook yarn substitutions either — a lightly variegated sock-weight yarn gives a totally different, painterly look using the identical stitch pattern, no pattern changes required.

I adore this pattern because it proves small projects can pack a big punch. Starting with that first magic ring is always so satisfying — cinching it closed and watching a perfect little circle appear feels like a tiny magic trick every single time. Building the second round with evenly spaced increases keeps the earring flat and disc-shaped, which is oddly meditative to work through. But the real star is the lacy detail round — it transforms a plain crochet circle into something delicate and jewelry-worthy, with little loops and picots that catch the light as you move. Attaching the earring findings at the end is the moment it all clicks into place; suddenly you're holding a finished accessory, not just a swatch. I also love how endlessly customizable this base pattern is — swap in beads, sequins, metallic thread, or tiny charms and you've got a completely different vibe using the exact same foundation. It's the kind of project you can finish in one sitting, which makes it perfect for using up sport-weight yarn scraps while still ending up with something genuinely wearable and pretty.
Common mistakes

  • Magic ring left too loose after the first roundPull the tail firmly after your first round of stitches is complete, not just after making the ring, since stitches worked into a loose ring can leave a visible gap at the center.
  • Increases not evenly spaced in the second roundPlace a stitch marker at the start of the round and count stitches between each increase as you go so the disc grows into a flat circle rather than a cupped or ruffled shape.
  • Lacy detail round pulled too tightKeep your tension relaxed on this final round — the picots and lacy stitches need a little slack to sit prettily rather than curling the edge of the earring inward.
  • Earring findings attached off-centerBefore opening the jump ring, lay the finished circle flat and mark the true top center point with a scrap of contrasting thread, then attach your finding there for a symmetrical hang.
  • Mismatched earring pair sizesCrochet both earrings back to back rather than finishing one completely before starting the second, so your tension stays consistent across the pair.
  • Yarn too thick for the lacy detail to read clearlyStick to a fine sport or fingering weight thread for this pattern — anything bulkier will muddy the delicate lacy texture that makes these earrings special.

The rounds, in full

Written out, round by round

Beginner-Friendly1-2 HoursFingering / Sport

Materials

Everything this one takes, in the order you will reach for it.

  • Fingering / Sport weight yarn
  • Crochet hook (size to suit your yarn)
  • Jump rings
  • Earring hooks (earring findings)
  • Needle-nose pliers

keep this to hand

Abbreviations

US crochet terms, as used in this pattern.

  1. chChain
  2. scSingle Crochet
  3. dcDouble Crochet
  4. sl stSlip Stitch
  5. st(s)Stitch(es)

Step 1: Begin with a Magic Ring

Starting with a magic ring allows you to pull the center closed, creating a tight, neat circle for the earring base.

  1. Round 1In the magic ring, ch 3 (counts as dc), make 11 dc into the ring. Join with a sl st to the top of the ch-3. (12 stitches)(12)

Step 2: Create the Second Round

  1. Round 2Ch 3 (counts as dc), dc in the same stitch, ch 1, 2 dc in the next stitch around. Join with a sl st. (24 stitches)(24)

Step 3: Add Lacy Detail

  1. Round 3Ch 5, sc in the space between the next 2 dc clusters around. Join with a sl st to the first ch. This round creates the lace-like edging for a delicate finish.Finish: Fasten off, and weave in the ends.

Step 4: Attach Earring Findings

Using needle-nose pliers, attach a jump ring to the top of the earring. Add an earring hook to the jump ring, and secure it tightly. Repeat for the second earring.

1. Mini Mandala Earrings

For a boho look, try a mini mandala pattern with multiple colors and intricate stitches like puff stitches and picots.

Start with a magic ring and work 12 sc into it.

Use puff stitches in the second round for texture, alternating with ch stitches.

Add picots around the edge for a decorative border.

2. Floral Motif Earrings

These earrings mimic the look of a delicate flower, adding a feminine touch to your jewelry collection.

Start with a center circle of sc stitches.

Create “petals” by making clusters of 3 or 4 dc stitches separated by ch stitches around the edge.

Finish with a picot on each petal tip for extra detail.

3. Hoop-Style Crochet Earrings

Using a metal hoop as a base, crochet around the hoop to create a strong, round earring with added durability.

Attach yarn to a metal hoop and work sc stitches around the hoop.

Add decorative stitches like shells or clusters for added interest.

Finish with a slip stitch to close and weave in the ends.

Important notes

Note 01

💡 Use a smaller hook than you would for garments — a steel or small-B/C hook keeps the stitches tight enough that the earrings hold their shape without sagging.

Note 02

💡 Work with a smooth, fine cotton or blended sport-weight thread; fuzzy or textured yarns can obscure the lacy detail round's picots and chain loops.

Note 03

💡 Leave a generous tail (at least 6 inches) after fastening off so you have plenty of length to weave in securely and attach your earring finding.

Note 04

💡 If adding beads, thread them onto your yarn before you begin crocheting the lacy round — you can't add strung beads partway through once you're already working.

Note 05

💡 Block your finished circles lightly with steam or a light misting of water and let them dry flat; this helps the lacy edge sit crisp and even.

Note 06

💡 Use jewelry-grade earring hooks or studs with a small loop, and open jump rings sideways (never pull them apart) to keep the metal from weakening or snapping.

FAQs

Asked on the glider

the ones that come up on the glider

What yarn weight works best for these round crochet earrings?

A fine sport or fingering weight cotton or cotton-blend thread works best, since it keeps the earrings lightweight and lets the lacy detail round show up clearly. Thicker yarns will make the earrings heavier and blur the delicate stitch definition.

How long does it take to make one pair?

Once you're familiar with the magic ring, increase round, and lacy edging, most crocheters can finish a single earring in well under an hour. A full pair typically comes together in one relaxed sitting.

Can I make these earrings without adding beads or charms?

Absolutely — the lacy detail round is designed to look finished and polished entirely on its own. Beads, sequins, and charms are optional embellishments to personalize the design, not requirements.

Do I need special jewelry-making skills to finish these?

No advanced jewelry skills are needed — attaching the earring findings is as simple as opening a jump ring, looping it through piece, and closing it again. It's a beginner-friendly finishing step.

Why did my earring turn out cupped instead of flat?

A cupped or ruffled shape usually means your increases weren't evenly spaced in the second round, causing some sections to grow faster than others. Recount your stitches and space increases evenly around the round to fix this.