Intermediate 4-6 hours Bulky yarn

Worked on the glider, counted out loud —

Reversible two-toned octopus amigurumi pattern

A two-color reversible octopus for confident beginners. About 4-6 hours to stitch both bodies and all twelve tentacles.

Jump to the rounds

What this one is

You know that friend who can never settle on one favorite color? This one's for them. Two bodies, two palettes, one octopus that flips inside out depending on the mood you're in — or the mood the kid on your lap is in. It's a toy that argues both sides can win, and honestly, that feels like the right kind of gift to have on hand.

Your hands spend most of this project in a continuous spiral, no joins, no turning, just round after round climbing steadily through Round 18 before the tentacles branch off into flat, turned rows. Between the two bodies and all twelve legs, plan on somewhere around four to six hours, likely spread across a couple of sittings rather than one long stretch. This pattern is written in US crochet terminology throughout.

Try it another way

The two-color structure is where this pattern really invites play. Try a bold-and-neutral pairing so the toy reads differently depending on which side is showing, or go tonal with two closely related shades for something more subtle. Since the body is worked identically twice — one skein per side — you can swap in a solid for one half and a self-striping or speckled yarn for the other without touching the stitch counts at all. You can also substitute a different yarn weight as long as you adjust your hook size accordingly and maintain a tight gauge — a lighter yarn will produce a smaller octopus, while a heavier yarn will make it larger, so long as both colors stay the same weight so the two body halves end up identical in size. For a flatter, huggable pillow-style toy rather than a plump amigurumi, skip the fiberfill in the inner body half entirely, as the pattern allows. And if chenille isn't your thing, any bulky-weight yarn holding about 120 m per 100 g skein will work — a plain acrylic bulky gives a firmer, more classic amigurumi feel, while chenille keeps things soft and huggable for younger hands.
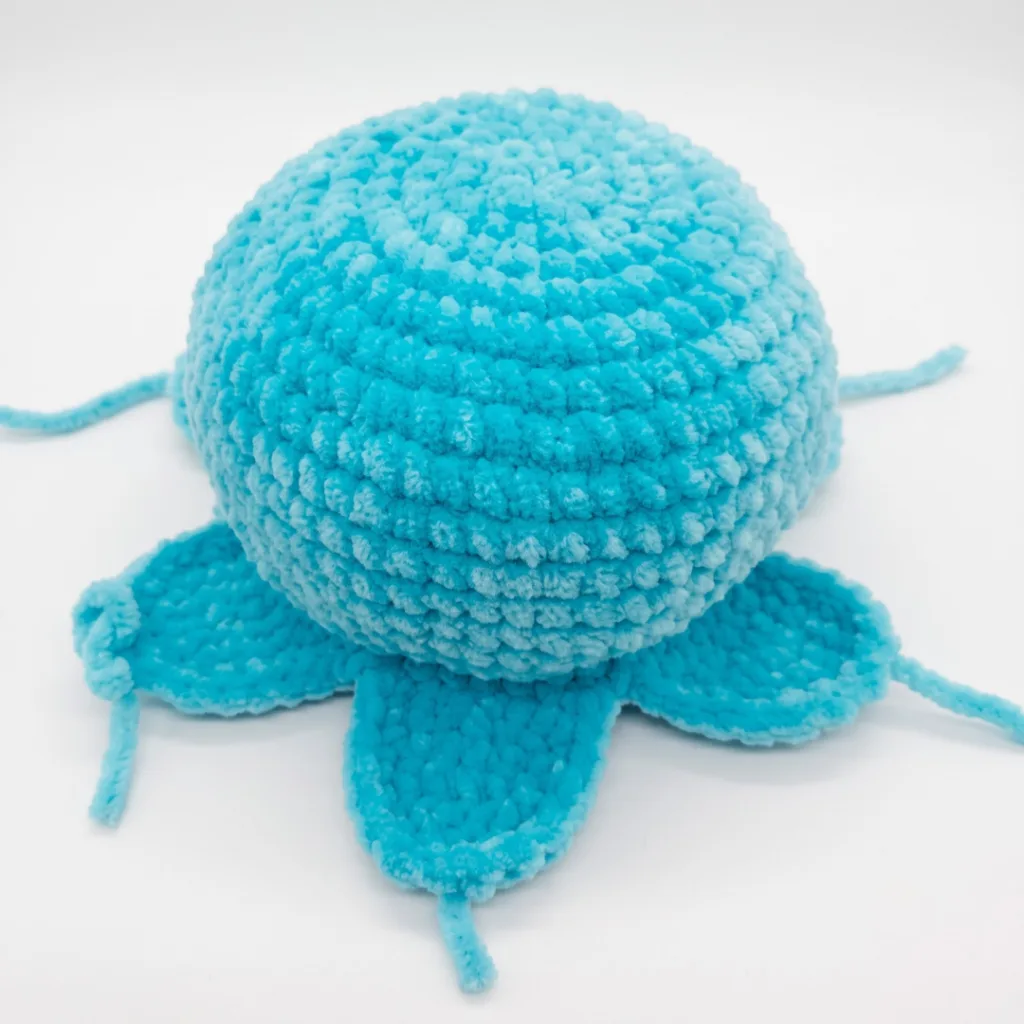
The rounds, in full

Written out, round by round

Intermediate4-6 hours4.0 mmBulky

Bring to the porch

Everything this one takes, in the order you will reach for it.

Yarn

  • Bulky weight (approx. 120 m / 100 g per skein), two contrasting colors — approximately 50 g of each color. A chenille-style yarn works beautifully for soft texture.

Hook

  • US G-6 / 4.0 mm

Notions

  • Two pairs safety eyes, 13 mm
  • Dark yarn or embroidery thread for stitching the mouth on each side
  • Stuffing / fiberfill — a small amount
  • Strong, thin sewing thread and tapestry needle for assembling
  • Stitch markers
  • Scissors
  • Craft glue (if safety eyes are glued rather than post-backed)

Octopus Body (Make 2 — one in each color)

  1. Round 18 sc in MR. (8)
  2. Round 2inc in each st around. (16)
  3. Round 3sc, inc repeat 8 times. (24)
  4. Round 4sc, inc repeat 12 times. (36)
  5. Round 55 sc, inc repeat 6 times. (42)
  6. Round 63 sc, inc, 6 sc, inc repeat 5 times, 3 sc. (48)
  7. Round 77 sc, inc repeat 6 times. (54)
  8. Round 84 sc, inc, 8 sc, inc repeat 5 times, 4 sc. (60)
  9. Rounds 9–14sc in each st around. (60) Work these 6 rounds with no increases or decreases.
  10. Round 154 sc, dec, 8 sc, dec repeat 5 times, 4 sc. (54)
  11. Round 167 sc, dec repeat 6 times. (48)
  12. Round 173 sc, dec, 6 sc, dec repeat 5 times, 3 sc. (42)
  13. Round 18sc in each st around. (42)Do not fasten off. You will now work the tentacles directly from these 42 stitches.

Tentacles (Worked across the opening of each body — 6 tentacles total per body)

Each tentacle is worked flat over 6 stitches, then the next tentacle begins 1 stitch along from where the previous one ended.

First Tentacle:

  1. Round 196 sc. Do not complete the round. Make 1 t-ch, turn. (6)
  2. Rounds 20–236 sc, t-ch, turn. (6)
  3. Round 24dec, 2 sc, dec, t-ch, turn. (4)
  4. Round 25dec, dec. (2) Fasten off and cut yarn, leaving a tail. Tuck tails inside when assembling — do not weave in yet.Remaining Tentacles (repeat for tentacles 2–6):Skip 1 stitch from the base of the previous tentacle. Join yarn in the next stitch (the 8th stitch of the round) and repeat Rows 19–25.Continue in this way until all 6 tentacles are complete, working across all 42 stitches of Round 18. There will be 6 stitches per tentacle and 1 skipped stitch between each.

Tentacle Edging Round:

After the final tentacle, do not cut the yarn. Instead, make 1 t-ch and work a continuous edging around all the tentacles and the spaces between them as follows:

Along each tentacle , work: 6 sc along one side edge (1 sc into the start of each row)

2 sc across the tip (Row 25)

6 sc along the second side edge Into each gap between tentacles , work: 1 sl st into the stitch between tentacles At the end of the edging round, sl st into the t-ch to close. Fasten off and cut yarn.

Repeat the entire Body + Tentacles + Edging section with the second color.

Putting it together

Step 1

Insert one pair of safety eyes into the right side of each body half, positioned between Rounds 10–11 with approximately 4 stitches between the two eyes. Secure the backs firmly if using post-backed safety eyes.

Step 2

Place a small amount of fiberfill into one body half (the inner layer). You may skip stuffing altogether if you prefer a flat, pillow-style toy.

Step 3

Nest the second body inside the first with wrong sides facing each other , so both right sides face outward.

Step 4

Using strong, thin sewing thread and a tapestry needle, sew the two halves together along the tentacle edges , aligning the tentacles as closely as possible.

Step 5

Also sew the two halves together along approximately Round 17 , creating an internal anchor seam. This prevents stuffing from shifting down into the tentacles when the toy is turned or handled.

Step 6

Tuck any remaining yarn tails from the tentacle tips inside the toy between the two body layers as you sew, rather than weaving them in separately.

Step 7

Glue or press safety eyes onto each side if they were not secured in Step 1.

Step 8

Using dark yarn or embroidery thread, stitch a simple mouth on each face side — a small curved line works well.

Step 9

Weave in any remaining ends.

Marlene's notes

Note 01

Keep your tension tight throughout the body — amigurumi fabric should have no gaps, and if you can see light through your stitches, go down a hook size (loose tension shows most on the dome of the head). Gauge is not critical for this project overall, but your fabric should be tight enough that stuffing does not show through the stitches, particularly with chenille-style yarn.

Note 02

A stitch marker at the start of each spiral round is not optional here; without a join to orient you, it's the only thing standing between you and a lost round.

Note 03

Stuffing is optional on the inner body half — the pattern notes you can skip it entirely for a flatter, pillow-style toy, so decide before you close up that seam.

Note 04

a clean invisible decrease, always insert your hook under the front loops only of the next two stitches. The result lies flat against the fabric rather than pulling up a bump, which matters most in Rounds 15–17 where the shaping is visible.

Note 05

Don't overstuff. This toy is reversible, so the stuffing needs to sit centered and not push against the sides. A light handful is enough — you want the body to feel lightly padded, not drum-tight.

Note 06

Aligning the tentacles during assembly is the trickiest step. Pin both halves together before sewing so the tentacles line up symmetrically. Taking an extra five minutes here makes the finished toy look professionally constructed.

Note 07

This pattern is written in US crochet terminology. Stitch counts are given at the end of each round in parentheses: (##).

Before you sit down

  • Weigh out your two colors ahead of time — you'll want roughly 50 g of each, so there's no scrambling mid-project if one skein runs light.
  • Read through the tentacle instructions before you finish the last body round, since each tentacle picks up right where the last one's decreases left off, and it helps to see the shape of all six before you start the first.
  • Set a stitch marker at the start of every round through Round 18 — in a continuous spiral it's easy to lose your place, and there's no join to catch you.
  • Work a small test swatch in your bulky-weight yarn to check your fabric is tight enough that stuffing won't peek through, especially if you've chosen a chenille-style yarn.

How the hours go

Octopus body (both colors)
about 2-3 hours total, because each body works through 13 rounds of steady spiral shaping before the tentacle rows even begin
Tentacles (12 total across both bodies)
about 1.5-2 hours, because each of the six tentacles per body is worked flat with its own turns and decreases, and there are twelve in all
Assembly and finishing
about 30-45 minutes, because setting two pairs of safety eyes, stitching two mouths, and sewing the bodies wrong-sides-together with strong thread all takes a careful hand

Looking after it

  • If you've worked this in a chenille-style yarn, hand wash gently in cool water and lay flat to dry — chenille can shed and mat if it's machine washed or tumbled.
  • Reshape the tentacles while damp, smoothing each one to a point, and store the finished toy stuffed-side up so the nested bodies keep their shape rather than settling flat.
FAQs

Asked on the glider

the ones that come up on the glider

Can I use a different yarn weight for this pattern?

Yes, you can substitute a different yarn weight as long as you adjust your hook size accordingly and maintain a tight gauge. A lighter yarn will produce a smaller octopus, while a heavier yarn will make it larger. Just keep in mind that the two colors should be the same weight so both body halves end up identical in size.

How do I make sure both body halves are exactly the same size?

Use the same hook and yarn weight for both halves and try to keep your tension consistent throughout. If you tend to crochet more loosely when you're tired or distracted, work both bodies in the same sitting or at the same time of day. Blocking each piece lightly before assembly can also help even out any minor differences.

Is this pattern safe for young children?

children under three, replace post-backed safety eyes with embroidered eyes using dark yarn — this eliminates any small-part risk. The toy itself, once assembled with tight seams, is durable and child-friendly. Always use a firm, non-toxic fiberfill and ensure all yarn tails are thoroughly secured inside the toy.

What is the best way to sew the two halves together neatly?

Use a strong, thin sewing thread rather than yarn for the assembly seam — it creates a less bulky join that sits flat between the two layers. Work a whipstitch along the tentacle edges, pulling each stitch snugly but not so tight that the fabric puckers. Pinning the halves together before you begin sewing makes a noticeable difference in how evenly everything lines up.