Intermediate 4-6 hours Worsted yarn

Worked on the glider, counted out loud —

Reversible tiger and bunny amigurumi you crochet as one

A two-in-one plush that flips from tiger to bunny. Intermediate make, about 4-6 hours with joining and embroidery.

Jump to the rounds

What this one is

You know that friend who can never pick a favorite animal? This one's for them. You work up a full orange tiger and a full white bunny separately, then nest one inside the other so a single toy turns from stripes to soft ears with one tug. It's a gift for the kid who wants two toys but only has room in the crib for one, and honestly, it's just as satisfying for you to make.

Your hands spend most of this project doing quiet, familiar things: single crochet in a spiral, increases that build a round head, a little shaping for paws. The real trick happens at the end, when you join both bodies through their loops at once and turn the whole thing inside out to check the fit. Between the two bodies, the ears, and the embroidered stripes, plan on a solid few hours across a sitting or two.

Try it another way

Once you've got the joining technique down, there's a lot of room to play. Swap the orange and white for the tan and dark brown listed for the Pug, or the yellow and brown from the Bee, and you've got a completely different reversible pairing using the same paw-joining round. If you want a single-animal version instead of the flip toy, just make the tiger or bunny body on its own and skip the nesting step entirely — you'll still get all 9 rounds of head and body shaping plus the ear-making instructions for whichever ear shape suits. You can also vary the ear length: the tiger ear starts from a chain of 4, while the bunny ear starts from a chain of 7, so mixing and matching gives you a different silhouette on the same joined body. For gifting, embroider the black stripes heavier or lighter depending on how bold you want the tiger side to read, and swap in the plush pink for bigger or smaller cheeks. If you're new to the reversible join, practice the Back Loop Only/Front Loop Only technique on a scrap swatch first so the real joining round goes smoothly.

The whole appeal here is the reveal — you crochet two complete, separate amigurumi bodies and then marry them with a single paw-joining round worked through the Back Loop Only of the tiger and the Front Loop Only of the bunny at the same time. That's not a beginner move, and getting it right feels like solving a small puzzle in yarn. Add in the two ear shapes worked straight from a chain rather than in the round, plus hand-embroidered eyebrows and tiger stripes in black cotton-blend yarn against plush velvet, and you get a toy that reads as two distinct animals depending on which way it's turned. It's the kind of project that makes you slow down and actually look at construction instead of following it on autopilot.
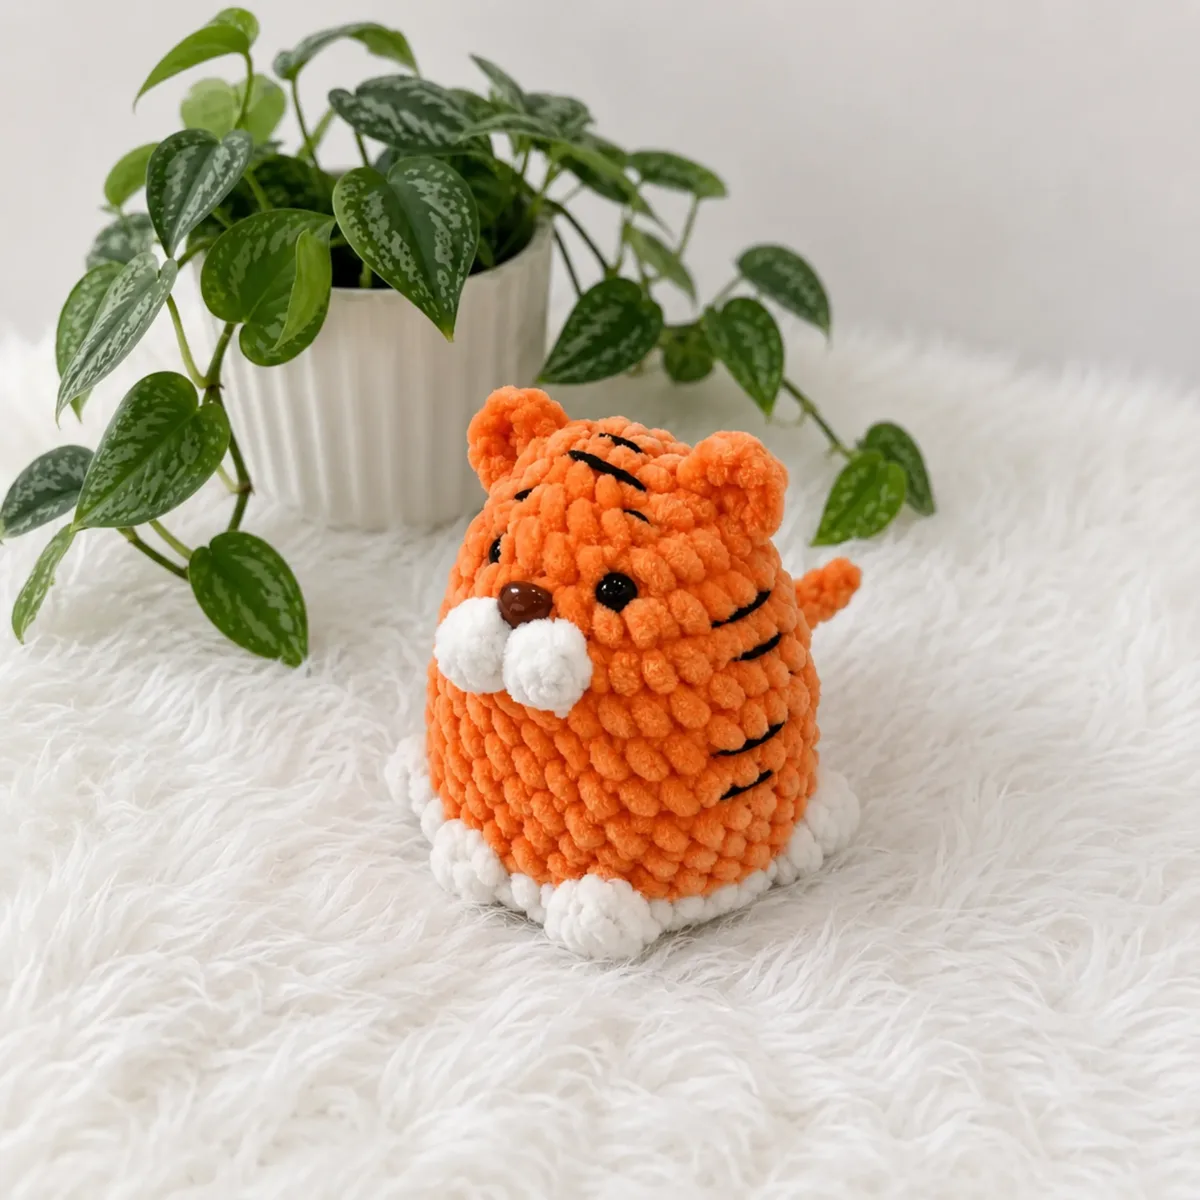
The rounds, in full

Written out, round by round

Intermediate4-6 hours4.0 mmWorsted

Bring to the porch

Everything this one takes, in the order you will reach for it.

Yarn

  • Velvet/plush yarn (such as a chenille-style baby yarn), approximately 20–30g each in orange and white for the Tiger/Bunny pair; tan and dark brown for the Pug; yellow and brown for the Bee; teal, light green, and yellow for the Dinosaur; and mint green for the Frog
  • Small amount of black cotton-blend yarn for embroidered details (eyebrows, stripes, mouths)
  • Small amount of plush pink yarn for cheeks

Hook size

  • 4.0 mm (US G/6) or 4.5 mm (US 7)
  • Safety nose, 10mm (Tiger and Bunny)

Tools

  • Safety eyes, 8–10mm, 1 pair per animal
  • Stuffing/fiberfill
  • Stitch marker
  • Yarn/tapestry needle
  • Scissors

Tiger — Head/Body

  1. Round 16 sc in MR. (6)
  2. Round 2inc in each st around. (12)
  3. Round 3sc, inc repeat around. (18)
  4. Round 42 sc, inc repeat around. (24)
  5. Round 53 sc, inc repeat around. (30)Switch to white yarn for the puff stitches only in Rnd 6.
  6. Round 614 sc, puff, 1 sc, puff, 13 sc. (30) Fasten off white and weave in the end.
  7. Rounds 7–9sc in each st around. (30) Insert safety eyes between Rnds 4 and 5, spaced 4 sc apart, with the nose placed between the two puff stitches. For a flatter profile, the eye and nose posts can be gently warmed and flattened on the inside with a lighter before assembly.
  8. Round 102 sc, ch 8, sc in 2nd ch from hook and next 6 ch, 28 sc. (30) This forms the tail — keep it centered on the back.
  9. Rounds 11–12sc in each st around. (30)
  10. Round 132 sc, sl st. Fasten off and weave in the end.

Ears (make 2 Tiger, 2 Bunny)

Tiger Ear: ch 4, 2 dc in 3rd ch from hook.

Bunny Ear: ch 7, 5 dc in 3rd ch from hook.

Weave in the ear tails through the top of the head and knot securely on the inside. Embroider eyebrows and tiger stripes with black cotton-blend yarn.

Bunny — Head/Body

  1. Round 16 sc in MR. (6)
  2. Round 2inc in each st around. (12)
  3. Round 3sc, inc repeat around. (18)
  4. Round 42 sc, inc repeat around. (24)
  5. Round 53 sc, inc repeat around. (30)
  6. Round 614 sc, puff, 1 sc, puff, 13 sc. (30)
  7. Rounds 7–9sc in each st around. (30) Insert safety eyes between Rnds 4 and 5, spaced 4 sc apart, with the nose placed between the puff stitches.
  8. Round 102 sc, puff, 27 sc. (30) Keep this centered on the back — it forms the small tail.
  9. Rounds 11–12sc in each st around. (30)
  10. Round 132 sc, sl st. Do not fasten off — leave the working loop live for joining.

Joining — Paws

Turn the Bunny piece wrong side out and slide it inside the Tiger piece, wrong sides together, matching up both tails.

Begin the joining round directly beneath the tail, at the center back. Switching to a hook one size smaller than what you used for the bodies makes this round easier to control.

  1. Joining RoundWork through BLO on the Tiger stitches and FLO on the Bunny stitches at the same time: 7 sc, puff, 5 sc, puff, 3 sc, puff, 5 sc, puff, 6 sc.

Pug — Head/Body

  1. Round 16 sc in MR. (6)
  2. Round 2inc in each st around. (12)
  3. Round 3sc, inc repeat around. (18)
  4. Round 42 sc, inc repeat around. (24)
  5. Round 53 sc, inc repeat around. (30)Switch to dark brown yarn for the puff stitches only in Rnd 6.
  6. Round 614 sc, puff, 1 sc, puff, 13 sc. (30) Fasten off dark brown and weave in the end.
  7. Rounds 7–9sc in each st around. (30)
  8. Round 102 sc, ch 4, sc in 2nd ch from hook and next 2 ch, 28 sc. (30)
  9. Rounds 11–12sc in each st around. (30)
  10. Round 132 sc, sl st. Fasten off and weave in the end.Tongue: ch 2, sc in 2nd ch from hook.Ear: ch 4, sl st in 2nd ch from hook, sc, hdc.Attach the ears to the head. Attach the tongue under the snout using the same method as the ears.

Bee — Body

  1. Round 16 sc in MR. (6)
  2. Round 2inc in each st around. (12)
  3. Round 3sc, inc repeat around, worked in brown. (18)
  4. Round 42 sc, inc repeat around. (24)
  5. Round 53 sc, inc repeat around. (30)
  6. Rounds 6–12sc in each st around. (30) Work Rnds 7 and 11 in brown, alternating with yellow for the remaining rounds to create the stripes.Antennae: ch 4, sl st in 2nd ch from hook and each ch across.Wings: ch 6, hdc in 3rd ch from hook, 3 dc.

Embroider the mouth and cheeks. Attach the wings and antennae. Work the legs the same way as the Tiger and Bunny.

Dinosaur — Body

  1. Round 16 sc in MR. (6)
  2. Round 2inc in each st around. (12)
  3. Round 3sc, inc repeat around. (18)
  4. Round 42 sc, inc repeat around. (24)
  5. Round 53 sc, inc repeat around. (30)
  6. Round 614 sc, 3 dc inc (in light green), 13 sc. (33)
  7. Round 714 sc, 3 dc dec (in light green), 13 sc. (30)
  8. Rounds 8–12sc in each st around. (30)Spine: Join yellow yarn and sc down the center back up through Rnd 10, ch 5, turn, 4 sc in 2nd ch from hook, then work sl st, 4 hdc, sl st, 4 hdc, repeating this pattern up to the forehead. Fasten off and weave in the end.

Embroider the mouth and cheeks.

Frog — Body

  1. Round 16 sc in MR. (6)
  2. Round 2inc in each st around. (12)
  3. Round 3sc, inc repeat around. (18)
  4. Round 42 sc, inc repeat around. (24)
  5. Round 53 sc, inc repeat around. (30)
  6. Rounds 6–12sc in each st around. (30)Eyes: ch 4, 2 dc in 3rd ch from hook.Sew or glue small black pupils onto the plush eye pieces, then attach the eyes to the body. Embroider the mouth and cheeks. Work the legs the same way as the previous animals.

Putting it together

Step 1

Insert the finished Bunny body inside the finished Tiger body, wrong sides facing each other, and line up both tails at the center back.

Step 2

Work the paw-joining round through the Back Loop Only of the Tiger and the Front Loop Only of the Bunny simultaneously, following the puff stitch placement given above.

Step 3

Weave in the live yarn tail from the Bunny piece securely once the joining round is complete.

Step 4

Thread the ear tails through to the inside of each head and knot to secure, then embroider the facial details on each side with black cotton-blend yarn.

Step 5

For the bonus animals, attach ears, wings, antennae, tongues, or eyes using their yarn tails, then embroider mouths and cheeks as noted.

Step 6

Weave in every remaining loose end throughout the piece.

Marlene's notes

Note 01

Use a 4.0 mm hook for a tighter, more structured fabric or 4.5 mm if your velvet yarn is thicker; either way, keep your tension snug rather than tight so the finished piece can still invert.

Note 02

Move your stitch marker every round without fail, since there's no join or turning chain to help you track where a round starts in continuous spiral work.

Note 03

Stuff each body — tiger and bunny — before you attempt the joining round, since you won't have easy access to the inside once the two pieces are nested together.

Note 04

This pattern is written in US crochet terminology.

Note 05

Each body is worked in continuous spiral rounds — do not join or chain up unless a step tells you to turn for a flat row. Gauge isn't critical for this project; just crochet snugly enough that stuffing doesn't peek through the stitches, but loosely enough that the Bunny piece can turn inside out through the Tiger piece. Stitch count is given at the end of each round in parentheses. The Tiger and Bunny bodies are worked as separate, unstuffed pieces and joined together at the paw round — this is what creates the reversible effect.

Note 06

Finished size with the recommended yarn is approximately 10 cm (4").

Before you sit down

  • Check you have enough orange and white velvet-style yarn on hand — about 20-30g of each — since running short mid-body means an obvious color break.
  • Read through the paw-joining step before you finish either body, so you understand how the Back Loop Only and Front Loop Only work together before you're committed.
  • Set a stitch marker at the start of round 1 and keep moving it up, since both bodies are worked in continuous spirals with no join or turn.
  • Crochet a couple of test rounds to gauge your tension — you want it snug enough that stuffing won't peek through, but loose enough that the bunny body can still turn inside out through the tiger.

How the hours go

Tiger head/body
about 1-1.5 hours because it runs 9 rounds of shaping plus the extra rows beyond that to complete the full body
Bunny head/body and ears
about 1.5-2 hours because you're repeating the body shaping for a second full piece plus working four ears from separate chains
Joining, stuffing, and embroidery
about 1-1.5 hours because the Back Loop Only/Front Loop Only join takes care, and the stripes and eyebrows are all hand-embroidered afterward

Looking after it

  • Hand wash the finished toy in cool water with a gentle detergent, since velvet and chenille-style plush yarns can mat or lose their nap in a hot machine wash.
  • Reshape the ears and paws while damp and lay the piece flat to dry, away from direct heat, so the safety eyes and embroidered stripes keep their position as it dries.
FAQs

Asked on the glider

the ones that come up on the glider

Do I need to finish both the tiger and bunny bodies before joining them?

Yes, both full bodies need to be complete and stuffed before you attempt the paw-joining round. The join relies on lining up the Back Loop Only of the tiger with the Front Loop Only of the bunny simultaneously, which only works once both pieces exist.

What if my bunny body won't turn inside out through the tiger?

This usually means your tension is too tight on one or both pieces. Try a slightly looser stitch or move up to the 4.5 mm hook, since the pattern notes that gauge isn't critical but the fabric needs enough give for the flip.

How do I keep track of my rounds without a stitch marker slipping?

Move your marker up into the last stitch of each completed round rather than leaving it loose, and check it every few rounds against your stitch count. Since the body is worked in a continuous spiral, there's no natural stopping point to catch you if you lose your place.

Why are the two ears made differently?

The tiger ear starts from a chain of 4 with 2 dc worked into the 3rd chain from the hook, while the bunny ear starts from a longer chain of 7 with 5 dc, giving the bunny a longer, floppier ear shape. Working them from chains rather than in the round keeps them flat and gives each animal its own silhouette.

How much yarn should I set aside for the black embroidery details?

You only need a small amount of black cotton-blend yarn for the eyebrows, tiger stripes, and mouths, so a single small skein or leftover scrap is usually plenty. It's worth keeping the strand slightly separated for finer stripe lines against the plush background.