Intermediate 2-3 hours Worsted yarn

Worked on the glider, counted out loud —

Little plush chicken amigurumi crochet pattern

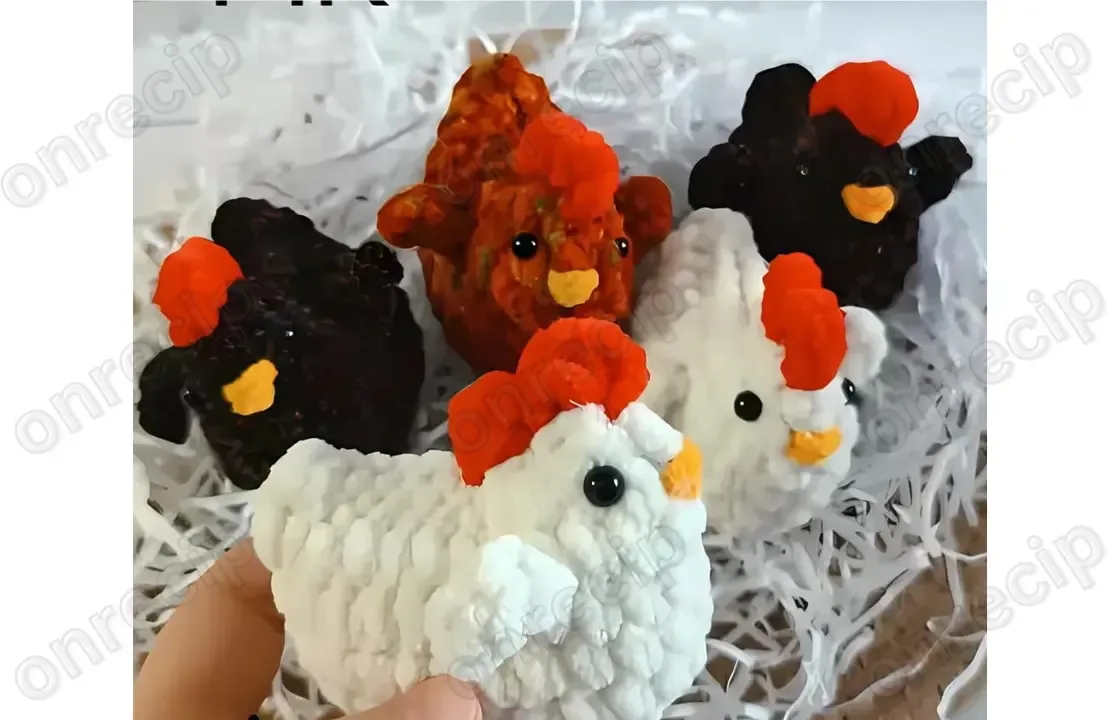
A quick plush chicken with a 5-round body and simple wings. About 2-3 hours, great for confident beginners.

Jump to the rounds

What this one is

This little chicken is made for the quiet stretch of an afternoon when you want something small and finished in your hands by evening. It suits anyone who likes a project that doesn't ask for a pattern binder and a pot of coffee just to get started - a gift for a kid's shelf, a basket filler, or a first toy amigurumi for someone easing into shaping rounds.

Your hands spend most of the time on plain single crochet rounds, with two short bursts of shaping at the start and a bit of careful counting when the wings go in. Between the increases, the sewing on of the toy eyes, and a little embroidery for the beak, you're looking at a project that comes together in a single sitting, maybe two if you like to stop and admire it. The entire toy is made in one piece, with the wings and comb crocheted directly onto the body - no separate pieces to sew on later. Using the listed materials, the finished toy comes out about 7 cm tall and 8 cm long, though your own size may vary a little depending on yarn, hook, and tension. Difficulty level: Easy.

Try it another way

This little chicken takes well to small changes. Swap the main color plush yarn for a different shade entirely and you get a whole new bird - try a soft gray for a more realistic look, or a bright color for something more toy-like. You could also keep the plush yarn for softness but work the comb and beak in a smooth cotton for contrast texture against the fuzzy body. If you want a slightly plumper chicken, work an extra round or two of plain single crochet after row 4, before the wings begin on row 5, which will lengthen the body without touching the shaping you already know works. For a set, make a few in different sizes by using a lighter or heavier weight yarn with the same 3.5 mm hook, keeping the stitch counts identical and letting the yarn do the resizing. This one's small enough to clip onto a bag or bootie lace, or you could skip the eyes and embroider a simpler face if it's meant for a very young child. However you shape it, the core rounds stay the same, so it's an easy pattern to keep coming back to with small tweaks each time.

There's a real satisfaction in watching a flat ring of 7 chains turn into a rounded little body in just two rows of increases - row 1 builds the oval base and row 2 doubles it out to 24 stitches, and suddenly you can feel the chicken shape in your palm. The wings are the fun part: worked right into the body with a few chains and a slip stitch, hdc, slip stitch combo, they give you two small three-dimensional shapes without any separate pieces to sew on later. Centering that fifth stitch between the wings on row 6 takes a bit of attention, but it's the kind of small precision that makes the finished chicken sit symmetrically instead of lopsided. It's a pattern that rewards you fast for not much fuss.
The rounds, in full

Written out, round by round

Intermediate2-3 hours3.5 mmWorsted

Bring to the porch

Everything this one takes, in the order you will reach for it.

  • Plush yarn in 3 colors, 120 m / 100 g (main color for the body, red for the comb, and a little orange for the beak embroidery)
  • 3.5 mm hook
  • 6 mm toy eyes
  • Needle for sewing parts
  • Scissors
  • Filler for toys (stuffing)
  • Crochet markers
  • Pins
  • Glue

Main Pattern

Before you begin Crochet in a spiral without lift stitches unless otherwise specified. Mark the beginning of the row with a crochet marker. Start crocheting with the main color and ensure the marker is in the center.

  1. Row 17 ch, from the second stitch from the hook inc, 4 sc, in the last stitch 4 sc, on the other side 4 sc, inc (16)
  2. Row 22 inc, 4 sc, 4 inc, 4 sc, 2 inc (24)
  3. Rows 3–424 sc (2 rows)
  4. Row 58 sc, wing (4 ch along them: sl st, sc, hdc, sl st into the base stitch), 9 sc, wing, 7 sc (24)
  5. Row 68 sc to the wing, 9 sc between the wings (the fifth stitch should be centered in front), after the wing 6 sc. End the row 1 sc earlier (23)

Marlene's notes

Note 01

Use the 3.5 mm hook as given and check your tension is snug enough that stuffing won't peek through the plush yarn, especially around the increase rounds.

Note 02

Keep a stitch marker moving with you through every round - plush yarn's fuzzy texture makes the first stitch of a round easy to lose track of.

Note 03

Sew the 6 mm toy eyes on before you close up the body, and stuff firmly but evenly as you go so the shaping from rows 1 and 2 doesn't collapse.

Note 04

Using the materials listed, the finished toy comes out about 7 cm tall and 8 cm long. Your toy may come out a different size depending on the yarn, hook, and crochet tension you use.

Before you sit down

  • Check you have enough of your main-color plush yarn on hand - one skein at 120 m / 100 g should easily cover the body with some left for finishing.
  • Set aside your red and orange scraps now so you're not hunting for them mid-project when it's time for the comb and beak.
  • Place a stitch marker at the start of round 1 before you begin the increases, since plush yarn can make stitches harder to spot by eye.
  • Read through row 5 and row 6 once before you start crocheting them - the wing placement and the centered fifth stitch are easier to follow if you know what's coming.
  • Have your pins and glue on hand for holding the comb and beak in place before you stitch or embroider them onto the finished body.

How the hours go

Body base, rows 1-2
about 15-20 minutes because the increases need careful counting to land on 16 then 24 stitches
Plain rounds and wings, rows 3-6
about 45-60 minutes because the wing chains and the centered stitch on row 6 slow you down a little
Finishing: eyes, comb, beak embroidery, stuffing
about 30-45 minutes because sewing small parts by hand and stuffing evenly takes patience

Looking after it

  • Hand wash your finished chicken in cool water with a gentle soap, since plush yarn tends to hold its softness better without a washing machine's agitation.
  • Reshape the body gently while damp and lay it flat to air dry away from direct heat, which keeps the plush fibers fluffy rather than matted.
FAQs

Asked on the glider

the ones that come up on the glider

How much plush yarn do I actually need?

One skein at 120 m / 100 g in your main color should be enough for the whole body with room to spare. The red and orange are only needed in small amounts for the comb and beak.

Can I use a different hook size?

The pattern is written for a 3.5 mm hook, and sticking with that size keeps your stitch counts and finished size matching the pattern. If you swap hooks, expect the chicken to come out a bit larger or smaller than intended.

Why does row 6 end one stitch earlier than row 5?

That's intentional shaping to bring the body toward closing at the top, and it's part of why the fifth stitch needs to sit centered between the wings. Just follow the stitch count given for that row and it will work out.

Do I need a stitch marker for this pattern?

Yes, it helps a lot with plush yarn since the fuzzy texture can hide your first stitch of the round. Move it up each round so you don't lose track partway through.

Where do the wings actually attach?

They're worked directly into row 5 and continued into row 6, so there's no separate wing piece to sew on afterward. You just work the chain and slip stitch combination right where the pattern tells you, along the body.

What size toy eyes does this pattern use?

The pattern calls for 6 mm toy eyes, which suit the small scale of this chicken. Sew them on before you finish stuffing so you have clear access from both inside and outside the body.