Intermediate 4-6 hours Worsted yarn

Worked on the glider, counted out loud —

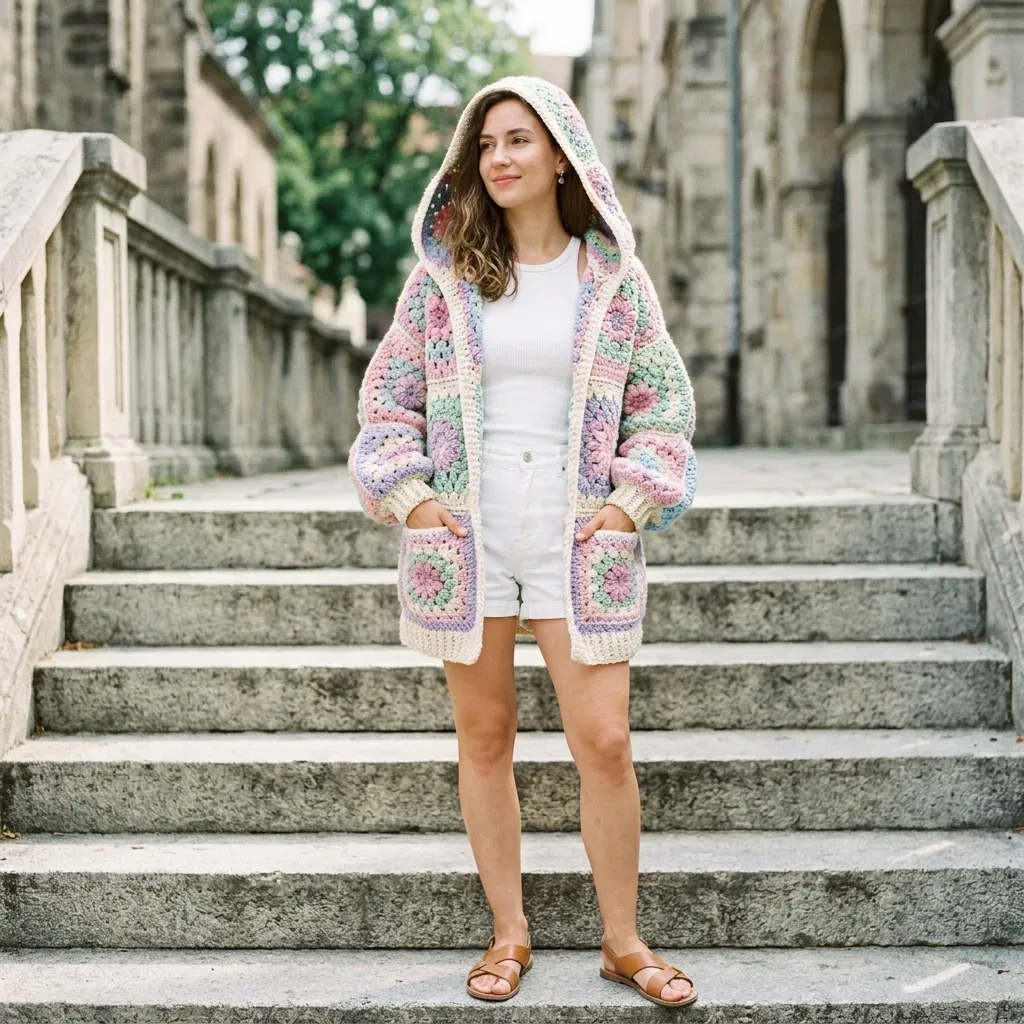
Pastel rainbow granny square hoodie crochet pattern

Oversized granny square hoodie for intermediate crocheters with pockets and a hood. Expect several evenings of squares plus a weekend

Jump to the rounds

What this one is

This one is for you if you've ever wanted a cardigan that feels like a hug and looks like confetti. Pull it on over a t-shirt, flip up the hood, and sink into a chair with tea close by. It suits the person who likes a project with a destination, not just a swatch that goes nowhere, and who doesn't mind a long runway to get there.

Your hands will spend most of this pattern making the same small, satisfying square again and again, 84 times in total, each one radiating pastel rounds out from a cream center. Once the pile is big enough, you shift to seaming panels, picking up stitches for ribbing, and setting sleeves. Plan on this stretching across several sittings rather than one weekend.

Try it another way

If the oversized fit isn't for you, the easiest change is yarn substitution rather than resizing, since the panel counts are locked to a 5-inch square. Try Paintbox Yarns Simply DK held double for a softer drape, or the WeCrochet Mighty Stitch Worsted if you want the subtle bloom and warmth that superwash wool brings to the squares. For color placement, keep cream as your unifying final round on every square, but shuffle the order of pink, lavender, mint, and baby blue as you radiate out from the center so some squares lead with blue and others with lavender, giving the finished panels a more scattered, less repetitive look. You could also swap the patch pockets out entirely for a plain front if you want a cleaner silhouette, since they're sewn on separately rather than built into the panel join. For a simpler project, make just the back and two fronts as a sleeveless vest, skipping the 16-square sleeves on each side and finishing the armholes with the same single crochet border used around the hood. The ribbed hem and cuffs will still give you that stretch and structure wherever you choose to end the piece.

There's real pleasure in the rhythm of 84 identical squares, each one a complete little lesson in chaining, double crochet, and working in the round, finished off with that cream final round that quietly unifies soft pink, lavender, mint, and baby blue. The satisfaction shifts once the squares become panels: you start to see the back, the fronts, and the hood take shape as actual garment pieces instead of a stack of motifs. Picking up the single crochet ribbing for the cuffs and hem, then shaping that cream border around both front edges and the hood opening, is where the project stops looking like a pile of squares and starts looking like something you'd wear out the door. It rewards patience with a genuinely wearable, oversized piece.
The rounds, in full

Written out, round by round

Intermediate4-6 hours6.0 mmWorsted

Bring to the porch

Everything this one takes, in the order you will reach for it.

  • Option 1: Lion Brand Pound of Love (100% acrylic, 1,020 yards per skein, worsted weight). This yarn offers excellent stitch definition, is machine washable, widely available in the pastel shades required, and very economical for a yardage-heavy project like this one.
  • Option 2: Paintbox Yarns Simply DK used double-stranded (100% acrylic, 137 yards per 50g ball). When doubled, DK weight gives a soft worsted gauge. This produces an especially soft drape while remaining machine washable, and the color range for pastels is fantastic.
  • Option 3: WeCrochet Mighty Stitch Worsted (80% acrylic, 20% superwash wool, 208 yards per 100g skein). The wool content gives beautiful stitch bloom and warmth. Still machine washable on gentle cycle with superior drape for a garment.
  • Choose any smooth worsted weight yarn that achieves the stated gauge. Avoid highly textured, thick-and-thin, or novelty yarns since the granny square lace structure will be obscured. Consistent plied yarns photograph and join most cleanly.

Yarn

  • Worsted weight, approximately 2,800 yards / 2,560 meters total

Break it down by color

  • Cream (Color A): approximately 1,100 yards / 1,006 meters
  • Soft Pink (Color B): approximately 300 yards / 274 meters
  • Lavender (Color C): approximately 250 yards / 229 meters
  • Mint Green (Color D): approximately 250 yards / 229 meters
  • Baby Blue (Color E): approximately 250 yards / 229 meters

Hook

  • US size J / 6.0 mm (adjust as needed to meet gauge)

Notions

  • Tapestry needle for seaming and weaving in ends
  • Scissors
  • Stitch markers
  • Rust-proof pins for blocking
  • Measuring tape

Panel distribution

Back panel = 20 squares (5 wide x 4 tall)

Left front = 10 squares (2 wide x 5 tall)

Right front = 10 squares (2 wide x 5 tall)

Left sleeve = 16 squares (2 wide x 8 tall)

Right sleeve = 16 squares (2 wide x 8 tall)

Hood = 10 squares (5 wide x 2 tall)

Pockets = 2 squares (1 each)

With first pastel color (your choice from B, C, D, or E), make a magic ring.

  1. Round 1Ch 3 (counts as first dc here and throughout granny square rounds), work 2 dc into ring, ch 2, (3 dc into ring, ch 2) 3 times, join with sl st to top of beginning ch-3. Fasten off. (4 clusters, 4 ch-2 corner spaces)Ch 1, sc in BLO of each sc across. Turn. (8 sc) Repeat Row 2 until cuff ribbing measures 8 inches (cuff circumference). Fasten off.Seam short ends together. Attach to sleeve cuff opening in same manner as hem ribbing, right side to right side. Make second cuff to match.
  2. Round 2Join same or different pastel color with sl st into any corner ch-2 sp. Ch 3, work 2 dc into same corner sp, ch 2, 3 dc into same corner sp (corner made), ch 1, (work corner in next corner sp, ch 1) 3 times, join with sl st to top of ch-3. Fasten off. (8 clusters total: 2 clusters per corner x 4 corners; 4 ch-1 spaces along sides)
  3. Round 3Join same or new pastel color into any corner ch-2 sp. Ch 3, 2 dc into same sp, ch 2, 3 dc into same sp (corner), ch 1, 3 dc into next ch-1 side sp (side cluster), ch 1, (corner in next corner sp, ch 1, side cluster in next ch-1 sp, ch 1) 3 times, join with sl st to top of ch-3. Fasten off. (12 clusters total: 2 per corner x 4 corners + 1 per side x 4 sides; 4 corner ch-2 spaces, 8 ch-1 spaces)
  4. Round 4Join same or new pastel color into any corner ch-2 sp. Ch 3, 2 dc into same sp, ch 2, 3 dc into same sp (corner), (ch 1, side cluster in next ch-1 sp) twice, ch 1, (corner in next corner sp, (ch 1, side cluster in next ch-1 sp) twice, ch 1) 3 times, join with sl st to top of ch-3. Fasten off. (16 clusters total: 2 per corner x 4 corners + 2 per side x 4 sides; 4 corner ch-2 spaces, 12 ch-1 spaces)
  5. Round 5Join Color A (cream) into any corner ch-2 sp. Ch 3, 2 dc into same sp, ch 2, 3 dc into same sp (corner), (ch 1, side cluster in next ch-1 sp) 3 times, ch 1, (corner in next corner sp, (ch 1, side cluster in next ch-1 sp) 3 times, ch 1) 3 times, join with sl st to top of ch-3. Fasten off Color A. (20 clusters total: 2 per corner x 4 corners + 3 per side x 4 sides; 4 corner ch-2 spaces, 16 ch-1 spaces)

Completed square has 5 clusters along each side edge (counting corner clusters) and measures 5 inches x 5 inches after blocking.

Make 84 squares varying pastel color combinations in rounds 1 through 4. Always finish round 5 with Color A.

Hem Ribbing

With Color A, ch 9.

  1. Round 1Sc in 2nd ch from hook and each ch across. Turn. (8 sc)
  2. Round 2Ch 1, sc in BLO of each sc across. Turn. (8 sc) Repeat Row 2 until ribbing measures 46 inches (the full circumference of the hem: back 25 inches + left front 10 inches + right front 10 inches + seam allowance 1 inch). Fasten off.Seam the short ends of the ribbing together to form a loop. Pin the ribbing loop to the hem edge of the garment with right side of ribbing facing right side of garment hem, slightly stretching the ribbing to match. Seam with slip stitch or whipstitch.

Center Front and Hood Border

With right side facing and Color A, begin at the lower right hem edge.

  1. Round 1Working up the right front edge, around the hood, and down the left front edge, work 1 sc in each ch-1 sp and cluster top along the front edges, and 1 sc per stitch around the hood opening, placing 3 sc in each outer corner. Place markers at the two lower hem corners and the two top corners where front meets hood. When you reach the bottom left hem corner, sl st to the first sc. Do not turn.
  2. Round 2Ch 1, sc in each sc around, working 3 sc into each marked outer corner. Join with sl st to first sc. Fasten off Color A.Weave in all border ends.

Checkpoint

Step by step: With Color A, ch 9.

After completing all 84 squares, block each one to 5 inches x 5 inches. Pin to measurements and mist with water, or steam block. Allow to dry fully before seaming. This step is essential to ensure all squares match before assembly.

Putting it together

Step 1

Weave in all remaining yarn ends securely.

Step 2

Wet blocking: Submerge the finished garment in cool water and gently squeeze out excess water (do not wring). Lay flat on blocking mats or clean towels. Pin to finished measurements: bust 46 inches, length 28 inches from shoulder, sleeve length 20 inches. Allow to dry completely (24 to 48 hours).

Step 3

Steam blocking alternative: Using a garment steamer, hover over each seam and square, pressing with your hand after steaming while the fabric is warm. Do not press the iron directly onto the yarn.

Step 4

Seam inspection: After blocking, check all seams under light. Reinforce any weak or gapping joins with a tapestry needle and Color A.

Marlene's notes

Note 01

Use stitch markers generously when assembling: the pattern asks you to mark the two lower hem corners and the two top corners where front meets hood before working the border rounds, and those markers are easy to lose track of in a pile of squares.

Note 02

Gauge on the granny square itself is mandatory here, not just a suggestion, since the whole panel layout is built on each square measuring exactly 5 inches after light blocking.

Note 03

When picking up stitches in BLO for the hem and cuff ribbing, keep your tension even across the whole 46-inch run so the finished loop seams onto the hem without puckering or gapping.

Before you sit down

  • Confirm you have enough of each color before you begin: roughly 1,100 yards of cream, 300 yards of soft pink, and 250 yards each of lavender, mint, and baby blue.
  • Make one granny square first and block it lightly; it needs to measure exactly 5 inches square, since every panel count depends on that.
  • Swatch the single crochet ribbing too, checking for 10 sc by 12 rows over 4 inches with Color A before committing to the full 46-inch hem length.
  • Read through the Panel distribution part in full before you start joining, so you know how many squares go into the back, each front, each sleeve, and the hood.

How the hours go

The 84 granny squares
about 8-10 hours total because each square is quick on its own, but the full count adds up across multiple color changes per square
Seaming panels and setting sleeves
about 3-4 hours because joining squares into the back, two fronts, two sleeves, and hood, then setting in sleeves, takes patience with shaping
Ribbing and border rounds
about 2-3 hours because the hem ribbing alone runs 46 inches in rows of 8 sc, plus the two-round front and hood border with corner shaping

Looking after it

  • Hand wash in cool water and lay flat to dry if you used the acrylic or Paintbox options; both are machine washable, but air drying flat protects the shape of the 84 seamed squares best.
  • If you chose the WeCrochet Mighty Stitch Worsted with its superwash wool content, wash on the gentle cycle as the yarn label allows, then reshape while damp and pin to the finished measurements before letting it dry completely.
FAQs

Asked on the glider

the ones that come up on the glider

Do I really need to make all 84 squares before I start assembling?

You don't have to finish every square before you start joining, but it helps to have the back panel's 20 squares and at least one front's 10 squares ready before you begin seaming, so you can confirm your layout matches the Panel distribution part. Many crocheters batch-make squares in color sets, then sort and join by panel.

What happens if my granny square doesn't come out to exactly 5 inches?

Since gauge is mandatory for this garment, a square that's off size will throw out every panel count, so go up or down a hook size from the suggested US J / 6.0 mm until your blocked square hits 5 inches by 5 inches. It's worth doing this check before you commit to 84 squares at the wrong tension.

Can I close the front with buttons instead of leaving it open?

The pattern is written with no closures for that relaxed open-cardigan look, but you could add buttons or ties along the cream single crochet border running down both front edges once it's complete. Just be sure to add buttonholes or loops as you work that border round, since it's worked in a single pass.

How long does the hem ribbing actually need to be?

The hem ribbing is worked to 46 inches total, which accounts for the back at 25 inches, each front at 10 inches, and a 1 inch seam allowance. Keep checking your ribbing length against a tape measure as you repeat Row 2, since it's easy to over- or under-shoot on a long straight piece.

Is this pattern beginner friendly if I've never made a garment before?

The individual granny square is genuinely beginner level if you can chain, double crochet, and work in the round. The intermediate rating comes entirely from the construction: seaming motifs into shaped panels, setting in sleeves, and picking up stitches for ribbing and borders, so go in prepared for that learning curve even if the squares themselves feel easy.

What finished size does this pattern produce?

As written, this pattern makes a size Medium with a closed bust of 46 inches and a total length of 28 inches from shoulder to hem. Since sizing is tied to the 5-inch square and the fixed panel counts, resizing means changing yarn weight or hook size to hit a different square measurement, not simply adding squares.