Intermediate 4-6 hours Chenille yarn

Worked on the glider, counted out loud —

Cozy Oversized Crochet Hoodie Cardigan Pattern

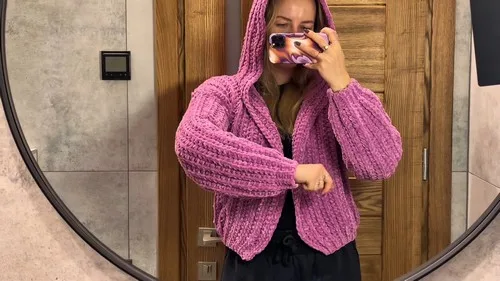
An oversized chenille hoodie cardigan for confident intermediate crocheters, worked flat in panels over several relaxed evenings.

Jump to the rounds

What this one is

This is the cardigan you reach for when the evening turns cool and you want something to wrap up in without fully committing to a coat. It suits the crocheter who likes a project with real structure -- panels to piece together, a hood that actually stays up -- but still wants to sink into a chair and work rows without checking a chart every second. It's for anyone who wants a hoodie that feels like it came from their own hands, not a rack.

Your hands spend most of their time in HDC and slip stitch, almost always worked in the back loop only, which gives the fabric its ribbed, cozy texture. You'll build two sleeve panels, two front panels with the hood extension worked right in, and one back panel, then join everything with a single crochet seam. Between the four main parts and the seaming, plan on spreading this over several sittings rather than knocking it out in one go.

Try it another way

Once you've made this hoodie once, it's an easy pattern to bend to your own taste. For a smaller, closer-fitting version, work your foundation chains a few stitches shorter than the 43 and 45 given here, keeping your row counts proportional so the panels still match at the seams. For a bolder look, work the two front panels in a contrasting shade from the back and sleeves, so the hood and front edges pop when the cardigan is worn open. If you want a lighter drape for milder weather, swap the chenille for a similar-weight yarn in cotton blend, though you'll want to swatch first since chenille's loft is part of what makes this piece feel so oversized and huggable. You can also play with the hood -- since it's built as an extension of the front panels rather than a separate piece, lengthening those rows slightly gives you a deeper, slouchier hood without any extra construction. And for a going-out version, consider working the assembly seam in a coordinating color so the single crochet seam becomes a visible design line rather than something to hide. Whatever you change, keep the back loop only habit consistent across every panel so the ribbed texture reads the same throughout.

The rounds, in full

Written out, round by round

Intermediate4-6 hours6 mmChenille

Bring to the porch

Everything this one takes, in the order you will reach for it.

  • Himalaya Dolphin Baby Chenille Yarn (approx. 6 balls or 600g)
  • 6 mm crochet hook
  • Lighter for sealing yarn ends
  • Stitch markers

Foundation

Chain 43.

  1. Round 1Skip 1 chain. HDC into the next 37 stitches. SS into the last 6 stitches. For Row 2Ch 1 and turn.SS BLO into the first 6 stitches.HDC BLO across remaining stitches.
  2. Round 3Ch 1 and turn. HDC BLO until 6 stitches remain. SS BLO into the next 5 stitches.SS through both loops in the final stitch.Repeat Repeat Rows 2 and 3 until you have 23 rows total.Finish Cut yarn, seal the end, and secure.

Front Panels with Hood (Make 2)

Body Section

Foundation

Chain 45.

  1. Round 1Skip 1 chain. SS into the next 4 stitches. HDC across remaining stitches. For Row 2Ch 1 and turn.HDC BLO until 4 stitches remain.SS BLO into the next 3 stitches.SS through both loops in the last stitch.
  2. Round 3Ch 1 and turn. SS BLO into the first 4 stitches. HDC BLO across remaining stitches.Repeat Repeat Rows 2 and 3 until you have 9 rows total.Hood Extension Hood Chain At the end of Row 9, chain 31.
  3. Round 10Turn your work. Skip 1 chain. HDC into the next 30 chains. Continue with HDC BLO across the original stitches.Finish with 4 SS ribbing stitches as before.Repeat Repeat Rows 2 and 3 (with the longer row length) for 9 additional rows, totaling 18 rows.

Back of Hood Shaping (Decrease Section)

Start Attach yarn to the first stitch of the 31-chain extension.

Ch 2.

Part 3

  1. Round 1HDC in the same stitch. HDC BLO across until 2 stitches remain. HDC2tog over the final 2 stitches.For Row 2 Ch 1 and turn.HDC2tog over the first 2 stitches.HDC BLO across remaining stitches.
  2. Round 3Ch 1 and turn. HDC BLO until 2 stitches remain. HDC2tog. Repeat Repeat Rows 2 and 3 for a total of 7 decrease rows.End with 23 stitches.Finish Cut yarn, seal the end, and secure.

Back Panel (Make 1)

Foundation

Chain 45.

Pattern Work 4 SS ribbing stitches.

HDC BLO across the remaining stitches.

Rows Repeat previous row sequence for 32 rows.

Finish Cut yarn, seal the end, and secure.

Assembly Layout Place the back panel with the good side facing up.

Place the front panels and sleeves with the bad side facing up.

Sleeve Seams Fold each sleeve panel in half with the bad side out.

Join long edges with a Single Crochet seam from armpit to wrist.

Repeat for the second sleeve.

Side and Shoulder Seams

Begin at the bottom ribbing and join the front panel to the back panel with a Single Crochet seam up to the armpit.

Continue joining the sleeve to the back panel around the armpit and over the shoulder.

Join the shoulder using the same seam method.

Repeat for the opposite side.

Hood Seam Turn hood inside out.

Seam the hood to the back panel’s neckline.

Seam the two hood halves together.

Finishing Weave in all ends.

Seal yarn tips if needed.

Turn the cardigan right side out.

Putting it together

Step 1

Weave in all ends.

Step 2

Seal yarn tips if needed.

Step 3

Turn the cardigan right side out.

Marlene's notes

Note 01

This pattern relies on back loop only stitching throughout, so get in the habit of checking your loop before every stitch -- it's an easy thing to lose track of in chenille, where the loops can be harder to see.

Note 02

Keep a lighter nearby for sealing yarn ends as you finish each panel; chenille sheds more than most fibers if the tips aren't melted down slightly.

Note 03

The decrease sections use HDC2tog at both edges across seven rows, so count carefully there -- losing track of a decrease row will throw off how your panels match up at the seam.

Before you sit down

  • Confirm you have enough Himalaya Dolphin Baby Chenille Yarn on hand -- about 6 balls or 600g -- before you chain your foundation row, since chenille dye lots can vary.
  • Set out your stitch markers ahead of time; you'll want them ready to mark row starts and loop placements as you work the back loop only sections.
  • Work a small swatch in HDC BLO with your 6 mm hook first to check your gauge feels right for an oversized, drapey fit.
  • Read through the first Foundation part fully, especially the skip-1-chain and slip stitch placement, before you commit to your opening chain of 43 or 45 stitches.

How the hours go

Foundation panels (sleeves and fronts)
about 1.5 to 2 hours per panel because the back loop only stitching is slow and deliberate, and the front panels carry extra rows for the hood extension
Back panel and shaping rows
about 1 hour because the seven decrease rows in Part 3 need careful HDC2tog counting at both edges to keep the taper even
Seaming and finishing
about 1 to 1.5 hours because joining five panels with a single crochet seam, weaving in ends, and sealing yarn tips all take patience even after the stitching is done

Looking after it

  • Hand wash the finished cardigan in cool water with a gentle detergent, since chenille yarns like this one can mat or shed more if machine agitated; press out excess water in a towel rather than wringing.
  • Dry flat on a clean towel, easing the panels and hood back into their oversized shape while damp, and store folded rather than hung so the shoulders and sleeve seams don't stretch over time.
FAQs

Asked on the glider

the ones that come up on the glider

How much yarn do I actually need for this cardigan?

The pattern calls for approximately 6 balls, or about 600g, of Himalaya Dolphin Baby Chenille Yarn. It's worth buying a touch extra from the same dye lot if you can, since chenille shades can shift slightly between batches.

Why does the pattern keep saying back loop only?

Working in the back loop only, or BLO, throughout the HDC and slip stitch sections is what gives this cardigan its ribbed, stretchy texture. If you stitch into both loops by habit, the fabric will lose that defined ridge look.

What does the hood actually look like once it's done?

The hood isn't a separate piece -- it's built as an extension right onto the two front panels. That means less seaming for you, and a hood that sits naturally against the shoulders once the panels are joined.

Why do I need a lighter for this project?

Chenille yarn tends to shed and fray at cut ends more than smoother fibers, so gently melting the yarn tips seals them and stops that shedding over time. Just pass the tip near the flame briefly rather than holding it in place.

What's happening in the seven decrease rows?

That section, in Part 3, uses HDC2tog at both the start and end of each row across seven rows to taper the panel gradually. It's the shaping that gives the piece its fitted transition points, so it's worth counting rows carefully there.

How do I join all the panels together at the end?

Every piece -- the two sleeves, two front panels with hoods, and one back panel -- gets joined using a single crochet seam. Take it slow and match your stitch counts panel to panel so the seams sit flat rather than puckering.