Intermediate 15-20 hours Worsted yarn

Worked on the glider, counted out loud —

Ocean blue granny star baby bunting crochet pattern

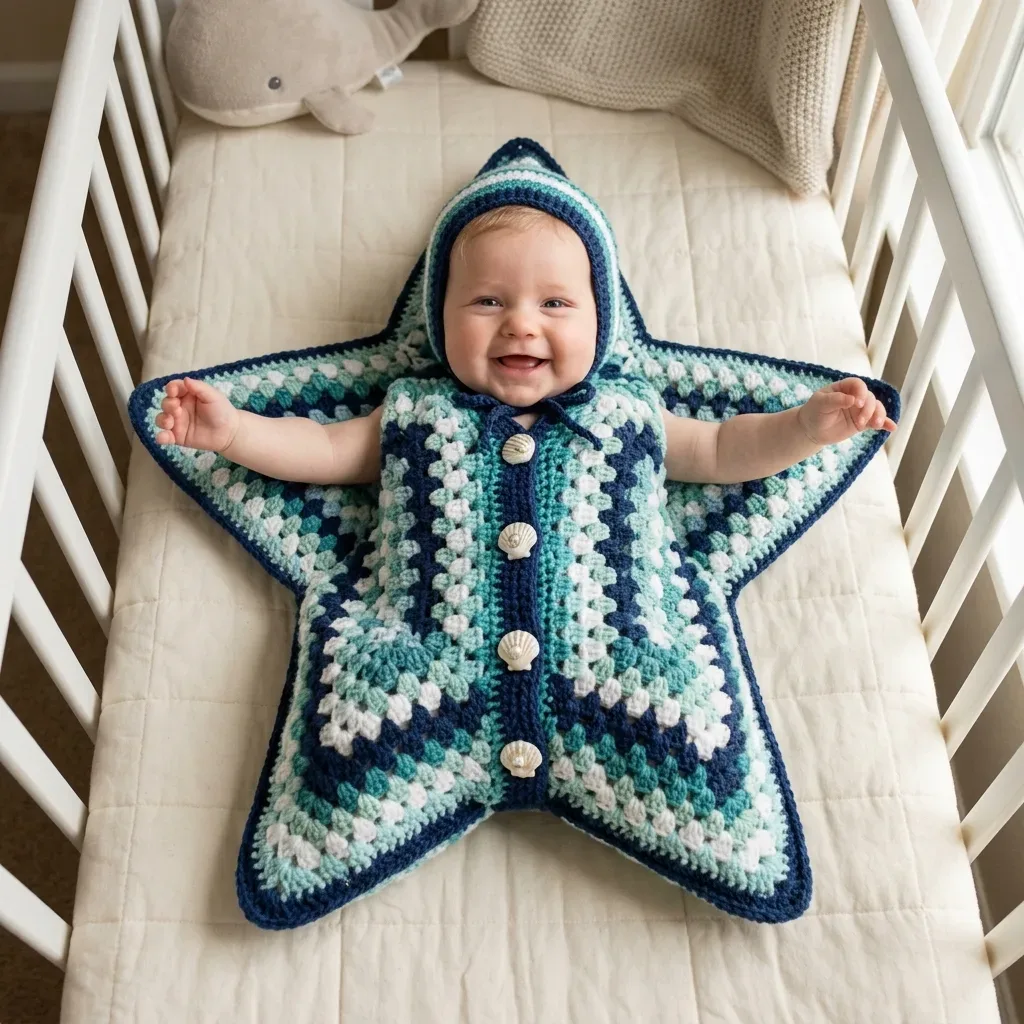
Intermediate star-shaped bunting in ocean stripes with a pointed hood. Allow 15-20 hours, perfect for a special baby gift.

Jump to the rounds

What this one is

You know the baby on your list who already has three blankets and doesn't need a fourth. This bunting is for that baby, the one whose parents want something that looks like nothing else in the nursery. The star shape with its five points is a bit of a showpiece, and the little pointed hood echoing those star tips makes it feel considered rather than just cozy.

Your hands will spend most of their time on the granny cluster stitch, working rounds that radiate outward in navy, teal, seafoam, and white, two rounds of each color before the sequence repeats. You join each round invisibly, work into chain spaces for the clusters, and shape the hood with dc2tog decreases late in the piece. Between the body, the hood shaping, and all that seaming and end-weaving, plan on 15 to 20 hours start to finish.

Try it another way

If you want a smaller bunting, work the same Main Pattern rounds but stop a round or two earlier before the hood shaping begins, keeping an eye on your stitch counts as you go. For a different mood entirely, swap the ocean palette: keep the two-rounds-per-color rhythm but run through sunset tones or a single tonal gradient instead of navy, teal, seafoam, and white. You can also hold Paintbox Yarns Simply DK double for a plushier, denser fabric if you want more warmth than the open cluster weave gives on its own, or choose Caron Simply Soft if you'd rather keep the drape light with a bit of sheen. The five seashell buttons are a nice nod to the ocean theme, but any 3/4 inch shank button works if you want to match a different color story. If you're making this for a baby who's already pulling up on furniture rather than lying still, consider sizing the armholes at the two side points a touch looser when you seam, since the star shape gives you some flexibility there without changing the stitch pattern itself.

There's something quietly satisfying about watching a flat star grow into a cocoon. You work the granny clusters round after round, watching the four-color sequence ripple outward like water rings, and then the moment comes where you fold the star in half and start seaming two of the five points into armholes. The hood shaping, with its dc2tog decreases pulling the stitch count down row by row, rewards you with a hood that actually comes to a point instead of a blob. And because the cluster stitch leaves a slightly open weave, you get a piece that reads as airy and breathable rather than bulky, which matters more than most patterns admit when you're making something for a baby to sleep in.
The rounds, in full

Written out, round by round

Intermediate15-20 hours6.0 mmWorsted

Bring to the porch

Everything this one takes, in the order you will reach for it.

Yarn

  • Worsted weight, 100% acrylic or acrylic-wool blend
  • Color A (Navy): Approximately 180 yards (165 m)
  • Color B (Teal): Approximately 160 yards (146 m)
  • Color C (Seafoam): Approximately 160 yards (146 m)
  • Color D (White): Approximately 140 yards (128 m)

Total yardage

  • Approximately 640 yards (585 m)

Hook

  • US Size J-10 / 6.0 mm crochet hook

Notions

  • Yarn needle for seaming and weaving ends
  • 5 seashell-shaped shank buttons, approximately 3/4 inch (19 mm) diameter
  • At least 6 stitch markers
  • Scissors

Yarn Suggestions

  • Lion Brand Vanna’s Choice works beautifully for this project. Caron Simply Soft gives a lovely drape with slight sheen. Paintbox Yarns Simply DK held double creates a plush, dense fabric. Any worsted weight yarn that achieves gauge will work. Prioritize machine washability and softness for baby items.

Main Pattern

  1. Round 1(RS): Dc into 4th ch from hook (beg ch-3 counts as first dc). Dc in each ch across. Ch 3, turn. (31 dc including beg ch-3)Chain 2 (does not count as stitch). Work 10 dc into magic ring. Join with sl st to first dc. Pull tail to close ring. (10 dc)Step by step: Checkpoint: You should have a small flat circle of 10 dc.
  2. Round 2(WS): Dc in each dc across. Ch 3, turn. (31 dc)Chain 2 (does not count as stitch). Work 1 cl into the first dc of Round 1. Chain 2. [Work 1 cl into the next dc, chain 2] 4 times. You now have 5 clusters each separated by a ch-2 space. These 5 ch-2 spaces are your star points. Place a stitch marker in each ch-2 space. Join with sl st to top of first cl. (5 cl, 5 ch-2 point spaces)
  3. Round 3Color B Join Color B. Dc in each dc across. Ch 3, turn. (31 dc)Chain 2. Work (cl, ch 2, cl) into the first marked ch-2 point space. Chain 1. [Work (cl, ch 2, cl) into next marked ch-2 point space, chain 1] 4 times. Join with sl st to top of first cl. Move markers to the ch-2 point spaces. (10 cl, 5 ch-2 point spaces, 5 ch-1 side spaces)
  4. Round 4Color B Dc in each dc across. Ch 3, turn. (31 dc)Join Color B with standing dc in any ch-2 point space. Chain 2. Work (cl, ch 2, cl) into the same ch-2 point space. Chain 1. Work 1 cl into the ch-1 side space. Chain 1. [Work (cl, ch 2, cl) into next ch-2 point space, chain 1. Work 1 cl into next ch-1 side space, chain 1] 4 times. Join with sl st to first cl. Move markers. (15 cl, 5 ch-2 point spaces, 10 ch-1 side spaces)
  5. Round 5Color C Join Color C. Dc in each dc across. Ch 3, turn. (31 dc)Chain 2. Work (cl, ch 2, cl) into the first ch-2 point space. Chain 1. [Work 1 cl into each ch-1 side space, chain 1 between each] until next ch-2 point space (2 cl in side spaces). Work (cl, ch 2, cl) into ch-2 point space. Chain 1. Rep from bracket around. Join with sl st to first cl. (25 cl, 5 ch-2 point spaces, 20 ch-1 side spaces)
  6. Round 6Color C Dc in each dc across. Ch 3, turn. (31 dc)Join Color C. Work point shells at all 5 points. Work 3 cl in side spaces on each of the 5 sides. (35 cl, 5 ch-2 point spaces, 30 ch-1 side spaces)
  7. Round 7Color D Join Color D. Dc in each dc across. Ch 3, turn. (31 dc)Work point shells at all 5 points. Work 4 cl in side spaces on each of the 5 sides. (45 cl, 5 ch-2 point spaces, 40 ch-1 side spaces)
  8. Round 8Color D Dc in each dc across. Ch 3, turn. (31 dc)Join Color D. Work point shells at all 5 points. Work 5 cl in side spaces on each of the 5 sides. (55 cl, 5 ch-2 point spaces, 50 ch-1 side spaces)
  9. Round 9Color A Join Color A. Dc in each dc across. Ch 3, turn. (31 dc)Work point shells at all 5 points. Work 6 cl in side spaces on each of the 5 sides. (65 cl, 5 ch-2 point spaces, 60 ch-1 side spaces)
  10. Round 10Color A Dc in each dc across. Ch 3, turn. (31 dc)Join Color A. Work point shells at all 5 points. Work 7 cl in side spaces on each of the 5 sides. (75 cl, 5 ch-2 point spaces, 70 ch-1 side spaces)

Hood Shaping Begins

  1. Round 11Color B Join Color B. Dc2tog over first 2 dc. Dc in each dc to last 2 dc. Dc2tog over last 2 dc. Ch 3, turn. (29 dc)Work point shells at all 5 points. Work 8 cl in side spaces on each of the 5 sides. (85 cl, 5 ch-2 point spaces, 80 ch-1 side spaces)
  2. Round 12Color B Dc2tog over first 2 dc. Dc in each dc to last 2 dc. Dc2tog over last 2 dc. Ch 3, turn. (27 dc)Join Color B. Work point shells at all 5 points. Work 9 cl in side spaces on each of the 5 sides. (95 cl, 5 ch-2 point spaces, 90 ch-1 side spaces)
  3. Round 13Color C Join Color C. Dc2tog over first 2 dc. Dc in each dc to last 2 dc. Dc2tog over last 2 dc. Ch 3, turn. (25 dc)Work point shells at all 5 points. Work 10 cl in side spaces on each of the 5 sides. (105 cl, 5 ch-2 point spaces, 100 ch-1 side spaces)
  4. Round 14Color C Dc2tog over first 2 dc. Dc in each dc to last 2 dc. Dc2tog over last 2 dc. Ch 3, turn. (23 dc)Join Color C. Work point shells at all 5 points. Work 11 cl in side spaces on each of the 5 sides. (115 cl, 5 ch-2 point spaces, 110 ch-1 side spaces)
  5. Round 15Color D Join Color D. Dc2tog over first 2 dc. Dc in each dc to last 2 dc. Dc2tog over last 2 dc. Ch 3, turn. (21 dc)Work point shells at all 5 points. Work 12 cl in side spaces on each of the 5 sides. (125 cl, 5 ch-2 point spaces, 120 ch-1 side spaces)
  6. Round 16Color D Dc2tog over first 2 dc. Dc in each dc to last 2 dc. Dc2tog over last 2 dc. Ch 3, turn. (19 dc)Join Color D. Work point shells at all 5 points. Work 13 cl in side spaces on each of the 5 sides. (135 cl, 5 ch-2 point spaces, 130 ch-1 side spaces)
  7. Round 17Color A Join Color A. Dc2tog over first 2 dc. Dc in each dc to last 2 dc. Dc2tog over last 2 dc. Ch 3, turn. (17 dc)Work point shells at all 5 points. Work 14 cl in side spaces on each of the 5 sides. (145 cl, 5 ch-2 point spaces, 140 ch-1 side spaces)
  8. Round 18Color A Dc2tog over first 2 dc. Dc in each dc to last 2 dc. Dc2tog over last 2 dc. Ch 3, turn. (15 dc)Join Color A. Work point shells at all 5 points. Work 15 cl in side spaces on each of the 5 sides. (155 cl, 5 ch-2 point spaces, 150 ch-1 side spaces)
  9. Round 19Color B Join Color B. [Dc2tog] twice. Dc in each dc to last 4 dc. [Dc2tog] twice. Ch 3, turn. (11 dc)Work point shells at all 5 points. Work 16 cl in side spaces on each of the 5 sides. (165 cl, 5 ch-2 point spaces, 160 ch-1 side spaces)
  10. Round 20Color B [Dc2tog] twice. Dc in each dc to last 4 dc. [Dc2tog] twice. Ch 3, turn. (7 dc)

This is the final body round. Work point shells at all 5 points. Work 17 cl in side spaces on each of the 5 sides. (175 cl, 5 ch-2 point spaces, 170 ch-1 side spaces)

  1. Round 21Color C Join Color C. [Dc2tog] 3 times. Dc in last dc. (4 dc) . Do not turn.Fasten off, leaving a 12-inch (30 cm) tail for seaming.

Setup Ring

Using Color A, make a magic ring (also called an adjustable ring).

The General Rule for All Remaining Body Rounds

  1. Round 1From here, the pattern follows a predictable formula: At each star point (ch-2 space): Work (cl, ch 2, cl). Chain 1.
  2. Round 2Into each ch-1 side space between two consecutive points: Work 1 cl. Chain 1.
  3. Round 3Each round adds 1 additional side cluster per side section. With 5 sides, each round adds 5 clusters to the total count.

Border Round (Color A)

Join Color A. Work 1 sc into each cl and 1 sc into each ch-1 side space around. At each ch-2 point space, work (sc, ch 2, sc). Join with sl st to first sc. Fasten off and weave in ends. (approximately 350 sc plus 5 ch-2 corners)

Checkpoint: The finished flat star should measure approximately 24 inches (61 cm) from one outer point tip to the opposite outer point tip. The star should have crisp, well-defined points and lie flat without curling.

Putting it together

Step 1

Weave in all yarn ends securely on the wrong side, weaving each tail in at least two directions.

Step 2

Wet blocking: Soak the finished bunting in cool water with a small amount of wool wash or gentle soap for 15 to 20 minutes. Gently squeeze out water without wringing. Roll in a dry towel to remove excess moisture. Pin to a foam blocking mat in a star shape with all 5 points stretched to their full length. Allow to dry completely flat, approximately 24 to 48 hours depending on humidity.

Step 3

Blocking opens the granny cluster lacework slightly, evens the color stripe transitions, and sets the star points crisp and sharp. I highly recommend this step. It will noticeably improve the finished appearance.

Step 4

Attach buttons after blocking and drying are complete.

Marlene's notes

Note 01

Use the US J-10 / 6.0 mm hook and check your gauge swatch against it; a cluster-plus-space measuring off from roughly 1.5 inches wide will throw off how the five points line up for seaming.

Note 02

Keep your stitch markers in the ch-2 point spaces from the moment you place them, since losing track of even one of the five points makes the later fold-and-seam step much harder to true up.

Note 03

Carry four colors across the body in the two-rounds-each sequence, and weave in every color-change tail in at least two directions on the wrong side rather than leaving them for one big session at the end.

Before you sit down

  • Lay out your four yarns and confirm you have the approximate yardage on hand: 180 yards of Navy, 160 of Teal, 160 of Seafoam, and 140 of White, since running short mid-stripe means an awkward dye-lot hunt.
  • Make the gauge swatch first. Chain 16 and work 8 rows of double crochet, checking against 14 dc and 8 rows to 4 inches, and size your hook up or down before you commit to the Setup Ring.
  • Set aside at least 6 stitch markers before you reach the round where you mark the 5 ch-2 point spaces, since you'll want them in place the moment those spaces appear.
  • Read through the Hood Shaping Begins part before you get there, so the dc2tog decreases at the start and end of each row, alongside the point shells, don't catch you by surprise mid-round.

How the hours go

Main Pattern (flat star body)
about 5-6 hours because it covers 10 rounds of building the star from a 10-dc magic ring up through the full cluster rounds
Hood Shaping Begins
about 4-5 hours because 11 rounds of dc2tog decreases and point shells across all five points take careful attention row by row
Seaming, border, and finishing
about 6-9 hours because folding the star, whipstitching the back seam, attaching the hood, adding the Border Round in Color A, and weaving in every color-change end all add up

Looking after it

  • Hand wash in cool water with a gentle soap or wool wash for 15 to 20 minutes, then squeeze out water without wringing and roll in a dry towel to lift out the rest.
  • Pin the bunting into its star shape on a foam blocking mat with all 5 points stretched out, and let it dry flat for 24 to 48 hours before storing it folded in a drawer rather than hung, since acrylic and acrylic-wool blends can stretch out of shape on a hanger.
FAQs

Asked on the glider

the ones that come up on the glider

Why does the bunting have arm openings instead of sleeves?

Two of the five star points become armholes once you fold the star and seam the back, which gives baby room to move their arms freely while staying tucked inside the cluster-stitch body. It's a deliberate trade for mobility over a fully enclosed sleep sack.

Do I need to be comfortable with color changes before trying this?

Yes, you'll be managing four colors in a two-rounds-each repeating sequence, so some prior experience changing colors cleanly at the join will help. If you haven't done a lot of color work, practice the join and carry technique on a small swatch first.

What if my gauge swatch doesn't match the stated measurements?

Adjust your hook size up or down until your 16-chain, 8-row swatch lines up with 14 dc and 8 rows to 4 inches. Since the whole star depends on even cluster spacing for the hood and seams to fit, it's worth taking the extra time here.

How do I know where to place my stitch markers?

Once you work the 5 clusters separated by ch-2 spaces in the Main Pattern, those ch-2 spaces are your star points, and that's exactly where the pattern calls for a stitch marker in each one. Keep at least 6 markers on hand so you're not scrambling partway through.

Can I use a different fiber than acrylic?

The pattern calls for worsted weight acrylic or an acrylic-wool blend for easy washability, which matters for baby items. Any worsted weight yarn that hits the stated gauge will work, so a machine-washable wool blend is a reasonable swap if you prioritize softness.

Why does the hood need its own shaping instead of just folding fabric over?

The Hood Shaping Begins part uses dc2tog decreases at both ends of each row across 11 rounds, which tapers the hood down to a point that echoes the star tips below rather than leaving it boxy. It's the same logic as shaping a granny square hat crown, just worked flat before seaming.