Confident Beginner 6-9 Hours Worsted yarn

Worked on the glider, counted out loud —

Ocean Blue Daisy Granny Square Pouch Crochet Pattern

Crochet an Ocean Blue Daisy Granny Square Pouch using twelve sunburst squares, a navy zip band, and a wrist strap. A confident beginner favorite!

Jump to the rounds

Before you sit down

Crochet twelve daisy squares, each starting from a magic ring center in orange with cream petals.

Work the border rounds on every square, alternating deep teal and soft aqua and forming corners with shell stitches.

Arrange six squares for the front panel and six for the back panel in your preferred color layout.

Whipstitch the squares together edge to edge using cream yarn and a tapestry needle to form both panels.

Join the front and back panels along the sides and bottom, leaving the top open for the zipper.

Sew the navy zipper band across the top opening using a sewing needle and thread.

Attach the D-ring and swivel clasp to the cream wrist strap, then secure the strap to the pouch.

Add the optional lining fabric inside for a cleaner finish if desired.

What this one is

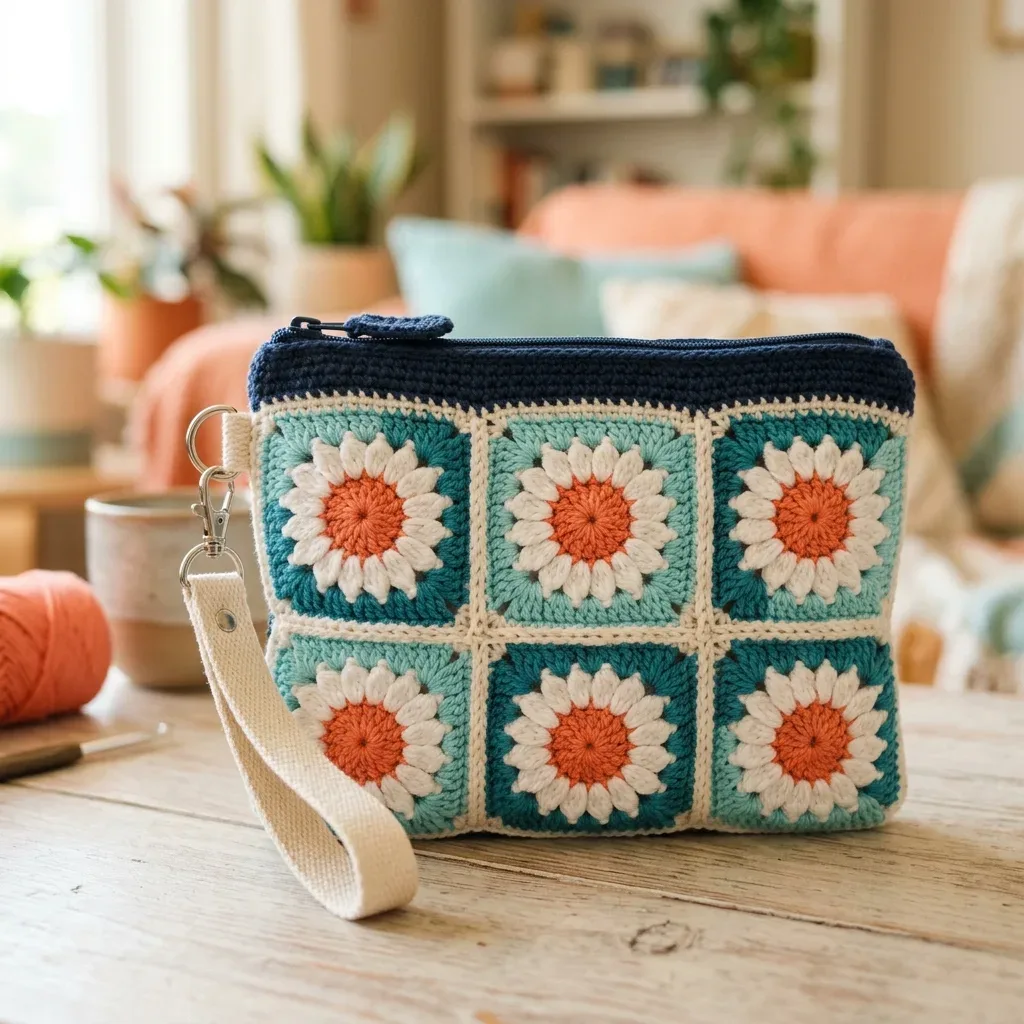
This Ocean Blue Daisy Granny Square Pouch is built from twelve cheerful sunburst daisy squares, each one blooming with an orange center, a ring of cream petals, and a border that alternates between deep teal and soft aqua. Six squares form the front and six form the back, all topped with a navy zip band and a cream wrist strap on a swivel clasp. It's the kind of project that feels like a little garden you can carry, perfect for crocheters who love granny squares but want something with real, wearable purpose.

You'll rely on core techniques you probably already know: the magic ring to start each daisy center, basic double crochet and single crochet, corner shells to square off the border rounds, and a whipstitch join to connect all twelve squares with cream yarn. Rated Confident Beginner, this pattern rewards patience rather than complicated stitch skills, since each square takes only 25 to 40 minutes and the whole project runs about 6 to 9 hours including assembly and finishing.

Once assembled, the finished pouch measures a generous 9 inches wide by 7 inches tall, with each daisy square landing at a tidy 3 inches square after the cream border round. The alternating teal and aqua borders give it a soft ombré-like rhythm, while the navy band and cream strap pull the whole palette together. It makes a lovely handmade gift, a market-stall favorite, or simply a sunny little accessory for your own everyday carry.

Variations

This pattern is endlessly customizable once you understand the daisy square formula. For a moodier palette, swap Color A (orange) for a mustard yellow and use navy and slate gray for the border rounds instead of teal and aqua — instant autumn vibes. A beachy version could use coral centers with white petals and alternating turquoise and seafoam borders, finished with a natural jute-look cotton strap. If you want a monochrome look, work every square in different shades of the same color family, which highlights the daisy shape itself rather than contrasting borders. Sizing is simple to adjust because the whole pouch is built from the 3-inch squares. For a larger clutch, add a third row of squares front and back (nine per side instead of six) to gain roughly 3 extra inches of height, or work four squares across instead of three for a wider 12-inch pouch — just remember to size your zipper and navy band to match the new width. For a mini coin purse, reduce to four squares total (two front, two back) and use a shorter 6-inch zipper. Yarn-wise, Lily Sugar'n Cream, Paintbox Yarns Cotton Aran, and Bernat Handicrafter Cotton all work beautifully, but a mercerized cotton like Scheepjes Catona (in the same worsted weight if held doubled, or swapped to a comparable Aran-weight cotton) will give your daisies a lovely subtle sheen. For a cozier, non-cotton version, a worsted acrylic or acrylic-cotton blend keeps the structure but adds softness — just add a lining fabric to help the shape hold, especially if you go with a drapier yarn.

I adore how this pouch turns a simple granny square into something joyful — that pop of orange center surrounded by cream petals just makes me smile every time I finish one. Working the magic ring for each daisy center feels satisfying and quick, and once you've made two or three squares, the corner shells and border rounds become almost meditative. Alternating the deep teal and soft aqua borders keeps the process from feeling repetitive, since you're always watching a new color combination take shape. I also love that the whipstitch join, worked through the back loops with cream yarn, gives such a clean, tidy finish between squares — no bulky seams fighting for space. And that final step, attaching the navy zip band and swiveling the clasp onto the cream strap, is genuinely exciting; it's the moment your pile of little flowers becomes a real, usable pouch. This is a project that rewards you at every stage, not just at the very end.

Common mistakes

  • Pulling the magic ring closedTug each loop of the magic ring individually after your Round 1 stitches are worked, then pull the tail firmly until the hole disappears completely before weaving in the end.
  • Working the corner (2 dc, ch 3, 2 dc)Place a stitch marker in each corner space as you complete a round so you can find it instantly on the next round, keeping your corners aligned square after square.
  • Mixing up the teal and aqua borderLay out all twelve squares in your planned front and back layout before joining, and keep a small note of which round color goes first so every square is consistent.
  • Whipstitching through both loopsSlow down on your first join and double check you're only catching the back loop of each matching stitch pair — this keeps the seam flat and nearly invisible.
  • Gauge drifting so squares finish largerCheck your gauge against 16 sc by 9 rows equaling 4 inches before starting all twelve squares, and size your hook up or down half a millimeter if needed.
  • Sewing the navy zip band on unevenlyPin the zipper in place along the top edge first, checking that both sides sit symmetrically, before sewing with your sewing needle and thread.

The rounds, in full

Written out, round by round

Confident Beginner6-9 Hours5.0 mmWorsted

Materials

Everything this one takes, in the order you will reach for it.

Yarn

  • Worsted weight (Aran / #4) cotton in five colors. You only need small amounts of each, so one ball per color is plenty.
  • Color A (Orange): Flower centers
  • Color B (Cream/Off-white): Petals, ring, border, and joins
  • Color C (Deep Teal): Square borders
  • Color D (Light Aqua): Square borders
  • Color E (Navy): Top band
  • Great yarn choices include Lily Sugar’n Cream, Paintbox Yarns Cotton Aran, or Bernat Handicrafter Cotton. Any smooth worsted cotton with good stitch definition works beautifully.

Hook

  • 5.0 mm (US H-8)

Additional Supplies

  • Tapestry needle
  • Scissors
  • Stitch markers
  • 9 inch (23 cm) navy zipper
  • Sewing needle and thread
  • One D-ring plus swivel lobster clasp
  • Approximately 6 inches (15 cm) cream cotton webbing for the strap
  • Lining fabric (optional)

keep this to hand

Abbreviations

US crochet terms, as used in this pattern.

  1. chchain
  2. sl stslip stitch
  3. scsingle crochet (UK: dc)
  4. hdchalf double crochet (UK: htr)
  5. dcdouble crochet (UK: tr)
  6. st(s)stitch(es)
  7. spspace
  8. reprepeat
  9. RS/WSright side/wrong side
  10. MRmagic ring
  11. Important reminderThe ch-3 that begins a double crochet round counts as the first dc throughout this pattern.

Pattern Instructions

Special Stitches Explained

Magic Ring (MR): This is an adjustable loop worked into the center of Round 1, then pulled tight to close the hole completely. If you have never done a magic ring before, it is easier than it sounds!

Corner: Worked as (2 dc, ch 3, 2 dc) into one stitch on the border round. This is what transforms the circle into a square.

Whipstitch Join: With a tapestry needle and cream yarn, sew through the back loops of matching stitches on two squares held side by side. This creates a flat, tidy seam that barely shows.

Pattern Notes Before You Begin

The pouch is made of two flat panels, a front and a back, each containing six daisy squares arranged 3 across by 2 down.

Make 12 squares total: 6 with a Deep Teal border (Color C) on Round 4 and 6 with a Light Aqua border (Color D) on Round 4. This creates the checkerboard effect.

Rounds 1 through 3 are identical for every square. Only the Round 4 border color changes.

Work in continuous joined rounds, fastening off and weaving in ends as you change colors for the cleanest look.

Pro tip: Block your squares lightly to 3 inches (7.5 cm) before joining. It makes seaming so much easier and gives your finished pouch a polished, professional look.

The Daisy Square Pattern

Make 12 squares total. Six with Deep Teal (C) on Round 4 and six with Light Aqua (D) on Round 4. Rounds 1 through 3 and Round 5 are identical for every square.

  1. Round 1(Orange, Color A) Into a magic ring: ch 3 (counts as first dc), 11 dc into the ring, pull the ring closed, sl st to top of beginning ch-3. (12 dc)
  2. Round 2(Cream, Color B) Join Cream to any st. Ch 3, dc in same st, then 2 dc in each st around, sl st to top of beginning ch-3. (24 dc)
  3. Round 3(Cream, Color B) Ch 1, sc in same st, sc in each st around, sl st to first sc. This sets the petal ring. (24 sc)
  4. Round 4(Deep Teal, Color C OR Light Aqua, Color D) Join border color to any st. Ch 3, dc in next 4 sts, (2 dc, ch 3, 2 dc) in next st (corner made), dc in next 5 sts; rep from twice more, (2 dc, ch 3, 2 dc) in next st, sl st to top of beginning ch-3. (36 dc and 4 corner spaces)
  5. Round 5(Cream, Color B) Join Cream to any corner ch-3 sp. Ch 1, (sc, ch 2, sc) in same sp, sc in each st to next corner, (sc, ch 2, sc) in corner sp, sc in each st to next corner; rep from around, sl st to first sc. Fasten off and weave in ends. (44 sc and 4 corner spaces)Hold two squares side by side, wrong sides together, right sides facing out. With Cream yarn and a tapestry needle, whipstitch through the back loops of matching stitches from corner to corner to join. Join 3 squares into a row.Whipstitch the lower edge of the top row to the upper edge of the bottom row in Cream, lining up the seams carefully. You now have one 3×2 panel. (1 panel complete)Step 4: Repeat for the Back Make the second panel exactly the same way. (2 panels total)The cream Round 5 on every square already frames each daisy, so the joins read as neat cream lines across the panel. Before adding the top band, settle the edges with one quick round.With Cream yarn and RS facing, join to any edge st of a finished panel. Ch 1, sc evenly around all four sides, working (sc, ch 2, sc) in each of the four outer corners. Sl st to first sc. Keep the count even along the top edge for the band to come. (approximately 39 sc across the top edge of each panel)Helpful tip: "Sc evenly" means about 9 sc along each square edge plus the corner stitches. Aim for 39 sc across three squares so the navy band lines up neatly.With RS facing, join Navy to the top-right st of a panel. Ch 1, sc across the top edge. (39 sc)Band Rows 2 through 6 (Navy, Color E)Ch 1, turn, sc in each st across. Repeat for a band about 1 inch (2.5 cm) tall, then fasten off. Work a matching band on the second panel. (39 sc per row)Hold front and back with wrong sides together, right sides facing out, navy bands aligned at the top.With Cream yarn, sc through both layers across the bottom, then up each side, stopping at the base of the navy band so the top stays open. (approximately 39 sc base plus 26 sc each side)Go mini: Switch to DK cotton and a 4.0 mm hook for a card-sized coin purse.Skip the strap: For a flat zip pouch, or lengthen the webbing for a crossbody clip.Troubleshooting TipsSeams looking bumpy? Whipstitching through the back loops only creates the flattest seam. Take your time and keep your tension even.

Building the Front and Back Panels Step 1: Lay Out the Front

Arrange 6 squares in a 3 across by 2 down layout, alternating deep teal and light aqua borders in a checkerboard pattern. Do the same for the back panel.

Step 2: Join Into Rows

Step 3: Join the Two Rows

Tidying the Panels

Step 1: Edge Each Panel

Step 2: Press Lightly Give both panels a gentle steam or spray block so they sit flat and square. (2 panels, blocked)

Navy Top Band and Side Seams

The band is worked separately along the top edge of each panel, then the two panels are seamed together around the sides and base.

Band Row 1 (Navy, Color E)

Side and Bottom Seams Step 1: Line Up the Panels

Step 2: Seam Three Sides

Caring for Your Ocean Blue Daisy Pouch Cotton yarn is sturdy, but a little care goes a long way: Hand wash gently in cool water with mild soap. Cotton loves a soft touch.

Reshape while damp and lay flat to dry, away from direct heat.

Cool iron or steam on the reverse if needed. Avoid the zip teeth.

Open the zip before washing and store the pouch flat or lightly stuffed.

Customization Ideas Want to make this pattern your own? Here are some ideas: Go bigger: Add a third row of squares (3×3) for a roomy clutch. The math stays the same!

Recolor the daisies: Keep the cream petals and swap the borders for your own palette. This would look stunning in sunset colors, all pastels, or a monochromatic scheme.

Sizing reminder: Every square you add changes the finished size by about 3 inches (7.5 cm). Block to gauge first, then plan your layout.

Squares not matching in size? Check your tension. If you crochet tightly, try going up a hook size. If you crochet loosely, try going down. Blocking helps even out minor differences.

Corners not lying flat? Make sure you are getting the full (2 dc, ch 3, 2 dc) into each corner stitch. Skipping the chain space is a common mistake.

Zip not fitting? You can adjust the zip length by sewing across the teeth and cutting off excess. Or, adjust your band row count to accommodate a different zip size.

You Did It!

Thank you so much for choosing this pattern for your next project! I hope you love making your Ocean Blue Daisy Granny Square Pouch as much as I loved designing it. The combination of cheerful daisies, that gorgeous color palette, and the practical wristlet design makes this such a satisfying make.
Assembly

Step 1

Step 1: Set the Zip: Open the 9 inch (23 cm) navy zip. With sewing thread, pin it behind the navy band so the teeth sit just below the top edge. Backstitch each zip tape to the inside of the band, easing to fit. (1 zip set)

Step 2

Step 2: Make the Strap Loop: With Cream yarn, ch 6 and sl st into the first ch to form a small loop. Fasten off and sew it firmly to the top-right corner of the pouch. (1 loop)

Step 3

Step 3: Build the Wristlet: Thread approximately 6 inches (15 cm) of cream cotton webbing through a D-ring, fold, and secure with a snap, rivet, or a few firm stitches. Clip the swivel lobster clasp onto the corner loop. (1 strap)

Step 4

Step 4: Final Touches: Weave in every remaining tail. Add a fabric lining now if you would like extra structure. Give the finished pouch one last light press. (0 ends showing)

Important notes

Note 01

💡 Make all twelve daisy squares with the same 5.0 mm hook and check your gauge early — since three squares across create the 9 inch width, even a slightly loose or tight square multiplied by six can shift your final size noticeably.

Note 02

💡 Use stitch markers in each corner chain-3 space as you work the border rounds so you never lose track of where the next corner shell begins, especially helpful once you're on square number eight or nine.

Note 03

💡 Keep your cream yarn (Color B) as a dedicated 'joining ball' separate from what you use for petals and borders, so you're not constantly cutting and rejoining while whipstitching all twelve squares together.

Note 04

💡 Block your finished squares before joining if they seem slightly cupped or uneven — a light steam block on a towel helps every square lie perfectly flat at 3 inches square before assembly.

Note 05

💡 Test-fit your 9 inch navy zipper against the joined front and back panels before sewing it permanently, trimming or adjusting placement so the navy band sits flush along the top edge.

Note 06

💡 If you're adding the optional lining fabric, cut it slightly smaller than your finished pouch panels so it doesn't peek out around the edges once everything is sewn together.

Note 07

💡 Gauge: One finished daisy square measures 3 inches (7.5 cm) square through Round 5 using a 5.0 mm hook, with 16 sc by 9 rows equaling 4 inches (10 cm). Three squares across give you the 9 inch (23 cm) width, and two squares plus the navy band give you the 7 inch (18 cm) height — match the square size and the whole pouch falls into place.

FAQs

Asked on the glider

the ones that come up on the glider

Can I use a different weight of yarn than worsted cotton?

You can, but you'll need to adjust your hook size and expect your finished squares and pouch to size up or down accordingly. Stick with worsted cotton if you want to match the stated 3 inch square and 9 by 7 inch pouch measurements exactly.

Do I need to know how to sew in a zipper?

Basic hand-sewing skills are enough since you're simply securing the navy zipper to the top edge with a sewing needle and thread. Pinning the zipper in place first makes the process much easier for beginners.

Why is my daisy square coming out smaller or larger than 3 inches?

This usually comes down to gauge, since your tension directly affects the final square size after the border round. Check your stitches against the 16 sc by 9 rows equaling 4 inches guideline, and size your hook up or down as needed.

Can I skip the lining fabric?

Yes, the lining fabric is listed as optional and the pouch will hold its shape fine with just the granny squares and navy band. Adding a lining simply gives a cleaner interior finish and a bit of extra structure.

What if I can't find a swivel lobster clasp and D-ring?

Any small purse hardware set with a swivel clasp and matching ring will work as a substitute, since their main job is attaching the cream wrist strap securely. Craft stores and online notions shops typically carry several size and finish options.