Intermediate 10-14 hours DK yarn

Worked on the glider, counted out loud —

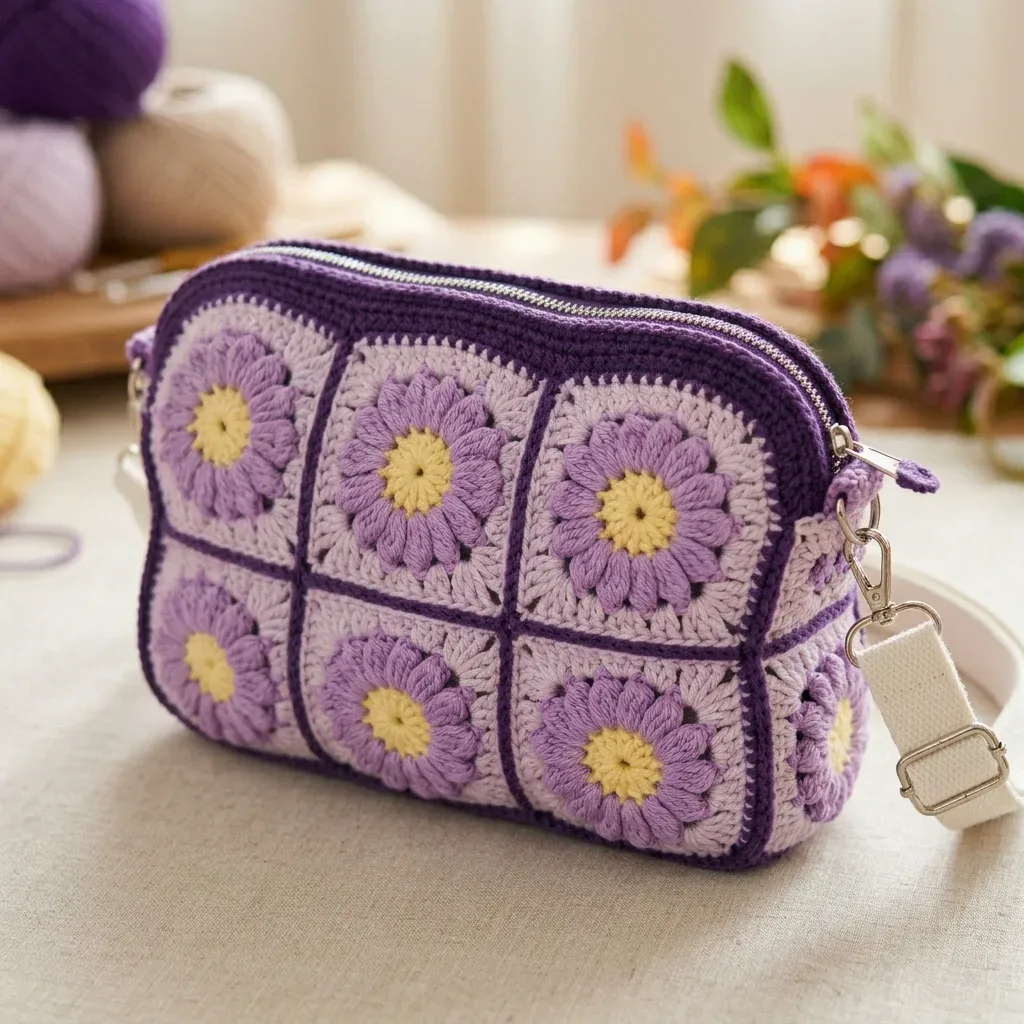
Lavender granny square pouch with puff stitch petals

A puff-stitch granny square pouch for intermediate crocheters, about 10-14 hours from magic ring to zipper.

Jump to the rounds

What this one is

This one's for you if you've got a quiet stretch coming and a pull toward something that actually looks finished when you're done. The puffed petals read as fussy from across the room, but they're built from a stitch you'll repeat until your hands stop thinking about it. If you've joined a few granny squares before and you're ready to add a zipper and some structure, this pouch meets you right there.

Your hands spend most of their time on two things: working that four-round petal square until the color changes feel automatic, and then sewing a zipper in by hand with a needle and thread. Between the magic ring start, the puff petals, and the squared corners, you're looking at roughly 10 to 14 hours total, which stretches into a weekend if you're in deep or a couple of weeks of evening sessions if you're pacing yourself.

Try it another way

If you want a smaller pouch, work fewer flower squares across the width or height; since the whole bag's size follows the 2¾ x 2¾ inch square measurement, trimming the count changes the finished dimensions in a predictable way. For a different mood, swap which color sits where: let Grape take over as the dominant background instead of trim, or push Buttercup out past the center of each flower so the magic ring start reads brighter. Yarn-wise, Paintbox Cotton DK keeps the puffs crisp and well defined, while YarnArt Jeans gives the finished pouch a bit more body if you want it to hold its shape without a stiff lining. DMC Natura Just Cotton leans softer and silkier, which suits a pouch you're making as a gift rather than daily carry. You can also rethink the hardware: the 1 inch adjustable cotton webbing with swivel clasps is built for a crossbody strap, but shortening it turns this into a wristlet, and skipping the strap loops entirely leaves you with a zippered pouch for a bag-in-bag situation. Whatever you change, keep the 48 dc corner round and the overall square count as your anchor so the shape doesn't drift.

The satisfaction here is in the contrast: Round 1 is a tidy 12 single crochet magic ring, flat and unremarkable, and then Round 2 turns it into 12 puffed petals that catch light differently than anything flat ever could. You draw nine loops through on every single one of those puffs, and the closing chain that locks each petal in place is the small, repeated move that keeps the whole flower from going floppy later. By Round 3, you're squaring off the circle with corner chain-2 spaces and double crochet, which is its own quiet trick worth paying attention to. Add the handwork of backstitching an 8-inch zipper around real corners, and you get a project that moves between rhythmic and precise in a way that keeps both halves of your attention satisfied.
The rounds, in full

Written out, round by round

Intermediate10-14 hours3.5 mmDK

Bring to the porch

Everything this one takes, in the order you will reach for it.

Yarn (DK Cotton)

  • Color A (Buttercup): approximately 10 grams
  • Color B (Lavender): approximately 55 grams
  • Color C (Pale Lilac): approximately 45 grams
  • Color D (Grape): approximately 45 grams

Recommended Yarn Brands

  • Paintbox Yarns Cotton DK offers a clean color range with great stitch definition for the puffs
  • YarnArt Jeans is a classic bag yarn that’s soft with a touch of body for structure
  • DMC Natura Just Cotton has a silky matte finish in dreamy lilacs and yellows

Crochet hook

  • 3.5 mm (US E/4)

Zipper

  • 8 inch / 20 cm nylon coil

Strap

  • approximately 1 inch / 2.5 cm cotton webbing, adjustable, with 2 swivel clasps
  • Tapestry needle
  • Sewing needle and matching thread
  • Scissors
  • Stitch markers

Optional

  • cotton lining fabric and pins

Quick Reference for Each Round

Make 16 squares total. Each square has four rounds in four colors.

  1. Round 1Color A 12 sc center in magic ringMake a magic ring. Chain 1, then work 12 single crochet stitches into the ring. Join with a slip stitch to the first single crochet and pull the ring closed tightly. Fasten off Color A. (12 sc)

The magic ring (sometimes called a magic circle or adjustable ring) lets you start crocheting in the round with no hole at the center. Loop the yarn around two fingers, work your first round of stitches into that loop, then pull the tail to cinch the center closed. This technique leaves no gap at the flower's heart. If magic rings intimidate you, you can substitute chain 4 and slip stitch to join into a ring. The center won't be quite as tight, but it works.

  1. Round 2Color B 12 puff petals

The puff stitch creates those gorgeous plump petals that make this bag so eye catching. Here's how to work it: Yarn over, insert your hook into the stitch, yarn over and pull up a loop to the height of a double crochet. Repeat this sequence (yarn over, insert, pull up a loop) 3 more times in the same stitch. You'll have 9 loops on your hook. Yarn over and draw through all 9 loops at once. Chain 1 to close and lock the puff. The closing chain is important because it secures the puff and prevents it from getting loose or floppy over time.

Join Color B to any single crochet from Round 1. Chain 2 (this does not count as a stitch), work a puff stitch in the same stitch, chain 1. Puff in the next stitch, chain 1. Repeat from * around the entire circle. Join with a slip stitch to the top of the first puff. Fasten off Color B. Twelve beautiful petals now bloom from your center. (12 puffs, 12 ch-1 spaces)

  1. Round 3Color C 48 dc with squared cornersJoin Color C in any chain 1 space. Chain 3 (counts as double crochet), then work (2 dc, ch 2, 3 dc) in the same space. This creates your first corner.Work 3 double crochet in each of the next 2 chain 1 spaces, then work (3 dc, ch 2, 3 dc) in the next chain 1 space for the corner. Repeat from * twice more, then work 3 double crochet in each of the last 2 chain 1 spaces. Join to the top of chain 3. Fasten off Color C. (48 dc, 4 corner spaces)
  2. Round 4Color D 72 dc grape frameLay your finished squares in a 4 row stack of 4 as you complete them. Count to 16 before assembly. Give them a quick steam or light blocking to help the corners sit nice and square.Join Color D in any corner chain 2 space. Chain 3 (counts as double crochet), then work (2 dc, ch 2, 3 dc) in the same space.Double crochet in each of the next 12 double crochet stitches, then work (3 dc, ch 2, 3 dc) in the next corner space. Repeat from * around, ending with double crochet in each of the last 12 stitches. Join to the top of chain 3. Fasten off, leaving a long tail for joining later. (72 dc, 4 corner spaces)

Putting it together

Step 1

Lay Out the Loop: Arrange your 16 squares right side up in 2 rows of 8. Follow this order around the bag: 3 front squares, 1 right side square, 3 back squares, 1 left side square. The two rows become the upper and lower halves of your bag. (2 rows x 8 squares)

Step 2

Join the Squares: Using Color D and a tapestry needle, whip stitch (or slip stitch if you prefer) neighboring squares together through the back loops only. Match stitch for stitch as you go. Join all squares within each row first, then join the two rows along their long horizontal edge. (16 squares joined)

Step 3

Close Into a Tube: Bring the two short ends of the joined panel together and seam them with Color D to form a ring. You now have 8 squares around and 2 squares tall in a tube shape. (1 open tube)

Step 4

Seam the Bottom: Flatten the tube so the front squares face the back squares. With Color D, seam the entire lower edge closed in a straight line. Let the side gusset squares fold inward at each end. This boxes out the base and gives the pouch its depth. (bottom closed)

Step 5

Tidy the Base Corners: At each bottom corner, tack the folded gusset to the front and back panels with a few small stitches. This helps the base sit flat and keeps that nice square shape. (2 corners tacked)

Step 6

Edge the Top Opening: Join Color D at a top side seam. Single crochet evenly around the entire top opening, keeping your stitch count even.

Step 7

Setting the Zipper: With the zipper open, pin it right side up underneath the top opening. Position it so the grape edge just covers the zipper tape. Using a sewing needle and matching thread, backstitch each side of the zipper in place. Take your time easing around the corners. Close the zipper to check that it runs smoothly before knotting off your thread. (8 inch zipper set)

Step 8

Making the Strap Loops: At each top side seam, join Color D and chain 6. Slip stitch back along the chain and fasten off to form a small loop. Alternatively, you can sew in metal D-rings if you prefer hardware. (2 loops)

Step 9

Attaching the Strap: Clip the swivel clasps of your adjustable cotton webbing strap into the two loops. Done! If you prefer an all yarn strap, chain to your desired length plus a little extra, then single crochet back along the chain for two rows. Sew the ends securely to the loops. (1 crossbody strap)

Step 10

Optional Lining: For a truly polished interior, cut lining fabric to the inside dimensions of your pouch plus seam allowance. Sew it into a pouch shape, then hand stitch it just below the zipper. This gives you a clean, sturdy interior that protects your belongings.

Step 11

Final Touches: Before you call this project complete: Weave in every remaining tail on the inside and trim close Give the whole pouch a gentle steam to settle the squares and relax the seams Check that the zipper glides smoothly Make sure the base sits flat when you set the pouch down Adjust the strap to your favorite crossbody length

Marlene's notes

Note 01

Your gauge on the flower square determines the whole bag's final size, so don't skip the test square measurement against the 2¾ x 2¾ inch target before you commit to all the squares you'll need.

Note 02

The puff stitch's closing chain-1 isn't optional styling; it's the thing that locks each petal so it doesn't loosen or go flat with handling over time.

Note 03

Keep your 3.5 mm hook consistent across colors and rounds, since a looser or tighter hand on just one round will show up as a mismatched square in the finished pouch.

Note 04

The finished pouch measures approximately 8 inches wide by 5.5 inches tall by 2.75 inches deep, perfect for holding your essentials without weighing you down.

Note 05

The starting chain 3 counts as the first double crochet throughout the pattern unless noted otherwise.

Before you sit down

  • Check that you've got enough of each color on hand: about 10g of Buttercup, 55g of Lavender, 45g of Pale Lilac, and 45g of Grape, since running short mid-square is annoying to fix later.
  • Make one test flower square through all four rounds before committing to the full set, and measure it against the target of 2¾ x 2¾ inches so you know early if your hook size needs adjusting.
  • Set out your stitch markers now, since you'll want them handy for tracking rounds and corner stitches once the puffs and the squared corners are in play.
  • Read through the puff stitch instructions once before you start Round 2, so the nine-loops-on-the-hook moment doesn't catch you off guard mid-round.
  • Each square is worked in four rounds, with each round using its own color. The right side always faces you. Join each round with a slip stitch and fasten off before changing to the next color.
  • Stitch counts appear at the end of each round in parentheses, like (12 sc). Always check your count before moving to the next round.

How the hours go

Flower squares (Rounds 1-3 plus remaining rows)
about 5-7 hours because each square works through four rounds and the puff stitch takes a slower, deliberate rhythm to get right
Joining squares and shaping the pouch
about 3-4 hours because squared corners need to line up cleanly across multiple panels before assembly
Zipper setting and strap loops
about 2-3 hours because hand-backstitching an 8 inch zipper around corners and chaining the strap loops at each side seam takes patience, not speed

Looking after it

  • Since this pouch is cotton throughout, hand wash it in cool water with a mild soap and skip the wringing; cotton holds water and a hard twist can distort your squares.
  • Lay it flat to dry and gently reshape the corners and petals while damp, then store it unstuffed in a drawer or open basket so the puff stitches keep their lift instead of flattening under weight.
FAQs

Asked on the glider

the ones that come up on the glider

Why does my flower square come out a different size than the pattern says

Your hook size and tension are doing more work here than usual, since the whole bag's dimensions follow that 2¾ x 2¾ inch square measurement. Go up a hook size if your squares run small, or down if they run large, and recheck before making the full set.

What if I've never worked a puff stitch before

You're drawing up four loops in the same stitch, which gives you nine loops on the hook total before you pull through and chain 1 to close. It feels unwieldy for the first petal or two, but it settles into a rhythm fast once your hands know the sequence.

Can I use a different yarn fiber instead of cotton

The pattern is written around cotton DK weights like Paintbox Cotton DK, YarnArt Jeans, or DMC Natura Just Cotton, which give the puffs good stitch definition and the bag some structure. A different fiber at the same weight could work, but check your gauge against the 2¾ inch square target first.

How do I keep the zipper from puckering when I sew it in

Pin it in place first with the zipper open and the grape edge just covering the zipper tape, then take your time backstitching around the corners rather than rushing the straight sides. Close the zipper partway through to check it still runs smoothly before you knot off.

Do I need stitch markers for this pattern

Yes, they're genuinely useful here for tracking your corner stitches through the squared corner rounds and for keeping your place across the four rounds of each flower square. It's easy to lose count once the puffs are in play.

How long will the whole pouch realistically take me

Plan for about 10 to 14 hours total across the squares, joining, and zipper assembly, which usually lands as a focused weekend or a couple of weeks of evening sessions. The puff stitch rounds and the hand-sewn zipper are the two stages that take the most patience.