Intermediate 8-12 Hours Fingering yarn

Worked on the glider, counted out loud —

Multi Color Crochet Granny Square Maxi Skirt Pattern

Learn to crochet a stunning multi color granny square maxi skirt with puff stitch waistband detailing—a boho wearable perfect for stretching your skills.

Jump to the rounds

Before you sit down

Begin each granny square with a ring formed from a small starting chain joined with a slip stitch.

Work double crochets into that ring to establish the first full round of the square.

Introduce new colors along the way by joining fresh yarn directly into the stitch you're about to work.

Build texture into the waistband section using clustered puff stitches worked into a single stitch.

Continue joining granny squares together to gradually build out the width and length of the skirt body.

Attach the completed waistband section to the top edge of the joined granny square panel.

Weave in all color-change ends neatly and give the finished skirt a gentle block before wearing.

What this one is

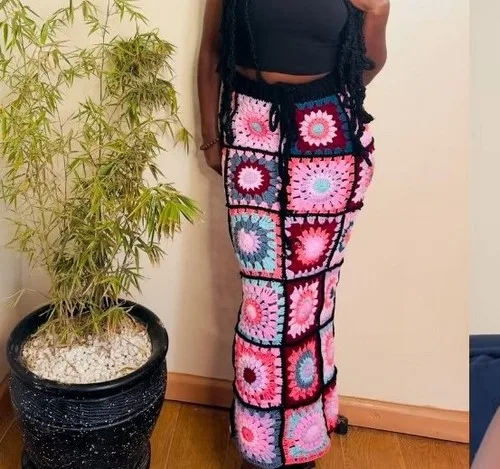
This multi color granny square maxi skirt takes the timeless granny square—a motif every crocheter recognizes—and transforms it into a flowing, wearable garment full of color and texture. What makes it special is how it bridges nostalgic crochet tradition with modern fashion, letting you build a one-of-a-kind skirt from squares worked in whatever palette speaks to you. It's perfect for crocheters who love working with color and want a project that results in something they'll actually wear, not just display on a shelf.

The pattern leans on classic granny square construction worked in the round, layered with puff stitches for texture and frequent color changes that keep the work lively and engaging. Expect to feel confident with double crochets, chain spaces, and joining rounds with slip stitches before diving in, since the waistband and hip sections build on those fundamentals with added stretch considerations. Between the granny squares, waistband shaping, and final assembly, plan for roughly 8-12 hours of crafting time, likely spread across several relaxed sessions rather than one sitting.

The finished skirt flows into a soft, breezy maxi silhouette with a textured waistband that hugs comfortably thanks to the larger hook size used around the hips. It has that effortlessly eclectic, handmade-with-love look—rows of granny squares in shifting colors catching the light as you move. This makes it a gorgeous statement piece for yourself or a truly memorable, thoughtful gift for a fellow yarn lover who appreciates fashion with a story stitched into every square.
Variations

The color possibilities here are endless, and that's half the fun. Try a sunset ombré using Mandala or Scheepjes Whirl for automatic gradient shifts without constant color changes, or go bold with jewel tones—emerald, sapphire, and amethyst—for a richer, more dramatic look. For a softer, romantic vibe, pastel granny squares in blush, lavender, and mint paired with a cream waistband create a dreamy cottagecore feel perfect for spring. If you want a beachy summer version, swap in cotton yarn like 24/7 Cotton in ocean blues and sandy neutrals for a breathable warm-weather skirt. For an autumn-ready piece, rust, mustard, and forest green squares with a chunky waistband instantly read as fall fashion. Since the base yarn used is a fingering-weight wool (Alise Baby Wool), you could substitute any similar fingering or sport-weight yarn—Cascade Heritage or Knit Picks Palette both work beautifully and come in huge color ranges for mixing and matching squares. If you prefer a more subdued, monochrome look, work every granny square in varying shades of the same color family so the puff stitch waistband becomes the star texture element instead of competing with a busy palette. You could also personalize the length by adding or removing rounds of granny squares before attaching the waistband, giving you a midi or floor-length version depending on how dramatic you want the flow. For gifting, consider crocheting the recipient's favorite color palette, or stitch in their birth flower colors for a meaningful, wearable keepsake they'll treasure for years.

There's something so satisfying about watching a single granny square multiply into an entire garment, and that's exactly what happens here. I love how this pattern starts with something so familiar—chain 4, join into a ring, sixteen double crochets—and builds it into a piece you'll actually wear out the door. The puff stitch detail in the waistband rounds adds this lovely dimensional texture that makes the piece feel elevated, not just 'crafty.' And the color changes! Every time you insert your hook and pull through a fresh new shade, the whole project transforms in front of you—it never gets boring. I also appreciate that the pattern calls for a larger hook (3.5mm or 4mm) specifically around the hips for stretch, which shows real thought went into wearability, not just aesthetics. It's the kind of project where each round feels like a small win, and by the time you're joining squares into the waistband, you can already picture yourself twirling in it. This is crochet that becomes fashion, and that transformation is endlessly rewarding to witness stitch by stitch.

Common mistakes

  • Losing track of where the round beginsPlace a stitch marker in the very first stitch of each round the moment you start it, and move it up as you go—this pattern even suggests this for the initial rounds, so make it a habit throughout.
  • Puff stitches coming out unevenKeep your tension slightly looser than usual when pulling up the three loops for the puff stitch, and don't be afraid to gently tug the loops on your hook to give yourself enough slack before the final yarn over.
  • Color change join looking sloppyAlways join new yarn in the stitch you're about to work by pulling through completely before tightening, and weave in ends along the same color's edge later so transitions stay crisp and camouflaged.
  • Forgetting to count the starting chainMentally (or physically) mark that chain-3 as stitch one every single round, and recount your total stitches before moving to the next round to catch errors early.

The rounds, in full

Written out, round by round

Intermediate8-12 Hours3 mmFingering

Materials

Everything this one takes, in the order you will reach for it.

  • Hips measurement, waist measurement, and length from waist to ankle
  • Yarn of choice (mentioned was Alise Baby Wool, 262 yards)

Crochet hooks

  • 3 mm for most of the project, 3.5 mm or 4 mm hook for the granny squares going around the hips for extra stretch

keep this to hand

Abbreviations

US crochet terms, as used in this pattern.

  1. chchain
  2. ststitch
  3. sl stslip stitch
  4. scsingle crochet
  5. hdchalf double crochet
  6. dcdouble crochet
  7. incincrease
  8. decdecrease
  9. mrmagic ring
  10. fofinish off

Start the Granny Square

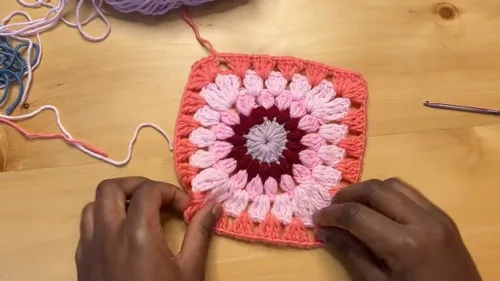
Each granny square for this skirt is worked to finish at approximately 6x6 inches.

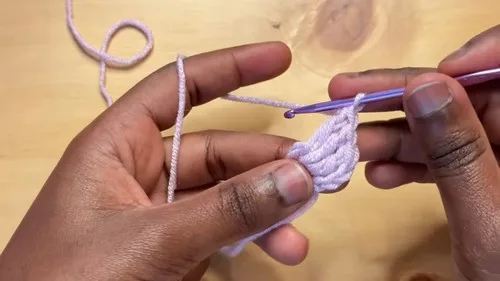
Make a slip knot and chain 4.

Join with a slip stitch in the first chain to form a ring.

  1. Round 1Chain 3 (counts as first double crochet). Make 15 double crochets into the ring (16 double crochets including the chain 3).Use a stitch marker to mark the end of the round if needed.

Changing Color

To change color, insert your hook into the stitch you're about to work, attach new yarn and pull through, securing the new yarn and continuing with it.

  1. Round 2(Creating Clusters): Chain 3 (counts as a double crochet). In the first stitch, yarn over, insert the hook, and pull up a loop, yarn over and pull through two loops, twice more in the same stitch, but do not complete the stitches separately. Yarn over and pull through all loops on the hook, leaving two loops, then pull through two. Chain 1. Repeat this process to create clusters around, ensuring you have 16 clusters by the end of the round.(16)
  2. Round 3Slip stitch into the chain-1 space, chain 3. Make 3 incomplete double crochets in the chain-1 space, yarn over and pull through all loops, then chain 2. Repeat in each chain-1 space around.
  3. Round 4(Creating Corners): Chain 4 (counts as a triple double crochet). Work triple double crochets and double crochets as instructed to create corners and sides with chain spaces between sets as corners are formed with 3 triple double crochets.

Joining the Squares

Arrange the granny squares according to your measurements and design preference.

Use a single crochet stitch with black yarn (or preferred color) for joining the squares edge to edge, creating the skirt's body.

Waistband

Attach yarn at the top edge of the skirt.

  1. Row 1Make single crochets around the top, skipping the chain-1 spaces to create the waistband.
  2. Row 2+Chain 3 and then double crochet in the next stitches, skipping one stitch in between sets of double crochets.To create a ribbed effect, perform front post and back post double crochets for the following rows.Finish the waistband with a final round of post stitches to ensure flexibility and comfort.

Assembly

Step 1

Secure all ends, and weave in the tails.

Step 2

For a drawstring, chain 150 (or desired length) and weave through the waistband.

Important notes

Note 01

💡 Keep two hook sizes on hand throughout this project—your standard 3mm for the granny squares and body, plus a 3.5mm or 4mm for the hip-area rounds—so you're not scrambling mid-project.

Note 02

💡 Use locking stitch markers (not just scrap yarn) to mark the end of each round, especially once you're working several joined granny squares where it's easy to lose your place.

Note 03

💡 When changing colors, cut yarn with at least a 6-inch tail on both the old and new color to make weaving in ends secure and manageable later.

Note 04

💡 Block your finished granny squares before joining the waistband—this evens out any tension inconsistencies between squares made at different times.

Note 05

💡 Since Alise Baby Wool is a delicate fingering weight, consider a gentle hand-wash or wool cycle when caring for your finished skirt to preserve stitch definition.

Note 06

💡 Each granny square is designed to finish at approximately 6x6 inches, so use this as your gauge check before joining squares into the skirt body.

More photos

FAQs

Asked on the glider

the ones that come up on the glider

Can I use a different yarn weight than the Alise Baby Wool mentioned?

Yes, any fingering or light sport-weight yarn will work well for this pattern. Just be sure to adjust your hook size slightly if your yarn is noticeably thicker or thinner than the original to maintain proper drape.

Why does the pattern call for a bigger hook size around the hips?

The larger 3.5mm or 4mm hook creates looser, more open stitches in that section, giving the fabric extra stretch where you need it most for comfortable wear. This detail helps the skirt move with your body instead of feeling restrictive.

How many granny squares will I need total for this skirt?

The exact quantity depends on your desired skirt width and length, which varies by body size and how full you want the silhouette. Start with your waistband round and build downward, adding squares until you reach your preferred length.

What if I've never done a puff stitch before—is this pattern still doable?

Absolutely, the puff stitch is explained step by step in the waistband and color-changing rounds, making it approachable even if it's new to you. Practice a few puff stitches on a scrap swatch first if you want extra confidence before working them into the actual piece.

Can I make this skirt shorter than a maxi length?

Yes, simply work fewer rounds of granny squares before attaching the waistband to create a midi or knee-length version instead. Just keep the same waistband and hip-stretch technique regardless of the length you choose.