Section 1: Base
The base is worked flat in rows of sc and forms a rectangle approximately 14 inches / 35.5 cm long by 5 inches / 12.5 cm wide.
Use Color A (cream) and H-8 / 5.0 mm hook throughout the base.
Foundation chain: Ch 57.
- Round 1(RS): Sc in 2nd ch from hook and in each ch across. Turn. (56 sc)
- Round 2Ch 1, sc in each st across. Turn. (56 sc)
- Round 3through 18: Rep Row 2. Turn after each row. (56 sc each row) After Row 18 the base should measure approximately 5 inches / 12.5 cm wide (short dimension) and 14 inches / 35.5 cm long (long dimension).Do not fasten off.Checkpoint: After Row 18, the base rectangle should measure 14 in / 35.5 cm long and 5 in / 12.5 cm wide.
Section 3: Lower Body Dense Cluster Stripe Section
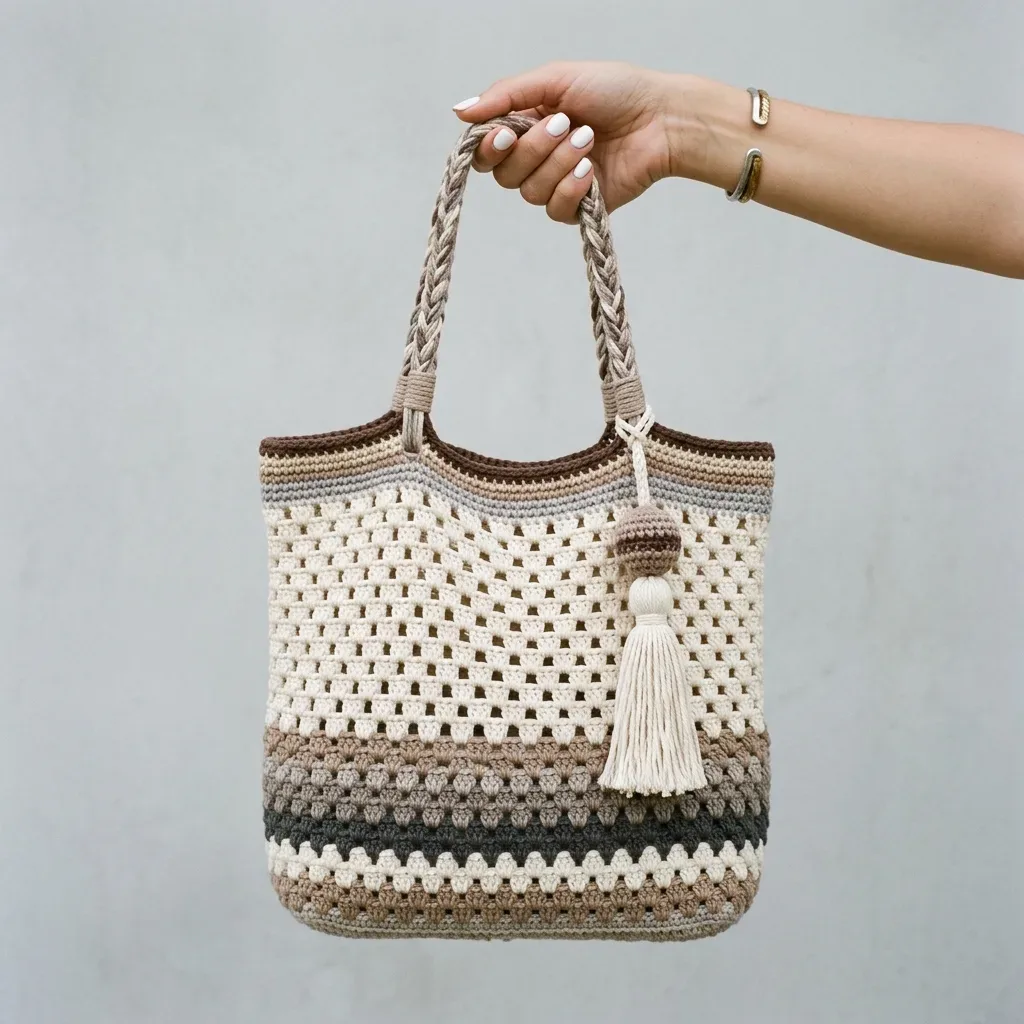
The lower body consists of 7 rounds of dense granny cluster work creating a textured, close-set cluster band. This section appears in the lower third of the bag and uses a sequence of neutral colors.
The 148 sc base translates to 37 cluster groups of (granny cl, ch 1) per round. Each cluster is worked into every 4th stitch of the sc round beneath, or into the ch-1 spaces of the round beneath in subsequent cluster rounds.
- Round 1(Color B, Taupe): Join Color B in any sc. (Granny cl in same st, ch 1, sk 3 sts) rep 37 times. Join to top of first granny cl with sl st. (37 clusters, 37 ch-1 sps)
Note: 37 groups x 4 sts = 148 sts consumed. Math confirmed.
- Round 2(Color E, Charcoal): Join Color E. Ch 3 (counts as first dc), 2 dc in same ch-1 sp (completes first granny cl), ch 1. (Granny cl in next ch-1 sp, ch 1) rep 36 times. Join to top of beg ch-3 with sl st. (37 clusters, 37 ch-1 sps)Round 3 (Color A, Cream): Join Color A. Rep Round 2. (37 clusters, 37 ch-1 sps)Round 4 (Color D, Mushroom Taupe): Join Color D. Rep Round 2. (37 clusters, 37 ch-1 sps)Round 5 (Color E, Charcoal): Join Color E. Rep Round 2. (37 clusters, 37 ch-1 sps)Round 6 (Color B, Taupe): Join Color B. Rep Round 2. (37 clusters, 37 ch-1 sps)
- Round 7(Color A, Cream): Join Color A. Rep Round 2. (37 clusters, 37 ch-1 sps) Checkpoint: After Round 7, the dense cluster band should measure approximately 3.5 to 4 inches / 9 to 10 cm tall above the base.
Section 5: Upper Body Open Granny Mesh Section
The upper body consists of 10 rounds of open granny mesh giving the characteristic see-through lattice pattern seen across the upper two-thirds of the bag. This section is worked primarily in Color A (cream) with single accent rounds in Color C (gray) and Color B (taupe).
In the open mesh, each group is: (granny cl, ch 2). Each group occupies one ch-2 sp from the round below. The foundation row converts the 148 sc into 37 granny mesh groups.
Mesh Foundation Round:
- Round 1(Color A, Cream): Sk first sc, (granny cl in next sc, ch 2, sk 3 sts) rep 37 times. Join to top of first cluster. (37 clusters, 37 ch-2 sps)
Verification: 37 x 4 = 148. Correct.
- Round 2(Color A, Cream): Sl st into ch-2 sp. Ch 3, 2 dc in same sp, ch 2. (Granny cl in next ch-2 sp, ch 2) rep 36 times. Join to top of ch-3. (37 clusters, 37 ch-2 sps)Round 3 (Color C, Gray): Join Color C. Rep Round 2. (37 clusters, 37 ch-2 sps)Round 4 (Color A, Cream): Rep Round 2. (37 clusters, 37 ch-2 sps)Round 5 (Color A, Cream): Rep Round 2. (37 clusters, 37 ch-2 sps)Round 6 (Color B, Taupe): Join Color B. Rep Round 2. (37 clusters, 37 ch-2 sps)Round 7 (Color A, Cream): Rep Round 2. (37 clusters, 37 ch-2 sps)Round 8 (Color A, Cream): Rep Round 2. (37 clusters, 37 ch-2 sps)Round 9 (Color C, Gray): Join Color C. Rep Round 2. (37 clusters, 37 ch-2 sps)Round 10 (Color A, Cream): Rep Round 2. (37 clusters, 37 ch-2 sps) Checkpoint: After Round 10 of the mesh section, the open mesh band should measure approximately 6.5 to 7 inches / 16.5 to 18 cm tall. Total bag height at this stage should be approximately 11 to 12 inches / 28 to 30.5 cm from the base.
Section 4: Lower Body Transition Rounds
- Round 1Two rounds of sc worked into the ch-1 spaces of the cluster section re-establish a flat sc foundation to transition into the granny mesh section.
- Round 2Transition Round 1 (Color A, Cream): Work 2 sc in each of 37 cluster tops, 2 sc in each of 37 ch-1 sps alternating, placing 1 extra sc at each of 4 corner areas (the two short-side centers and two long-side centers). Target: 148 sc evenly distributed. (148 sc)
- Round 3Transition Round 2 (Color B, Taupe): Ch 1. Sc in each sc around. Join. (148 sc)
- Round 4Checkpoint: After the two transition rounds, you are back to 148 sc and the lower body should measure approximately 5 inches / 12.5 cm tall from the base.(148)
Section 6: Top Edging
- Round 1The top edging creates the dark striped rim visible at the top of the bag. It uses Color F (chocolate brown) and Color B (taupe) in alternating rounds of sc and sl st.
- Round 2Prep Round (Color A, Cream): Sc in each cluster top and in each ch-2 sp. (37 + 37 = 74 sc)(74)
- Round 3Edging Round 1 (Color F, Chocolate Brown): Ch 1. Sc in each sc around. Join. (74 sc)
- Round 4Edging Round 2 (Color F, Chocolate Brown): Ch 1. Sc in each sc around. Join. (74 sc)
- Round 5Edging Round 3 (Color B, Taupe): Ch 1. Sc in each sc around. Join. (74 sc)
- Round 6Edging Round 4 (Color F, Chocolate Brown): Sl st in each sc around. Join. Fasten off. (74 sl sts)
The edging should measure approximately 0.75 to 1 inch / 2 to 2.5 cm tall.
Checkpoint: The finished bag body before handles should measure approximately 13 inches / 33 cm from base to top rim.
Section 7: Handles Braided Cord Construction
The bag uses two braided handles attached at the top rim, positioned on the front and back walls centered on each long side.
Each handle is created from 12 strands of yarn cut to 80 inches / 203 cm each.
Color arrangement per handle: 4 strands Color B, 4 strands Color D, 4 strands Color A (or substitute macrame cord as noted in materials).
Marking handle placement:
Front long side: Count 37 sc along the front top edge. Mark center 12 sts. The left handle base attaches at st 10 from left edge of front panel, right handle base attaches at st 10 from right edge of front panel, creating a handle spanning approximately 4.5 inches / 11.5 cm between attachment points.
Repeat identical placement on back panel.
Attaching handle strands: Step 1: Hold all 12 strands together and fold at midpoint to create 24 working ends.
Step 2: Pull fold through the designated top edging stitch from front to back using crochet hook or yarn needle.
Step 3: Pull all 24 ends through the fold loop to create a larks head mount.
Step 4: Divide 24 strands into 3 groups of 8.
Step 5: Braid the three groups in a standard 3-strand braid for 10 inches / 25.5 cm.
Step 6: Attach the braid end to the corresponding second attachment point on the same side using another larks head mount, threading the ends through the designated stitch and securing with a tight overhand knot on the inside of the bag.
Step 7: Trim ends to 0.5 inch / 1.3 cm and tuck inside the bag rim. Secure with a few stitches using yarn needle.
Step 8: Repeat for the second handle on the back panel.
Section 8: Tassel Charm
The tassel is attached to one side of the front left handle base using a short loop.
Materials for tassel: Color A yarn, approximately 40 strands cut to 8 inches / 20.5 cm each Color D yarn, approximately 10 strands cut to 8 inches / 20.5 cm each
Color F yarn, 1 strand cut to 30 inches / 76 cm for wrapping A small amount of Color D to create the pom ball at top Pom top construction:
Wind Color D around 3 fingers approximately 40 times. Slide off fingers. Tie tightly at center with a 12-inch / 30.5 cm strand. Cut loops. Trim to a round shape approximately 1 inch / 2.5 cm in diameter.
Tassel construction: Step 1: Hold all 40 strands of Color A and 10 strands of Color D together. Fold at midpoint.
Step 2: Using Color F, wrap tightly around all strands approximately 0.75 inch / 2 cm down from the fold to create the tassel neck.
Step 3: Knot wrap yarn securely. Thread the wrap ends up through the center of the tassel top and trim.
Step 4: Trim all tassel strands evenly to desired length (approximately 4 inches / 10 cm from neck to bottom).
Assembly:
Step 1: Thread the pom ball tie ends through the loop at the top of the tassel fold. Knot securely so pom sits directly above tassel neck.
Step 2: Attach swivel clip or lobster clasp to a 4-inch / 10 cm ch loop made in Color A. Tie or sew ch loop to the pom-tassel top.
Step 3: Clip swivel to handle attachment point at front left handle base.
Section 9: Interior (Optional)
The bag does not require a liner for structural integrity due to the cotton density at the base and lower body. However, for a fully finished look or to prevent small items from falling through the open mesh section, you can add a fabric liner.
Cut a fabric liner from medium-weight cotton or linen in a matching neutral. Cut two pieces 15 x 14 inches / 38 x 35.5 cm (front and back), two pieces 6 x 14 inches / 15 x 35.5 cm (sides), and one piece 15 x 6 inches / 38 x 15 cm (base panel). Sew into a box shape with 0.5 inch / 1.3 cm seams. Insert into bag, fold the top edge over the top rim, and whipstitch the liner to the inside of the top edging round using coordinating thread.