Intermediate 8-10 hours Worsted yarn

Worked on the glider, counted out loud —

Coral Peach Barrel Bag With Tropical Fabric Accents

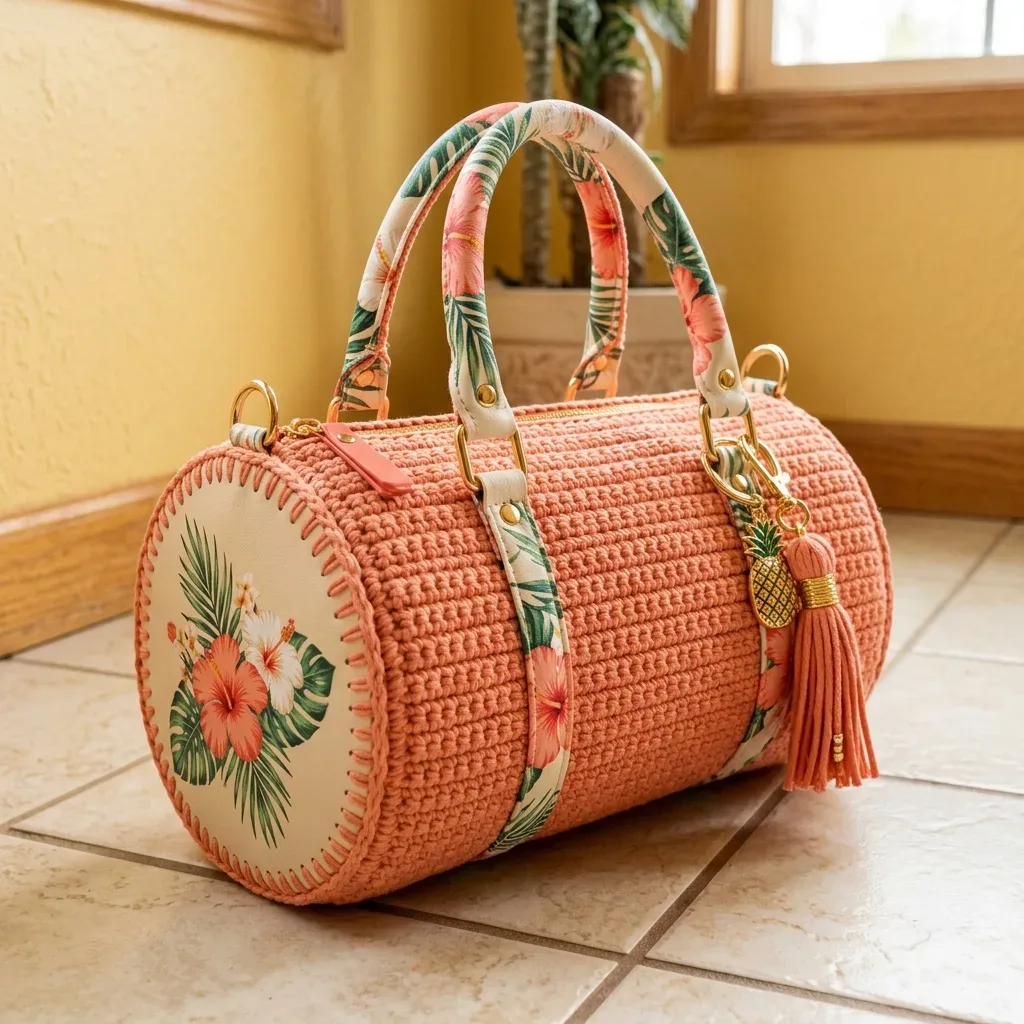
An intermediate crochet barrel bag with a zipper and tropical accents, about 8-10 hours for confident stitchers.

Jump to the rounds

What this one is

This bag is for the evening you finally admit you need something sturdier than a tote that collapses when you set it down. Picture a bag that holds its shape on a counter, a bar top, or the passenger seat, with the coral texture catching the light and the cream end panels giving it a clean, finished look. It is for anyone who wants a crochet project that feels like a real accessory, not just a soft toy or scarf, something you would actually carry out the door.

Your hands spend most of the time in back loop only single crochet, row after row, building the textured body panel before shaping two flat cream circles with simple increase rounds. Then you seam the tube, whipstitch the end panels in place, hand sew a zipper, and add fabric accents and a tassel. All told, expect about 8 to 10 hours from first chain to finished bag, spread over a few sittings rather than one long stretch.

The finished bag measures 9.5 inches long by 4.75 inches in diameter, built from one textured rectangular body panel, two flat circular end panels, a zipper, wrapped fabric handle straps, decorative bands, and a tassel charm. This pattern is rated intermediate.

Try it another way

The body panel is just 60 rows of 38 single crochet stitches worked back loop only, so you can shorten or lengthen the tube before you seam it if you want a shorter or longer bag, just keep in mind the end panels are sized to a 14.75 to 15 inch circumference. For yarn, 24/7 Cotton gives the crispest stitch definition if you want the texture to really pop, while Paintbox Cotton Aran leans softer and Lily Sugar'n Cream Solids is the easiest to find for an everyday version. Swap the colorway entirely by making the body in cream and the end panels in coral peach, or pick a tropical fabric with a different palette for the appliqué circles, straps, and lining to shift the whole mood. If you do not want a zipper closure, you could leave the top open as a tote and skip that step, though you will lose the polished finish. The 1 inch and 0.5 inch D-rings are easy to source in different finishes if gold hardware is not your style, and a different fat quarter of fabric changes how much pattern shows on the straps.

There is real satisfaction in watching a flat rectangle of back loop only single crochet turn into a round, structured tube just by seaming the two short edges together. The visible whipstitch where the cream end panels meet the coral body is not something you hide, it becomes a deliberate decorative line that proves you stitched this by hand. Hand sewing a zipper into crochet for the first time feels like a small leap, and once the teeth sit clean above the edge, you will want to do it again. Add tropical fabric circles, wrapped handle straps, gold hardware, and a tassel charm, and you end up with something that reads as a finished object, not a project still in progress.
The rounds, in full

Written out, round by round

Intermediate8-10 hours4 mmWorsted

Bring to the porch

Everything this one takes, in the order you will reach for it.

Main yarn

  • 120 yards of worsted weight cotton in coral peach

End panels

  • 45 yards of worsted weight cotton in cream
  • Seaming and tassel accent: 20 yards of coral or coordinating cotton

Suggested Yarns

  • Lion Brand 24/7 Cotton for crisp structure and clear stitch definition
  • Paintbox Cotton Aran for a soft color range with sturdy cotton feel
  • Lily Sugar’n Cream Solids for easy to find sturdy cotton for everyday bags

Tools and Notions

  • US G-6 / 4 mm crochet hook, or size needed to match gauge
  • Yarn needle
  • Removable stitch markers
  • Ruler or tape measure
  • One 9 inch zipper in coral or peach
  • Two 1 inch D-rings
  • Four 0.5 inch D-rings or strap loops
  • Rivets or strong sewing thread
  • Tropical cotton fabric: 1 fat quarter is enough for applique circles, straps, and lining

Optional

  • Optional: fusible interfacing
  • Optional: foam cord for handle padding
  • Optional: bag feet
  • Optional: pineapple charm

Body Panel Instructions

This panel forms the main barrel shape of your bag. You will work it flat in rows, then seam it into a tube.

With coral peach yarn, chain 39.

  1. Row 1Single crochet in the 2nd chain from hook and in each chain across. Chain 1, turn. (38 sc)
  2. Rows 2–60Single crochet in the back loop only in each stitch across. Chain 1, turn after each row except the final row. (38 sc each row)Back Loop Single Crochet (BLO sc): This stitch creates the beautiful ribbed barrel texture on the body of the bag. Insert your hook under the back loop only of the next stitch, yarn over, pull up a loop, yarn over, and pull through both loops. Working in the back loop only leaves the front loop exposed, creating horizontal ridges.(38)

Checkpoints

After Row 20, lay flat and measure. It should be about 4.75 inches tall.

After Row 40, lay flat and measure. It should be about 9.5 inches tall.

After Row 60, fasten off and leave a 24 inch tail for seaming. Your panel should measure about 9.5 by 14.75 inches.

Creating the Barrel Tube

Now you will transform your flat panel into a tube. Bring Row 1 and Row 60 together with the right side facing out. Using the long tail you left, whipstitch through the row end loops to form a clean tube.

Do not pull the seam too tight. The tube should remain round and flexible. When finished, the tube circumference should be about 14.75 to 15 inches, and the open length from end to end should be about 9.5 inches.

End Panels Instructions (Make 2)

These cream circles form the decorative ends of your barrel bag. You will add tropical fabric applique to them before attaching to the body.

With cream yarn, make a magic ring. Work in continuous rounds unless told otherwise. Place a marker in the first stitch of each round.

  1. Round 1Work 6 single crochet in the ring. (6 sts)
  2. Round 2Increase in each stitch around. (12 sts)
  3. Round 3Single crochet in the next stitch, increase. Repeat 6 times. (18 sts)
  4. Round 4Single crochet in the next 2 stitches, increase. Repeat 6 times. (24 sts)
  5. Round 5Single crochet in the next 3 stitches, increase. Repeat 6 times. (30 sts)
  6. Round 6Single crochet in the next 4 stitches, increase. Repeat 6 times. (36 sts)
  7. Round 7Single crochet in the next 5 stitches, increase. Repeat 6 times. (42 sts)
  8. Round 8Single crochet in the next 6 stitches, increase. Repeat 6 times. (48 sts)
  9. Round 9Single crochet in the next 7 stitches, increase. Repeat 6 times. (54 sts)
  10. Round 10Single crochet in the next 8 stitches, increase. Repeat 6 times. Invisible join. (60 sts)Invisible Join for Circles: This technique gives your end panels a seamless finish. Cut the yarn and pull the tail through the last stitch. Thread the tail on your needle, pass under both loops of the first stitch, then back down through the last stitch. Tighten gently for a clean invisible seam.Each finished crochet circle should measure about 4.75 inches across and have 60 outer stitches.

Adding the Fabric Applique

Cut two fabric circles measuring 3.75 to 4 inches across. Fuse lightweight interfacing to the wrong side of each circle. Center one fabric circle on each crochet end panel and stitch around the applique by hand or machine before joining the panels to the body.

Zipper Installation

Installing the zipper gives your bag a polished, functional closure.

Step by step: Flatten the tube with the seam centered at the bottom. Mark the top center opening. Pin or clip the zipper behind the top edge so the teeth sit just above the crochet edge. Hand sew the zipper tape to the inside top edge using small backstitches. Keep your stitches even and avoid catching the zipper teeth. Add a small fabric zipper tab at the pull end if desired.

Putting it together

Whipstitch Join

This is how you will attach the end panels to the body. Hold the pieces with wrong sides together. Insert your needle from front to back through the circle stitch and the matching body row end. Pull snug but not tight, and repeat evenly around the edge.

Step 1

This step brings your bag together. Pin one end panel to one open side of the tube, matching the top, bottom, and side quarter points first. The 60 stitches of the end panel join evenly to the 60 body row end spaces.

Step 2

With coral yarn and a yarn needle, whipstitch through one end panel stitch and one body row end space all the way around. Repeat for the second side.

Step 3

After joining, your bag should be a smooth barrel measuring 9.5 inches long and about 4.75 inches in diameter. If the seam ripples, remove a few inches and rejoin with lighter tension.

Marlene's notes

Note 01

Use a US G-6 / 4 mm hook, or size up or down until your swatch matches gauge, since a loose or tight body panel will throw off how the end panels fit.

Note 02

Keep your single crochet in the back loop only consistent across all 60 rows, uneven tension here shows up as a wavy tube once it is seamed.

Note 03

When hand sewing the zipper, keep your backstitches small and even, and watch that you are not catching the zipper teeth as you sew along the inside top edge.

Note 04

Gauge: Body panel gauge is 16 single crochet stitches by 16 rows equals 4 inches in back loop single crochet, blocked flat. End circle gauge is a final round circumference of about 14.75 to 15 inches before joining.

Note 05

The chain 1 at the start of body rows does not count as a stitch.

Note 06

Work the body in rows to create lengthwise ribs, then seam the first and last rows together to make the tube.

Note 07

Work end panels in continuous rounds and move your marker up each round.

Note 08

UK makers: US sc equals UK dc.

Note 09

Left handed makers can follow the same stitch counts, your seaming direction will simply mirror the photos.

Before you sit down

  • Wind off your coral peach and cream cotton separately and check you have at least 120 yards of coral and 45 yards of cream before you start the body panel, plus 20 yards set aside for seaming and the tassel.
  • Work a small swatch in back loop only single crochet and check it against 16 stitches by 16 rows to 4 inches, blocked flat, since the end panels and zipper depend on that gauge.
  • Set out your removable stitch markers now, you will need them to mark the top, bottom, and side quarter points when you pin the end panels to the tube.
  • Read through the Creating the Barrel Tube section before you finish your last row, so you know to leave a long tail for whipstitching Row 1 to Row 60 together.

How the hours go

Textured body panel
about 3 to 4 hours, because 60 rows of back loop only single crochet across 38 stitches is a long, steady stretch of plain rows
Two cream end panels
about 1.5 to 2 hours, because each circle works through several increase rounds and needs to come out flat and even to match the tube
Seaming, zipper, and finishing
about 3 to 4 hours, because whipstitching the tube, joining both end panels, hand sewing the zipper, and adding the appliqué, straps, and tassel all take careful handwork

Looking after it

  • Hand wash the finished bag in cool water with a mild soap, since it is built from worsted weight cotton that holds up well to gentle washing but can lose shape if machine washed and dried.
  • Reshape the barrel while damp by smoothing the seams and pressing it lightly against a flat or round surface, then let it air dry fully before you store it, ideally stuffed lightly to help it keep its 4.75 inch diameter.
FAQs

Asked on the glider

the ones that come up on the glider

Why does gauge matter so much for this bag?

The end panels are worked to a specific final round circumference of about 14.75 to 15 inches, and the zipper is a fixed 9 inch length, so if your gauge is off the end panels will not seam cleanly to the tube. Swatch first and adjust your hook size until you match 16 single crochet by 16 rows to 4 inches.

Can I substitute the cotton yarns in the materials list?

Yes, any of the three cottons listed, 24/7 Cotton, Paintbox Cotton Aran, or Lily Sugar'n Cream Solids, will work as long as you match gauge. gives the crispest stitch definition while Paintbox feels a touch softer.

How do I keep from catching the zipper teeth while sewing it in?

Pin or clip the zipper behind the top edge first so the teeth sit just above the crochet edge, then hand sew with small, even backstitches along the inside top edge. Go slowly near the pull and check from the right side as you go.

What if my seamed tube does not measure exactly 9.5 by 4.75 inches?

A little variance is normal, but check your gauge swatch and your tension on the back loop only rows first, since those determine the final tube size. If it is noticeably off, it is worth frogging back a few rows rather than forcing the end panels to fit.

Do I need rivets, or can I just sew the D-rings on?

The materials list gives you the choice of rivets or strong sewing thread, so if you do not have a rivet setter, sturdy hand stitching through the D-rings and strap loops works fine. Just reinforce the stitching since the straps take the bag's weight.

How long should I actually set aside for this project?

Plan on roughly 8 to 10 hours total, which breaks down into a few hours for the long body panel, more time for the two end panels, and the rest for seaming, the zipper, and finishing details. Most people spread it over several sittings rather than finishing in one go.