Intermediate 4-6 hours Worsted yarn

Worked on the glider, counted out loud —

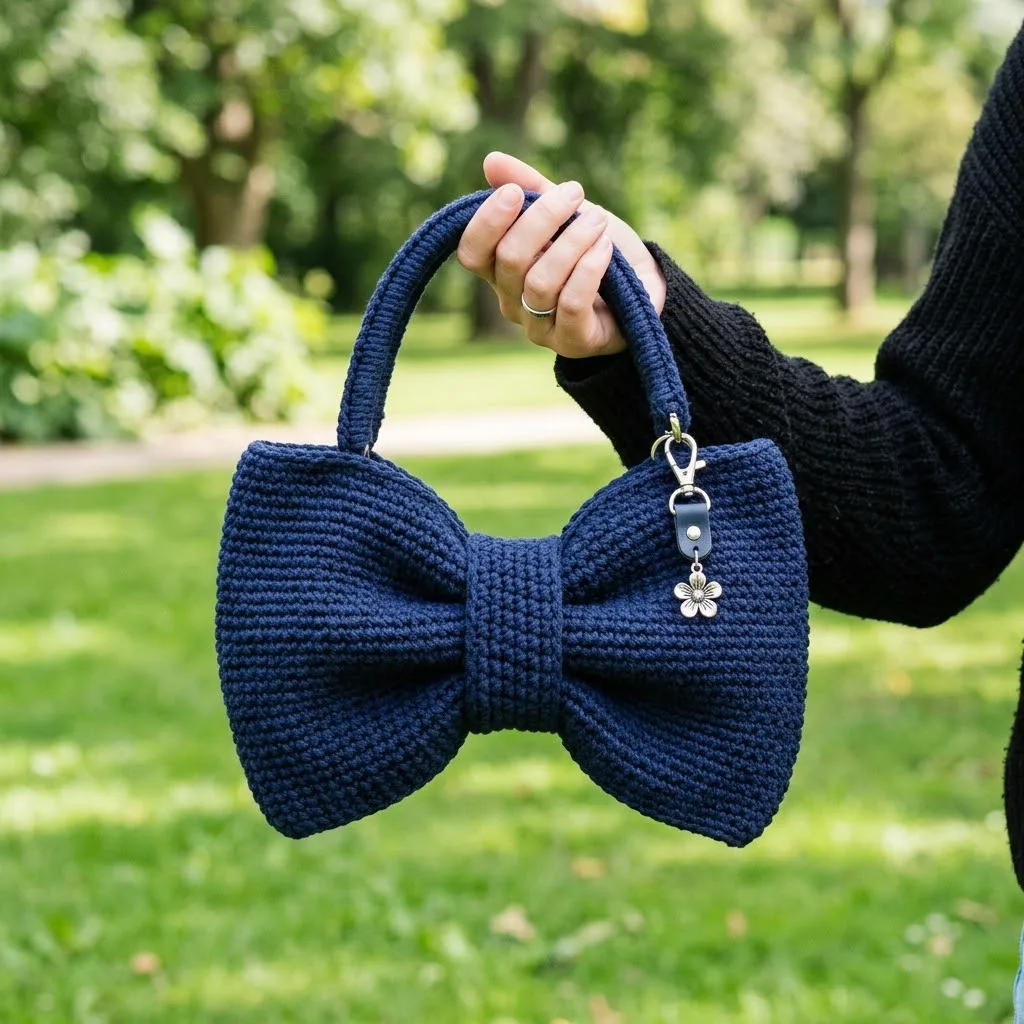
Midnight navy bow shoulder purse crochet pattern

A structured navy bow purse in firm BLO single crochet, well suited to confident beginners with about five hours to spare.

Jump to the rounds

What this one is

This one's for the crocheter who wants a purse that holds its shape, not just its stitches - a bow-shaped bag with real structure built from firm BLO single crochet rows. Picture it slung over your shoulder for an evening out, navy and neat, the bow front doing all the talking. If you've made amigurumi before and want to try something wearable, this bag bridges the gap between toy and accessory nicely.

Your hands will spend most of the time in back-loop-only single crochet, first building the tall bow center over eight rounds, then working two long straight strips - one ninety rows long, one twenty-four - that wrap and seam into the bow's wings and knot. There's a handle to attach too. Between the ribbed panels and the finishing seams, plan on a few solid sittings rather than one quick sit-down project.

Try it another way

If you'd like a smaller bow, work Part 6 exactly as written - ch 13, twelve stitches - since its twenty-four rows already make a neat, narrow band, and you could stop the longer Part 5 strip well short of ninety rows for a slimmer wrap around the bow base. Swap the navy for a soft neutral or a saturated color if you want the purse to read differently against an outfit; because the whole design leans on stitch definition, choose a smooth cotton or cotton-blend yarn rather than anything fuzzy, or the BLO ribbing will disappear into the halo. You could also work the two long strips in a contrast color against a navy bow center, so the wrapped band around the panels reads as a deliberate design line rather than a plain seam. For a different use, skip the handle rounds and finish the piece as a flat clutch instead of a shoulder purse - the bow center and wing shaping stay exactly the same, only the strap disappears. Keep the stuffing light no matter what color or size you land on, since the wings are meant to hold their shape softly, not puff into a ball.

There's something deeply satisfying about watching a plain strip of single crochet turn into a crisp, ribbed bow. Working every row in back loop only gives the fabric a defined texture and a firmness you can feel as you go - this isn't floppy amigurumi crochet, it's closer to building with cloth. You'll spend real time in the two long strips, ninety rows for the wrap piece and twenty-four for the shorter one, and that repetition becomes almost meditative once your gauge settles in. Then there's the payoff: shaping the bow center over eight rounds and lightly stuffing the wings with fiberfill so the bow holds its puff without going stiff. The whole thing rewards patience with a finished piece that looks tailored, not toy-like.

The rounds, in full

Written out, round by round

Intermediate4-6 hours4.0 mmWorsted

Bring to the porch

Everything this one takes, in the order you will reach for it.

  • Approximately 300-350 yards of worsted weight cotton or cotton-blend yarn
  • I used a navy blue shade, but any solid color will showcase the ribbed texture beautifully
  • Look for yarn with good stitch definition and minimal stretch
  • 4.0mm (US G/6) crochet hook
  • You may need to adjust your hook size to achieve proper gauge
  • Gauge: 18 stitches and 20 rows = 4 inches in single crochet worked in back loops only
  • Tapestry needle for seaming
  • Stitch markers
  • Polyester fiberfill for light stuffing in the bow wings
  • Optional: magnetic snap closure, decorative charm, or a small piece of fabric for lining
  • Take time to check your gauge. This pattern relies on a firm, structured fabric. If your gauge is too loose, your purse will be floppy. Go down a hook size if needed.

Bow Wing Panels (Make 2)

These panels create the signature bow shape. The ribbed texture comes from working in the back loop only throughout.

  1. Round 1Ch 37. Sc in 2nd ch from hook and in each ch across. (36 sts)
  2. Round 2Ch 1, turn. Sc in BLO of each st across. (36 sts)Rows 3-40: Repeat Row 2. (36 sts) At this point, you have a ribbed rectangle. Now we will shape the curves that give the bow its characteristic rounded edges.
  3. Round 41Ch 1, turn. Dec, sc in BLO of each st to last 2 sts, dec. (34 sts)
  4. Round 42Ch 1, turn. Sc in BLO of each st across. (34 sts)
  5. Round 43Ch 1, turn. Dec, sc in BLO of each st to last 2 sts, dec. (32 sts)
  6. Round 44Ch 1, turn. Sc in BLO of each st across. (32 sts)Rows 45-52: Repeat Rows 43-44 four more times. (24 sts after Row 52)
  7. Round 53Ch 1, turn. Dec, sc in BLO of each st to last 2 sts, dec. (22 sts)
  8. Round 54Ch 1, turn. Dec, sc in BLO of each st to last 2 sts, dec. (20 sts)Rows 55-58: Repeat Row 54 four more times. (12 sts after Row 58) Fasten off and leave a long tail for seaming.

You should now have a panel that is wider at one end and tapers at the other. The ribbed lines run horizontally across the piece. Make a second identical panel.

Center Gusset And Base Panel

Center Gusset and Base Panel

This piece wraps around the bottom of the purse and connects the two bow wing panels. It also creates the depth of the bag.

  1. Round 1Ch 17. Sc in 2nd ch from hook and in each ch across. (16 sts)
  2. Round 2Ch 1, turn. Sc in BLO of each st across. (16 sts)Rows 3-90: Repeat Row 2. (16 sts) This creates a long narrow strip. The length may need adjustment depending on your gauge. The strip should be long enough to wrap around the bottom curved edge of one bow panel, across the base, and around the opposite bow panel’s bottom edge.Fasten off and leave a long tail.

Center Band (Bow Knot)

Center Band (The Bow Knot)

This smaller piece wraps around the center of the purse to create the pinched bow effect and hides the seaming.

  1. Round 1Ch 13. Sc in 2nd ch from hook and in each ch across. (12 sts)
  2. Round 2Ch 1, turn. Sc in BLO of each st across. (12 sts)Rows 3-24: Repeat Row 2. (12 sts) Fasten off and leave a long tail for seaming.

Handle (Make 1)

The handle is a tube worked in continuous rounds. This creates a sturdy, rounded handle that is comfortable to hold.

  1. Round 1Ch 4. Sl st to first ch to form a ring. Ch 1, work 8 sc into the ring. Do not join. Place a stitch marker in the first stitch of each round and move it up as you work. (8 sts)
  2. Rounds 2–80Rounds 2-80: Sc in each st around. (8 sts)The handle should measure approximately 12-14 inches long. Adjust the number of rounds if you prefer a longer or shorter handle.Sl st to next st. Fasten off and leave a long tail.

Important tip: The handle may want to curl as you work. This is normal. It will straighten out when you attach it and the weight of the purse pulls it down.

Assembly Instructions

Take your time with assembly. This is where the bow shape comes together, and careful seaming makes a huge difference in the finished look.

Step 1: Prepare the Bow Wing Panels

Lay both bow wing panels flat with the right side facing up. The ribbed lines should run horizontally. Identify the tapered end of each panel. This tapered end will be the center of the bow where everything cinches together.

Step 2: Add Light Stuffing (Optional but Recommended)

Before closing the panels, add a small amount of polyester fiberfill to the wider curved sections of each bow wing. This helps the bow hold its rounded shape. Do not overstuff. You want gentle fullness, not a firm pillow.

Step 3: Attach the Gusset

Using your tapestry needle and matching yarn, whipstitch or mattress stitch the center gusset strip around the outer curved edge of one bow wing panel. Start at one tapered end, work around the curved bottom edge, and end at the opposite tapered end.

Repeat for the second bow wing panel, attaching it to the other long edge of the gusset strip.

Your purse should now have dimension and hold its shape.

Step 4: Create the Bow Center

This is the fun part. Bring the two tapered ends of the bow wings together at the center top of the purse. Pinch the fabric inward to create that classic bow silhouette.

Wrap the center band piece around this pinched section. Pull it snug enough to create nice gathers, but not so tight that you cannot fit items inside the purse. Whipstitch the short ends of the center band together on the inside of the purse. Tack the band to the bow panels in a few spots to keep it from sliding around.

Step 5: Attach the Handle

Position the handle ends at the top of the center band, one on each side of the bow knot. Stitch each end securely to the inside of the purse, reinforcing with several passes of yarn. The handle should form a smooth arc above the bow center.

Step 6: Add Closure and Finishing Touches

For a magnetic snap closure, install the snap pieces inside the purse opening before you complete the center band attachment. Position them so the purse closes securely when carried.

Add a decorative charm to the center band if desired. A small lobster clasp attached to a leather tab looks elegant against the navy yarn.

Weave in all remaining ends. Block gently by misting with water and shaping with your hands if the bow wings need adjusting.
Marlene's notes

Note 01

This pattern relies on a firm, structured fabric - if your 4.0mm hook gives you a loose gauge, go down a hook size before you start the bow center.

Note 02

Every row of the strips is worked in back loop only, which is what creates the ribbed look; skipping BLO on even one row will show as a visible change in texture.

Note 03

Stuff the bow wings lightly with polyester fiberfill - the goal is a gentle puff rather than a firm ball, so the bow keeps its flat, ribbon-like shape.

Note 04

Finished dimensions: approximately 12 inches wide across the bow, 6 inches tall at the bow center, 4 inches deep at the widest point, with a handle drop of about 5 inches.

Note 05

Maintain consistent tension throughout - the ribbed texture looks best when your stitches are uniform. If you notice your tension loosening as you work, take a break, since tired hands make uneven stitches.

Note 06

Count your stitches at the end of every row - the shaping rows require accuracy, and losing or gaining a stitch will throw off the symmetry.

Before you sit down

  • Check that you have your yarn on hand - you'll need approximately 300-350 yards of worsted weight cotton or cotton-blend, and it helps to wind off a good amount before you start the long strips.
  • Work a small swatch in BLO single crochet first, since the pattern relies on a firm, structured fabric; go down a hook size from the suggested 4.0mm if your swatch comes out loose.
  • Read through the note in Part 5 before you begin it - the strip length is meant to adjust to your gauge, so know in advance that you're aiming to wrap around the bottom curved edge of one bow panel, across the base, and around the other.
  • Set your tapestry needle and fiberfill within reach, since you'll need them for seaming the strips together and for lightly stuffing the bow wings as you finish each part.

How the hours go

Height Of Bow Center
about 45-60 minutes, because shaping eight rounds for a dimensional piece takes more attention than a flat strip.
Part 5 (the long wrap strip)
about 2-3 hours, because ninety rows of BLO single crochet add up even at a steady pace.
Part 6 and the handle
about 1-1.5 hours, because twenty-four rows plus the two handle rounds go quickly once your rhythm is set.

Looking after it

  • Hand wash the purse in cool water with a gentle detergent, since cotton holds its shape best without machine agitation; reshape the bow while it's damp and let it dry flat.
  • Store the purse with a little tissue paper tucked into the bow wings so they keep their puff between wears, and keep it out of direct sun so the navy cotton doesn't fade.
FAQs

Asked on the glider

the ones that come up on the glider

How long should the Part 5 strip actually end up?

The pattern gives ninety rows as a starting point, but your exact length depends on gauge. Keep wrapping and checking against your bow panels until it comfortably covers the bottom curve of both panels and the base between them.

Can I use a heavier or lighter yarn than worsted weight?

You can, but since this pattern is built around gauge for a firm fabric, expect to adjust hook size and yardage to match. Swatch first to make sure the BLO ribbing still looks defined at your new gauge.

Why does my purse feel floppy even though I followed the stitch counts?

This usually means your gauge is looser than the pattern needs. Go down a hook size from the suggested 4.0mm and work a fresh swatch before continuing.

Do I need to stuff the whole bow, or just parts of it?

Just the wings. The fiberfill is there for light stuffing so the bow puffs gently without going stiff, not to fill the entire piece.

What's the difference between Part 5 and Part 6?

Part 5 is the long strip, ninety rows, that wraps around the bottom curved edges of the bow panels and across the base. Part 6 is the shorter strip, twenty-four rows, used for the center knot band.

Is this a good project if I've only made amigurumi before?

Yes - the stitches themselves, chain, single crochet, and BLO, are familiar amigurumi basics. The main new skill here is working long flat strips and seaming them into a three-dimensional bow shape.