Intermediate 8-12 Hours Worsted yarn

Worked on the glider, counted out loud —

Monochrome Gray Granny Square Bag Free Crochet Pattern

Crochet a monochrome gray granny square bag with 27 charcoal-bordered squares. Free pattern with sizing, joining tips, and yarn guidance for a chic tote.

Jump to the rounds

Before you sit down

Crochet 27 granny squares, working each through three rounds and finishing every one with a charcoal outer round.

Block each square lightly so they all match the same finished square measurement before joining.

Lay out and group your squares into a front panel, back panel, two side panels, and a bottom strip.

Whip stitch the panels together through back loops only with charcoal yarn, matching stitches corner to corner along each seam.

Assemble the joined panels into the full three-dimensional bag shape, connecting front, back, sides, and bottom.

Add the charcoal top band around the bag opening to reinforce and finish the upper edge.

Crochet two handles separately and attach them securely at the front and back top edges.

Install fabric lining and magnetic snaps for a finished, closeable interior.

What this one is

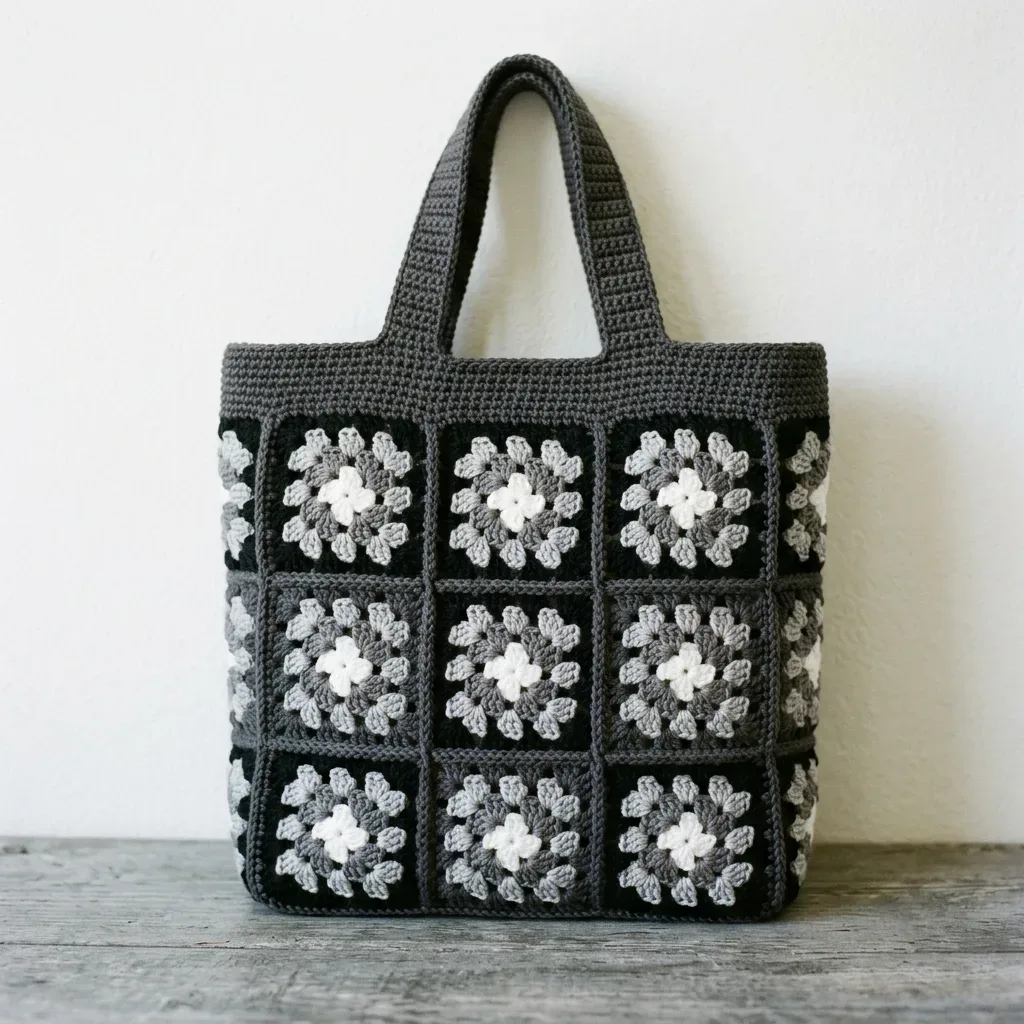
This monochrome gray granny square bag takes a beloved classic — the humble granny square — and gives it a grown-up, minimalist makeover. Twenty-seven squares come together into a structured tote with a crisp charcoal border unifying every panel, while the centers and middles stay scrappy with ivory, light gray, and medium gray. It's perfect for crocheters who love the meditative rhythm of granny squares but want a finished piece that feels sleek enough for daily errands rather than strictly cottagecore.

You'll practice classic granny square construction through three rounds per square, careful color management for that consistent charcoal edge, and a precise whip stitch join through back loops to connect all 27 pieces into front, back, side, and bottom panels. A top band and two handles finish the structure. This is an intermediate-friendly project — comfortable square-making skills help, but the real skill builder is patience with seaming 15 stitches per edge, corner to corner, until the whole tote holds its shape.

The finished bag measures roughly 10.5 inches wide, 12 inches tall, and 3.5 inches deep, with a 6-inch handle drop that works equally well hand-carried or slung over your forearm. Worked in cotton, the stitches stay crisp and the bag holds its structure beautifully over time rather than sagging. It's a wonderful handmade gift for anyone who loves timeless, wearable-with-anything accessories — or a rewarding stash-busting project for yourself, especially if you've been hoarding gray cotton leftovers.

Variations

Once you've made this in classic charcoal-and-gray, the variations are endless. Try a warm neutral palette with charcoal swapped for a rich espresso brown border and centers in oatmeal, camel, and taupe — Paintbox Cotton Aran has gorgeous warm neutrals that would sing here. For a bolder statement, keep the charcoal border but let the centers go rainbow-scrappy, using up odds and ends from your stash for a true memory-bag effect. A coastal version works beautifully too: navy borders with centers in white, sky blue, and seafoam, worked in 24/7 Cotton for that slightly lustrous, beachy sheen. Sizing is flexible if you adjust your panel count. For a smaller crossbody version, drop the front and back panels to a 2×3 grid (18 squares total instead of 27) and shorten your side panels to 1×2 — just remember each seam still joins 15 stitches per edge as long as your squares stay the same 3.5-inch gauge. For an oversized weekend tote, expand front and back to 4×3 grids and add a fourth side panel row. Yarn substitutions are easy since cotton is really the star here for stitch definition — Scheepjes Catona held double gives a noticeably softer drape if you prefer a less structured bag, while a single strand of DK-weight cotton with a smaller hook creates a more delicate, refined version perfect for evenings out. For a seasonal spin, try a soft blush and dusty rose palette with a plum border for a romantic feel, or deep forest green with cream centers for an autumn market-bag vibe. Don't skip the lining and magnetic snaps — swapping in a printed cotton lining is a fun way to add a hidden pop of personality.

I designed this bag because I wanted something that felt like a proper granny square project — scrappy, textured, a little nostalgic — but that I could actually carry to brunch without feeling like I was wearing a blanket. The charcoal border on every single square is the trick: no matter how you mix your ivory, light gray, and medium gray in the centers, that consistent dark edge pulls the whole thing together instantly. Laying out all 27 squares before joining is genuinely satisfying — you get to play stylist for a minute, arranging your 3×3 panels and side strips until the gradient feels balanced. And the whip stitch join through back loops only? It gives you this clean, almost machine-finished seam on the right side, which is exactly the polished look this design needs. Worked in cotton, every stitch pops with definition, so all that careful color placement actually shows. By the time you're stitching the top band and handles on, you'll have a bag with real structure and heft — not floppy, not fussy, just a solid, satisfying, wear-it-forever tote.
Common mistakes

  • Squares end up slightly different sizes, making the panels pucker or gap when joined.Block every square lightly to the same 3.5-inch measurement before joining. Even small size differences compound across 27 squares, so a quick spritz-and-pin session for each one pays off enormously in the final assembly.
  • Whip stitching through both loops instead of back loops only, creating a bulky, twisted-looking seam.Slow down on your first seam and consciously pick up only the back loop on each stitch as instructed. This keeps the join flatter and gives that clean, professional finish the charcoal border is meant to highlight.
  • Losing track of stitch alignment and ending up with more or fewer than 15 stitches matched per edge.Place a stitch marker at the halfway point (around stitch 7-8) on both edges before you start whip stitching. This lets you check alignment midway through the seam instead of discovering a mismatch at the very end.
  • Inconsistent charcoal border rounds, where tension or hook grip changes make some borders look thicker or looser than others.Work all charcoal border rounds in one sitting if possible, keeping your hook grip and yarn tension consistent. If you must stop, note your row and pick back up with a fresh mental check on tension before continuing.
  • Joining panels in the wrong order, leading to a lopsided or mismatched bag shape.Lay out all 27 squares in their panel groups exactly as described — front, back, two side panels, bottom strip — and photograph the layout before you join anything. Refer back to the photo throughout assembly to stay oriented.
  • Running out of a specific gray shade mid-project because centers weren't planned proportionally.Before starting, roughly divide your ivory, light gray, and medium gray yarn into thirds or based on how many squares you want in each shade. This prevents an unbalanced-looking bag where one shade dominates simply because it was used first.

The rounds, in full

Written out, round by round

Intermediate8-12 Hours5.0 mmWorsted

Materials

Everything this one takes, in the order you will reach for it.

  • Charcoal (Main Color): approximately 320 yards / 293 meters

Medium Gray

  • approximately 110 yards / 100 meters

Light Gray

  • approximately 80 yards / 73 meters

Ivory or White

  • approximately 60 yards / 55 meters
  • Suggested yarns that work beautifully for this project include Paintbox Cotton Aran for crisp stitch definition and a wide range of gray shades, Lion Brand 24/7 Cotton for a smooth and slightly lustrous finish that holds its shape, or Scheepjes Catona held double for a softer, more refined look.

Tools you will need

  • 5.0 mm crochet hook (US H/8)
  • Tapestry needle
  • Stitch markers
  • Scissors

Optional

  • fabric for lining and 2 magnetic snaps for closure

keep this to hand

Abbreviations

US crochet terms, as used in this pattern.

  1. chchain
  2. sl stslip stitch
  3. scsingle crochet (UK: dc)
  4. hdchalf double crochet (UK: htr)
  5. dcdouble crochet (UK: tr), which means yarn over, insert hook, pull up a loop, yarn over and pull through two loops, yarn over and pull through remaining two loops
  6. spspace
  7. st(s)stitch(es)
  8. Special StitchGranny Cluster

Step 1: The Granny Square (Make 27)

Choose a light center color (A), a gray middle color (B), and use charcoal for the border (C) on every square.

  1. Round 1(Color A): Into a magic ring: ch 3 (counts as dc), 2 dc, ch 2, [3 dc, ch 2] 3 times in ring; join with sl st to top of ch 3. Pull ring closed. (12 dc, 4 corner spaces)
  2. Round 2(Color B): Join in any corner ch-2 sp. Ch 3, (2 dc, ch 2, 3 dc) in same sp, ch 1, (3 dc, ch 2, 3 dc) in next corner sp; repeat from around; ch 1, join to top of ch 3. (24 dc, 4 corners)
  3. Round 3(Color C, charcoal): Join in any corner ch-2 sp. Ch 3, (2 dc, ch 2, 3 dc) in same sp, ch 1, 3 dc in next ch-1 sp, ch 1, (3 dc, ch 2, 3 dc) in corner sp; repeat from around, ending ch 1, 3 dc in last ch-1 sp, ch 1; join to top of ch 3. Fasten off. (36 dc, 12 clusters)Helpful tip: Weave in ends as you go. With 27 squares, those tails add up fast. Block each square lightly so every one sits at a true 3.5 inches / 9 cm before joining.

Top Band (Charcoal)

  1. Round 1Join charcoal at any top corner. Sc evenly around the whole opening, 15 sc per square edge; join. (120 sc)
  2. Round 2through 5: Ch 1, sc in each st around; join. (120 sc each round) You can work in a continuous spiral if you prefer. Just mark the round start with a stitch marker. The firm band keeps the rim from stretching out with use.

Handles (Make 2)

Foundation: With charcoal, ch 7. (7 ch)

  1. Round 1Sc in 2nd ch from hook and each ch across; turn. (6 sc)
  2. Round 2through 70: Ch 1, sc in back loop of each st across; turn. (6 sc each row) 70 rows equals approximately 16 inches / 40 cm. Fasten off, leaving a long tail for sewing.Attaching the handles: Position each handle’s ends on the band over the 1st and 3rd squares of the front, approximately 1.5 inches / 4 cm from the top edge. Sew securely, reinforcing each end with a few extra passes of yarn. Repeat on the back panel.

Assembly

Step 1

Finishing steps:

Step 2

Weave in all remaining ends on the inside and trim close

Step 3

Gently steam block the assembled bag so seams sit flat and corners stay crisp

Step 4

Optional lining: Cut fabric to the inner dimensions plus 0.5 inch seam allowance, sew into a box shape, and hand stitch to the inside of the band

Step 5

Optional closure: Add two magnetic snaps to the band centers on front and back

Step 6

Care instructions:

Step 7

Hand wash cool with mild detergent; do not wring

Step 8

Reshape while damp and dry flat, away from direct heat and sunlight

Step 9

Empty the bag before washing and store loosely stuffed to help it hold its shape

Step 10

Cotton may relax slightly with use. A quick re-block restores the structure

Important notes

Note 01

💡 Make one test square first and block it before committing to all 27 — matching that 3.5-inch finished size matters more than hitting the exact row gauge, since even a quarter-inch difference multiplied across 27 squares will throw off your panel dimensions.

Note 02

💡 Use a 5.0 mm (US H/8) hook consistently throughout, including for the top band and handles, so your gauge stays uniform between the granny squares and the finishing pieces.

Note 03

💡 Keep your charcoal yarn separate and easily accessible since it appears in every single square's final round plus the entire top band and handles — consider winding a dedicated charcoal cake or bobbin to avoid constant rummaging.

Note 04

💡 Place stitch markers at the corners of each square as you finish it, so when you lay out your 27 squares for arranging, you can instantly see which edges are corners versus straight sides during joining.

Note 05

💡 When whip stitching, always hold squares with wrong sides together and work corner to corner in one continuous pass per seam — stopping and restarting mid-edge is where stitch counts most often go wrong.

Note 06

💡 Prewash or pre-treat your lining fabric before installing it with the magnetic snaps, since cotton granny squares and cotton lining fabric can shrink at different rates if the bag is ever laundered later.

FAQs

Asked on the glider

the ones that come up on the glider

Can I make this bag without lining it?

Yes, the granny squares and charcoal joins are sturdy enough to stand alone if you prefer an unlined, breathable tote. Just note that skipping the lining means skipping the magnetic snap closure, so you'd want to add a button or drawstring instead for security.

What yarn weight works best for crisp stitch definition?

A worsted-weight cotton like Paintbox Cotton Aran or 24/7 Cotton is ideal since cotton's low stretch shows off the granny square texture beautifully. Held-double Scheepjes Catona is a great alternative if you want a slightly softer drape while still keeping definition.

How many total yards of yarn do I need for the whole bag?

You'll need approximately 320 yards of charcoal as your main color, plus roughly 110, 80, and 60 yards of your three accent grays for a combined total near 570 yards. Buying an extra skein of charcoal is wise since it's used in every square, the top band, and both handles.

Why does my finished bag look uneven even though each square measures correctly?

This usually comes from inconsistent whip stitch tension during joining rather than the squares themselves. Keep your seaming tension snug but not tight, and try to join all seams in a similar sitting so your hand tension stays consistent throughout.

Can I use scrap yarn for the centers if it's a different fiber than the cotton main color?

It's best to stick with cotton throughout since mixed fibers can create subtle differences in drape, sheen, and how the piece blocks. If you do mix in a scrap acrylic or blend, block a test square first to make sure the gauge and texture still match your charcoal cotton border.