Beginner 4-6 hours Worsted yarn

Worked on the glider, counted out loud —

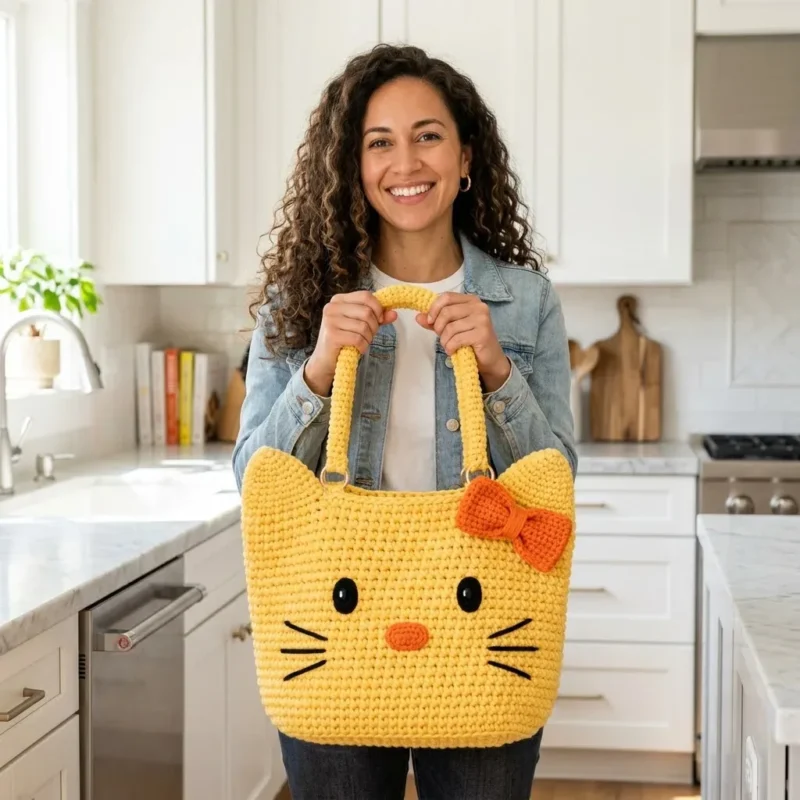
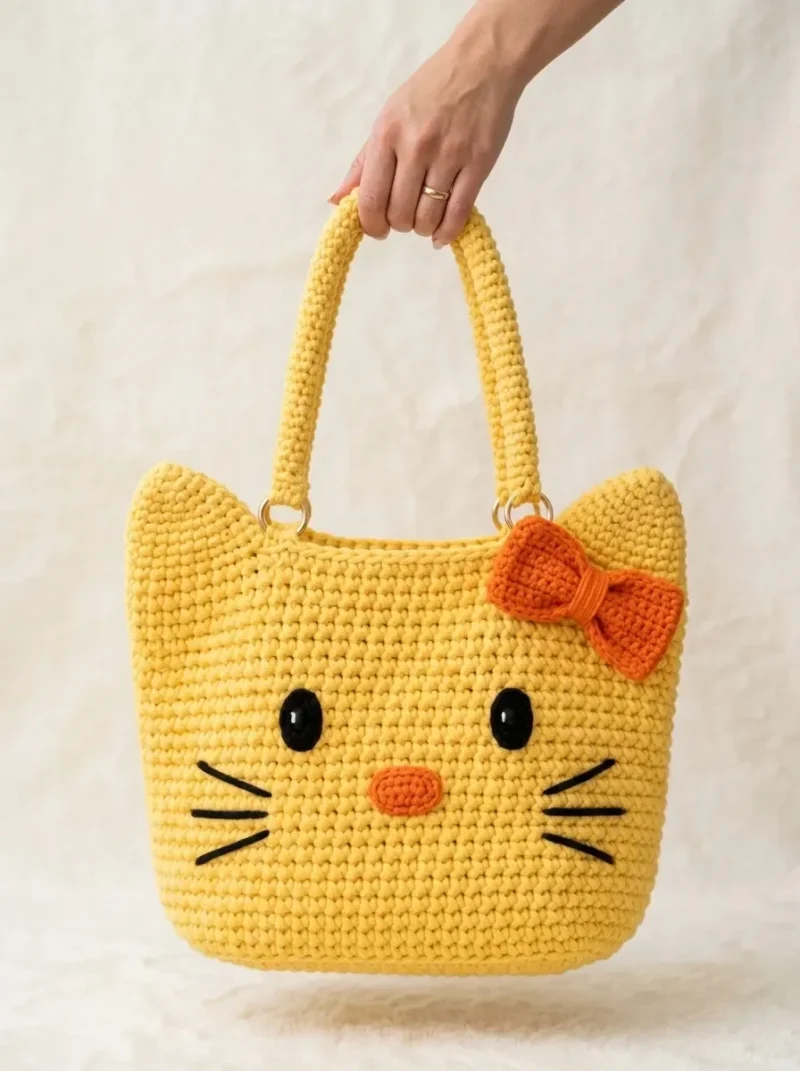
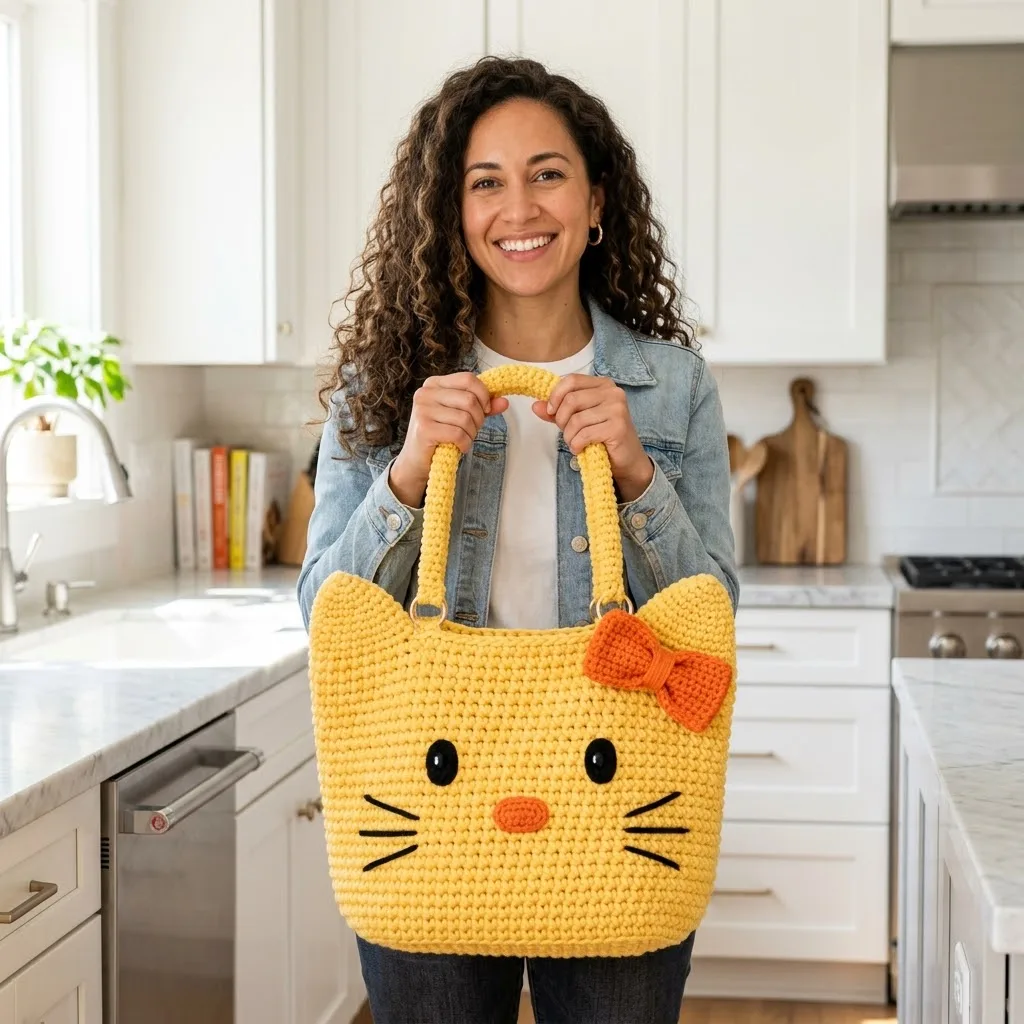
Cheerful kitty tote bag crochet pattern with bow trim

A beginner-friendly crochet tote with cat ears and a bow, ready in about 4 to 6 hours of easy single crochet.

Jump to the rounds

What this one is

This tote is the project you make for the cat lover in your life — the kid who draws whiskers on everything, the friend who collects feline mugs, or you, if you've been wanting a bag with a bit of personality. It's playful without being fussy, cheerful without demanding much from you besides basic single crochet and a little patience for the shaping. Perfect for carrying a paperback, a water bottle, or an afternoon's worth of yarn to a friend's porch.

Your hands will spend most of their time in plain single crochet — rows and rows of it for the body, then a quick chain of sixty-one for each handle, worked back and forth before you finish the edges with a tidy row of single crochet all the way around. The ears come together fast with steady sc2tog decreases, dropping from fifteen stitches down to one in just eight rows. All told, expect to spend somewhere around four to six hours from gauge swatch to sewn-on bow.

Try it another way

The easiest swap is color — work the body in a different shade and keep the ears in a contrast for a different kind of cat entirely, or reverse it so the ears pick up the main color and the body goes neutral. If you want a slightly roomier bag, you can add extra rows to the body before you start the handles, just keep your stitch count steady at whatever your starting chain gave you. The handles themselves are flexible too: Part 5 as written gives you a strap about 20 inches long and 1 inch wide from a chain of 61, but shortening that starting chain gives you a shorter, more structured handle for carrying over the forearm rather than the shoulder. The bow is an easy place to experiment — try the loops in a bright contrast and the center in the same yellow as the body so it reads as an accent rather than a match. If this is going to be a project bag rather than an everyday tote, consider adding a second round of single crochet around the top edge before attaching the handles, for a bit more structure where the strain hits hardest.

What makes this one satisfying is the mix of plain and fiddly. The body is forgiving single crochet, round after round, the sort of stitching you can do while half-watching something on the television. Then the ears ask for real attention: sc2tog decreases every single row, shrinking from fifteen stitches to one in just eight rows, so you watch the little triangle take shape right in your hands. The handles are their own small victory — a chain of sixty-one worked into sixty stitches, then finished with a neat edging round so the strap never looks raw at the join. By the time you stitch on the bow loops and center, you've touched nearly every basic technique in the book, just in miniature.

The rounds, in full

Written out, round by round

Beginner4-6 hoursWorsted

Bring to the porch

Everything this one takes, in the order you will reach for it.

  • for This Crochet Tote Bag

Gauge

12 single crochet stitches and 14 rows = 4 inches in single crochet

Gauge matters here because you want your bag to hold its shape. Too loose and it will stretch. Too tight and it will be stiff and hard to work.

Skill Level and Stitches Used

This crochet pattern is suitable for confident beginners who have completed a few projects and feel comfortable with basic stitches. If you have made a hat or a simple bag before, you can absolutely do this.

Abbreviations and Definitions:

Chain (ch): The foundation stitch. Yarn over, pull through the loop on your hook. This creates the starting row for most projects.

Single Crochet (sc): Insert hook into stitch, yarn over and pull up a loop (2 loops on hook), yarn over and pull through both loops. This is the most basic crochet stitch and creates a tight, dense fabric.

Single Crochet Increase (inc): Work 2 single crochet stitches into the same stitch. This adds one stitch to your count.

Single Crochet Two Together (sc2tog): A decrease. Insert hook into first stitch, pull up a loop, insert hook into next stitch, pull up a loop (3 loops on hook), yarn over and pull through all 3 loops. This removes one stitch from your count.

Slip Stitch (sl st): Insert hook, yarn over, pull through stitch and loop on hook in one motion. Used for joining and moving across stitches without adding height.

Magic Ring (MR): An adjustable starting loop that closes completely. If this intimidates you, chain 2 and work your first round stitches into the second chain from the hook instead.

Finished Dimensions The completed kitty tote bag measures approximately: Width: 14 inches across the top opening Height: 12 inches from base to top edge (not including ears)

Depth: 5 inches at the base Handle drop: 8 inches

Your measurements may vary slightly based on your gauge and tension. That is completely normal and nothing to worry about.

Step by Step Crochet Pattern Instructions Base of the Bag

The bag starts with an oval base worked in continuous rounds. Place a stitch marker at the beginning of each round and move it up as you go.

  1. Round 1Ch 21. Starting in the 2nd ch from hook, work 1 sc in each of the next 19 ch. In the last ch, work 3 sc (this turns the corner). Now working along the opposite side of the foundation chain, work 1 sc in each of the next 18 ch. Work 2 sc in the last ch. (42 sts)
  2. Round 2Work 1 inc, 18 sc, 3 inc, 18 sc, 2 inc. (48 sts)
  3. Round 3Work 1 sc, 1 inc, 18 sc, (1 sc, 1 inc) 3 times, 18 sc, (1 sc, 1 inc) 2 times. (54 sts)
  4. Round 4Work 2 sc, 1 inc, 18 sc, (2 sc, 1 inc) 3 times, 18 sc, (2 sc, 1 inc) 2 times. (60 sts)
  5. Round 5Work 3 sc, 1 inc, 18 sc, (3 sc, 1 inc) 3 times, 18 sc, (3 sc, 1 inc) 2 times. (66 sts)
  6. Round 6Work 4 sc, 1 inc, 18 sc, (4 sc, 1 inc) 3 times, 18 sc, (4 sc, 1 inc) 2 times. (72 sts)

At this point, your base should measure approximately 5 inches wide by 9 inches long. It will be an elongated oval shape.

Body of the Bag Now you will work straight up without increases to create the walls.

  1. Round 7Working in the back loops only for this round, sc in each st around. (72 sts) This back loop only round creates a crisp edge at the base of your bag. You will feel the fabric start to cup upward.
  2. Round 8through 45: Sc in each st around. (72 sts) Continue working in both loops as normal. Work 38 rounds of even single crochet. This creates the main body of your tote.At the end of Round 45, your bag body should measure approximately 11 inches tall from the base.
  3. Round 46Sc in each st around. Sl st to first sc to join. Fasten off and weave in end. (72 sts)

Cat Ears (Make 2)

The ears are worked in rows, creating flat triangles.

Part 4

  1. Round 1Ch 16, sc in 2nd ch from hook and in each ch across. Ch 1, turn. (15 sts)
  2. Round 2Sc2tog, sc in each st until 2 sts remain, sc2tog. Ch 1, turn. (13 sts)
  3. Round 3through 8: Repeat Row 2. You will decrease by 2 stitches each row. After Row 8, you should have 1 stitch remaining. Fasten off, leaving a long tail for sewing.

The ears will naturally curl slightly. This is fine. They will flatten when sewn to the bag.

Handles (Make 2)

The handles need to be sturdy. Work tightly for this section.

Part 5

  1. Round 1Ch 61, sc in 2nd ch from hook and in each ch across. Ch 1, turn. (60 sts)
  2. Round 2through 4: Sc in each st across. Ch 1, turn. (60 sts) After Row 4, do not turn. Work 1 row of sc evenly down the short side, across the foundation chain, and up the other short side to create a finished edge all around. Sl st to join. Fasten off, leaving a tail for sewing.

The handles should measure approximately 20 inches long and 1 inch wide.

Bow Loops

Ch 21, sc in 2nd ch from hook and in each ch across. (20 sts)

Work 3 more rows of sc. Fasten off.

To assemble the bow: Fold the larger piece so the short ends meet in the middle, creating a figure eight shape. Wrap the small center piece around the middle and sew in place at the back. The bow should measure approximately 3 inches wide.

Cat Nose Using orange yarn and your magic ring technique:

  1. Round 16 sc in magic ring. (6 sts)
  2. Round 2Inc in each st around. (12 sts)
  3. Round 3(1 sc, 1 inc) 6 times. (18 sts) Sl st to join. Fasten off, leaving a tail for sewing. The nose will be a small flat circle, approximately 1.5 inches across. Stuff very lightly with yarn scraps if you want it slightly puffy, or leave flat.

Assembly Instructions This is where your kitty comes to life. Take your time with placement.

Positioning the Face

1. Eyes: Place the safety eyes approximately 4 inches down from the top edge of the bag and about 3.5 inches apart. If using buttons, sew them on after the nose is placed so you can adjust positioning.

2. Nose: Center the orange nose between and below the eyes, approximately 2 inches below the eye line. Sew in place using the yarn tail and a whip stitch.

3. Whiskers: Using black yarn, embroider 3 straight stitches on each side of the nose, angling slightly outward and downward. Each whisker should be approximately 2 inches long.

Attaching the Ears

Pin the ears to the top corners of the bag, positioned so they angle slightly outward. The base of each ear should sit approximately 1 inch from the side edge and 1 inch down from the top. Sew securely using a whip stitch, going around the base of the triangle twice for strength.

Attaching the D-Rings and Handles

Thread one end of a handle through a D-ring. Fold the handle end over by about 1.5 inches and sew securely to itself, enclosing the D-ring. Repeat for the other end of the same handle with the second D-ring.

Sew the D-rings to the inside top edge of the bag, positioned at the side corners where the ears are attached. The handles should hang inside the bag when not in use and can be pulled up for carrying.

Bow Center

Ch 4, sc in 2nd ch from hook and in each of the next 2 ch. Ch 1, turn. (3 sts)

Work 5 more rows of 3 sc. Fasten off, leaving a long tail.
Marlene's notes

Note 01

Keep your tension even through the body rounds — a bag worked too loose will stretch out of shape once you load it up, while one worked too tight turns stiff and hard to fold flat.

Note 02

The ears will curl slightly as you decrease through Part 4; that's normal, and they flatten once you sew them to the body, so don't try to block them flat beforehand.

Note 03

Check your handle measurements as you go — Part 5 should finish at roughly 20 inches long and 1 inch wide, so if yours runs short or long, it's worth checking your row count before sewing it on.

Porch photos

Before you sit down

  • Work the gauge swatch first — you're aiming for 12 single crochet stitches and 14 rows across 4 inches, since a looser swatch means a tote that sags under its own yarn.
  • Set aside enough yarn for the body, both ears, both handles, and the bow pieces before you start the first round, so you're not guessing mid-project how much is left.
  • Read through Part 4 before you pick up your hook — the ear decreases happen every single row, and it helps to know in advance that you're dropping from fifteen stitches to one over eight rows.
  • Have a stitch marker or scrap yarn ready to mark the start of rounds, especially once you move from the body into the handle and ear sections, since it's easy to lose track of where a row begins.

How the hours go

Gauge swatch and body setup
about 30 minutes, because getting 12 stitches and 14 rows to 4 inches right up front saves frustration later
Ears (Part 4)
about 20 minutes per ear, because the sc2tog decreases happen every row and need close counting
Handles (Part 5)
about 45 minutes per handle, because four rows of 60 stitches plus the finishing edge round take real time

Looking after it

  • Hand wash in cool water with a gentle detergent and lay the bag flat to dry, since the shape holds best when it's not hung wet and stretched by its own weight.
  • Reshape the ears and the top edge while the piece is still slightly damp, then store the tote stuffed with a towel or tissue paper so it keeps its shape between outings.
FAQs

Asked on the glider

the ones that come up on the glider

Why do the cat ears curl when I finish them?

That curl comes from the steady sc2tog decreases in Part 4, which naturally pull the fabric inward. It settles down once you sew the ears flat onto the body, so there's no need to block or steam them first.

How long should the finished handles be?

Part 5 is written to give you handles about 20 inches long and 1 inch wide, worked from a starting chain of 61 into 60 stitches. If you want a shorter strap, just shorten the starting chain before you begin.

My gauge swatch doesn't match — does it matter?

It matters more here than in a lot of projects, since the pattern wants 12 single crochet stitches and 14 rows to 4 inches to keep the bag from stretching or going stiff. Adjust your hook size up or down until your swatch matches before you commit to the body.

Can I make the bag bigger without changing the pattern math?

Yes — you can add extra plain rows to the body before you start the handles and ears, since those sections are worked separately. Just keep track of how many rows you add so both sides stay even.

Do the two ears need to match exactly?

They should both follow Part 4's eight rows of decreases down from fifteen stitches to one, so working them back to back from the same written rows keeps them consistent. Minor curl differences even out once they're sewn on.

What's the bow made from — is it one piece or two?

The bow comes together from two separate pieces, the Bow Loops and the Bow Center, which you make and then join. Keeping the center a touch snug around the loops gives the bow its pinched, finished look.