Intermediate 60-90 hours Bulky yarn

Worked on the glider, counted out loud —

Monochrome granny square hooded cardigan pattern

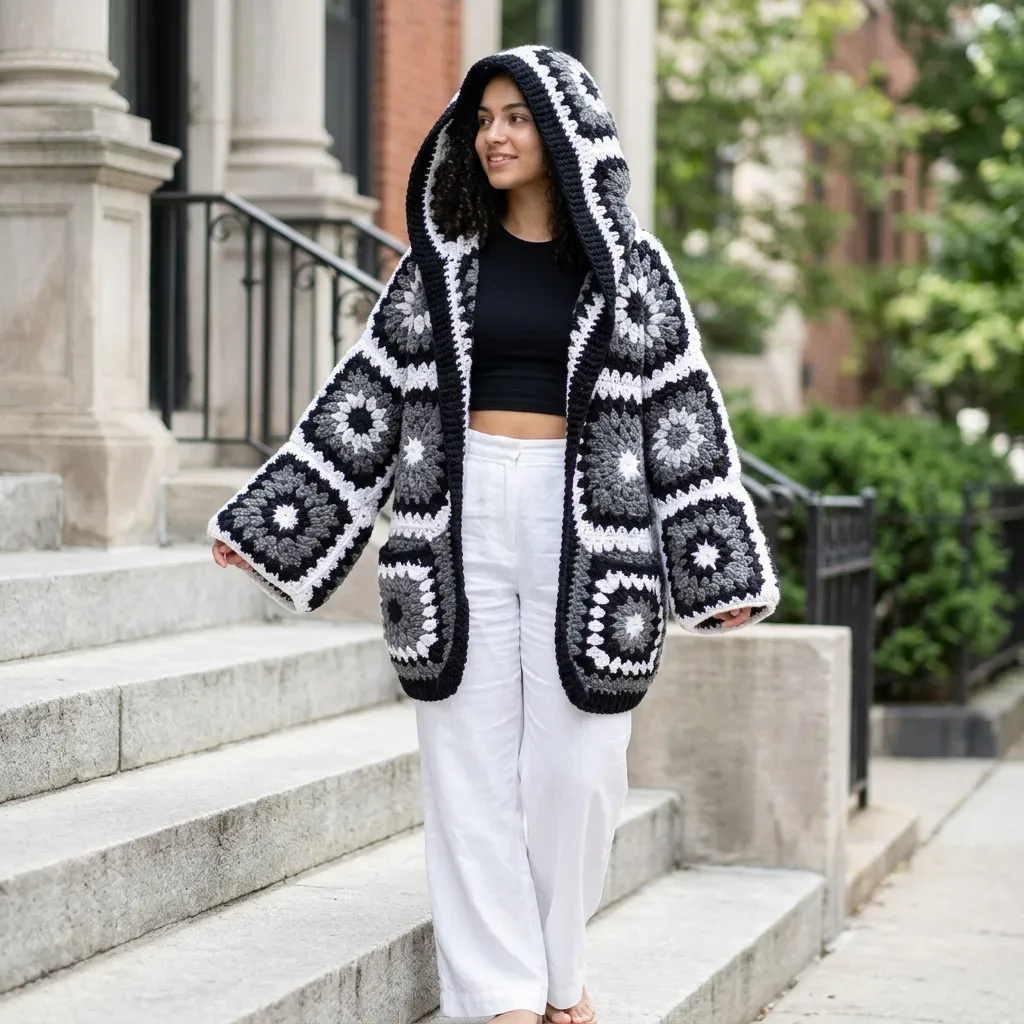
Oversized granny square hoodie in black, grey, and white. Intermediate level, 60-90 hours. For confident motif joiners.

Jump to the rounds

What this one is

This is the cardigan you reach for when you want to look like you tried without actually trying. No buttons, no closures, just a wide open front that you pull on and wrap around yourself. It's for the crocheter who already has a few finished garments behind them and wants to sink into something bigger, bolder, and a little more architectural than a scarf or a hat.

Your hands will spend most of this project on one shape, over and over: a granny square that graduates from white at the center out through medium grey and charcoal to black. You'll make ninety-three of them for a size medium, then join them into five panels before seaming and bordering. Between the squares and the finishing, plan on sixty to ninety hours total, with twenty to twenty-five of those hours on squares alone if you're working at a steady six to eight an hour.

Try it another way

If you want a lighter, more everyday layer, drop the hood panel and finish the neckline with the same black border you're already using for the front — the construction of separate panels seamed together makes it easy to swap one out. For a different mood entirely, reverse the color logic: work Color A at the center of each square and let it graduate outward to white, so the cardigan reads pale and soft instead of graphic and bold. You could also stagger the color graduation so not every square finishes on black — mix in squares that end on charcoal or medium grey for a scrappier, less uniform outer surface. Since the whole garment is built from motifs, this is also a natural place to experiment with yarn: swap the bulky acrylic or wool-acrylic blend for a different bulky weight fiber and you'll change the drape of those wide sleeves and the open front considerably. If ninety-three squares feels like a lot, remember that gauge is per-square, so a smaller size means fewer motifs rather than smaller motifs, which makes scaling the project up or down mostly a matter of patience rather than pattern changes.

There's a real satisfaction in watching a single motif become a whole panel, and then watching five panels become a garment with a hood and dropped shoulders. The color graduation from white center out to a black outer round on every square is the kind of detail that photographs beautifully but is also just quietly meditative to stitch, round after round, fastening off and rejoining a new shade each time. You get the rhythm of a beginner stitch with the payoff of an intermediate finish: consistent tension across dozens of squares, clean joins where panels meet, and a picked-up border that turns raw edges into a thick, deliberate frame around the front and hood. It's the kind of project that teaches you patience and rewards you with something genuinely wearable.
The rounds, in full

Written out, round by round

Intermediate60-90 hours6.5 mmBulky

Bring to the porch

Everything this one takes, in the order you will reach for it.

Yarn

  • Bulky weight yarn (CYCA 5), 100% acrylic or wool-acrylic blend recommended for durability and ease of care.
  • Color A (Black): 1,600 yards / 1,463 meters
  • Color B (Charcoal Grey): 900 yards / 823 meters
  • Color C (Medium Grey): 700 yards / 640 meters
  • Color D (White): 500 yards / 457 meters

Total yardage

  • approximately 3,700 yards / 3,383 meters

Hook

  • US Size K-10.5 / 6.5 mm (adjust as needed to meet gauge)

Notions

  • Yarn needle for weaving ends and seaming
  • Scissors
  • Stitch markers (at least 10)
  • Blocking mats and pins or a blocking board
  • Spray bottle or basin for wet blocking

Main Pattern

Foundation Using Color D (White), make a magic ring. Alternatively, chain 4 and join with slip stitch to form a ring.

  1. Round 1Color D, White Chain 3 (counts as first dc), work 2 dc into ring, ch 2, [3 dc into ring, ch 2] 3 times, sl st to top of beg ch-3 to join. Fasten off Color D.(4 clusters of 3 dc, 4 ch-2 corner spaces)
  2. Round 2Color C, Medium Grey Join Color C in any ch-2 corner sp. Ch 3 (counts as first dc), work 2 dc in same corner sp, ch 2, 3 dc in same corner sp (first corner made), ch 1, [3 dc, ch 2, 3 dc] in next ch-2 corner sp, ch 1. Rep from [ ] 2 more times. Sl st to top of beg ch-3 to join. Fasten off Color C.(8 clusters of 3 dc, 4 ch-2 corner spaces, 4 ch-1 side spaces)
  3. Round 3Color B, Charcoal Grey Join Color B in any ch-2 corner sp. Ch 3, 2 dc in same corner sp, ch 2, 3 dc in same corner sp, ch 1, 3 dc in next ch-1 sp, ch 1, [3 dc, ch 2, 3 dc in next ch-2 corner sp, ch 1, 3 dc in next ch-1 sp, ch 1] 3 times. Sl st to top of beg ch-3 to join. Fasten off Color B.(12 clusters of 3 dc, 4 ch-2 corner spaces, 8 ch-1 side spaces)
  4. Round 4Color A, Black Join Color A in any ch-2 corner sp. Ch 3, 2 dc in same corner sp, ch 2, 3 dc in same corner sp, ch 1, [3 dc in next ch-1 sp, ch 1] 2 times, [3 dc, ch 2, 3 dc in next ch-2 corner sp, ch 1, [3 dc in next ch-1 sp, ch 1] 2 times] 3 times. Sl st to top of beg ch-3 to join. Fasten off Color A.(16 clusters of 3 dc, 4 ch-2 corner spaces, 12 ch-1 side spaces)Checkpoint: After completing one square, block it. It should measure exactly 6 in x 6 in / 15 cm x 15 cm. Adjust hook size if needed before making the remaining squares.

Border

The border frames the entire front opening in Color A.

With RS facing, join Color A at the lower right-hand corner of the right front hem edge.

Foundation row: Work sc evenly up the right front edge, around the hood front opening, and down the left front edge. Work 1 sc into each ch-1 sp, 1 sc into each joining seam, and 3 sc into each outer corner. Do not turn.

  1. Round 1Sc across entire front and hood edge. Ch 1, turn.
  2. Round 2Working in BLO, sc across. Ch 1, turn.
  3. Round 3Working in both loops, sc across. Sl st to first sc. Fasten off. Weave in all remaining ends.

Marlene's notes

Note 01

Work with a US Size K-10.5 / 6.5 mm hook, but treat that as a starting point and adjust up or down as needed to hit the blocked 6 in / 15 cm square gauge.

Note 02

Each round of the Main Pattern is worked in its own color and fastened off before the next round begins, so keep your color changes clean and your ends organized as you go — you'll be weaving in a lot of them across 93 squares.

Note 03

Consistent tension matters more here than in a single-motif project, since any drift in square size will compound across the back panel, two front panels, two sleeve panels, and the hood panel before you even get to seaming.

Note 04

size medium with an intentionally oversized fit: Bust circumference at underarm 52 in / 132 cm. Total length from center back shoulder to hem 34 in / 86 cm. Sleeve length from shoulder seam to cuff 24 in / 61 cm. Hood height 14 in / 35.5 cm. Each granny square after blocking 6 in x 6 in / 15 cm x 15 cm.

Note 05

US K-10.5 / 6.5 mm hook: 1 completed granny square (4 rounds) = 6 in x 6 in / 15 cm x 15 cm after blocking. Do not skip blocking your gauge square. Granny squares can draw in significantly before blocking and the final garment dimensions depend on consistent square size. To check gauge, make one complete square following the instructions, weave in ends, and wet block. Measure after drying completely. If your square is larger than 6 inches, go down one hook size. If your square is smaller than 6 inches, go up one hook size.

Note 06

Work 3 double crochet (dc) stitches into the same stitch or space. This is the foundational stitch of the granny square. Each cluster counts as one unit when counting corners and sides.

Note 07

Hold two squares with wrong sides together. Insert hook through the back loops of both corresponding edge stitches simultaneously, pull up a loop of joining yarn (Color A/Black), chain 1, then single crochet (sc) through both layers evenly across the edge. Fasten off. This creates a visible ridge on the right side that adds graphic texture.

Note 08

All squares are worked in rounds with the right side always facing. Do not turn between rounds. Each square uses all four colors, and Color A (Black) is always the final round and is the color used for all joins and border work. Color sequence for every square: Round 1 is Color D (White), Round 2 is Color C (Medium Grey), Round 3 is Color B (Charcoal Grey), Round 4 is Color A (Black). Fasten off each color after its round. Join new color in any corner chain-2 space unless otherwise stated. Brackets [ ] indicate instructions to repeat the specified number of times.

Note 09

Back panel: 5 squares wide x 6 squares tall = 30 squares. Right front panel: 2 squares wide x 6 squares tall = 12 squares. Left front panel: 2 squares wide x 6 squares tall = 12 squares. Right sleeve: 3 squares wide x 4 squares tall = 12 squares. Left sleeve: 3 squares wide x 4 squares tall = 12 squares. Hood: 5 squares wide x 3 squares tall = 15 squares. Total squares: 93. Before joining any panels, lay out all 93 blocked squares in their panel configurations to verify the layout.

Note 10

Before joining, wet block all 93 squares. This step is essential for neat assembly. Soak each square in cool water for 10 to 15 minutes. Gently press out excess water without wringing. Pin each square to blocking mats at exact 6 in x 6 in dimensions.

Before you sit down

  • Make one gauge square through all 4 rounds and block it before you commit to the full 93 — it should measure 6 in x 6 in / 15 cm x 15 cm after blocking, and squares draw in significantly before that step.
  • Lay out your yarn by color: 1,600 yards of Color A (Black), 900 of Color B (Charcoal Grey), 700 of Color C (Medium Grey), and 500 of Color D (White), against the roughly 3,700 yards the whole project needs.
  • Set aside at least 10 stitch markers before you start joining panels — you'll want them for tracking corners and seam lines as the squares come together.
  • Read through Round 1 and Round 2 of the Main Pattern once before your first stitch so the corner and side-space structure is clear in your head before the color changes start stacking up.

How the hours go

Granny squares (93 total)
about 20 to 25 hours because that's the estimate for experienced crocheters working 6 to 8 squares per hour, and each square takes 4 rounds with a color change every round
Panel assembly and seaming
about several hours per panel because you're joining squares into a back panel, two front panels, two sleeve panels, and a hood panel, then seaming all five together
Border
about a few hours because it runs the entire front opening and hood edge in Color A, picking up stitches evenly across seams, ch-1 spaces, and corners

Looking after it

  • Hand wash in cool water or use a gentle machine cycle if your acrylic or wool-acrylic blend allows it, since bulky-weight fibers like this hold a lot of water and can stretch under their own weight if wrung out.
  • Dry the cardigan flat, reshaping the panels and easing the border back into place while it's damp, then store it folded rather than hung so the dropped shoulders and hood keep their shape between wears.
FAQs

Asked on the glider

the ones that come up on the glider

Do I need to be able to read a full garment pattern to make this?

You should have at least one finished garment behind you and feel comfortable joining motifs, since this pattern is rated intermediate. The granny square itself is beginner-friendly, but the challenge is in consistent tension across many squares and clean seaming.

How many squares do I actually need to make?

a size medium, the pattern calls for approximately 93 squares. Experienced crocheters working 6 to 8 squares per hour spend about 20 to 25 hours on that portion alone.

Why does my square look smaller than 6 inches before I block it?

Granny squares typically draw in significantly before blocking, so an unblocked square will read smaller than the finished 6 in x 6 in / 15 cm x 15 cm measurement. Always check your gauge on a blocked square, not a raw one.

How much yarn should I have on hand before I start?

Plan for roughly 3,700 yards total, split across four colors: 1,600 yards of black, 900 of charcoal grey, 700 of medium grey, and 500 of white. Buying a little extra in your dominant color, black, is worth it since it also carries the entire border.

Does the cardigan close in the front?

No, there are no buttons or closures anywhere on this design. The front stays open and drapes, framed by the thick black border along the front edge and hood opening.