Intermediate 12-16 hours Worsted yarn

Worked on the glider, counted out loud —

Mint Bunny Baby Cocoon with Floppy Ears Crochet Pattern

Intermediate crochet cocoon with bunny hood and ears, 12-16 hours of work, perfect for newborn photos or snuggling.

Jump to the rounds

What this one is

You know those quiet stretches where someone's expecting and you want to make something they'll actually use, not just admire. That's this cocoon. It's built for a newborn, soft enough for delicate skin, snug enough to feel like a hug, and that bunny hood with the floppy dusty rose ears makes it just as sweet for photos as it is for everyday naps on the couch.

Try it another way

If you want a longer cocoon for an older baby, you could add a few extra even rounds to the Lower Body Tube beyond the stated 17, just keep your stitch count at 48 sc so the width stays proportional. Swapping the mint for a different worsted weight shade is simple since the whole body is plain single crochet, no stitch pattern to interrupt. You could also flip the color story and use your Color A shade as the main body color with mint reserved for the ear linings instead, which gives a completely different mood from the same construction. For a non-bunny version, skip the ears and whiskers entirely and let the Hood Facing Edge stand alone as a simple snug hood, still finished with the embroidered eyes and nose for a quieter, rounder-eared creature feel. If this is meant purely for photography rather than daily wear, you might work the pompom tail a touch larger using extra Color B, since it won't need to withstand regular machine washing the way an everyday cocoon would.

There's something deeply satisfying about watching a flat oval ring turn into a three-dimensional pod with nothing but increases, decreases, and a stitch marker keeping you honest. You'll shape the body through the oval foundation, hold it steady through 17 rounds of plain tube, then flare it out again, all without a single join to fuss over. The ear panels bring in a bit of back-and-forth row work and a color change for the dusty rose lining, a nice change of rhythm after all those rounds. And the face, those straight-stitch eyes, the filled nose, the whiskers, is where the whole thing stops being a tube and starts being a bunny. It's the kind of project where every stage looks different from the last, so you're never bored, just steadily closer to something a baby will actually sleep in.

The rounds, in full

Written out, round by round

Intermediate12-16 hours5.0 mmWorsted

Bring to the porch

Everything this one takes, in the order you will reach for it.

  • Main Color (MC): Soft mint or sage green, approximately 600 yards (550 m) of worsted weight yarn (weight category 4)
  • Color A (CA): Dusty rose or blush pink, approximately 60 yards (55 m) of worsted weight yarn, for the ear linings
  • Color B (CB): White or cream, approximately 20 yards (18 m) of worsted weight yarn, for the pompom tail
  • Small amounts of black and gray worsted weight yarn or embroidery floss for the facial features
  • US size H-8 / 5.0 mm crochet hook
  • Stitch markers (at least 4)
  • Yarn needle for seaming and embroidery
  • Scissors
  • Pompom maker or two cardboard circles approximately 2.5 inches in diameter
  • White yarn or matching white roving for the pompom, or purchase a 2.5-inch pompom

Bottom Oval Foundation

  1. Round 1Using MC make a MR. Work 6 sc into the ring. Pull tail to close ring. Do not join. Place marker in first stitch. (6 sc)
  2. Round 2Work 2 sc in each st around. (12 sc)
  3. Round 3(Sc 1, inc) repeat 6 times around. (18 sc)
  4. Round 4(Sc 2, inc) repeat 6 times around. (24 sc)
  5. Round 5(Sc 3, inc) repeat 6 times around. (30 sc)
  6. Round 6(Sc 4, inc) repeat 6 times around. (36 sc)
  7. Round 7(Sc 5, inc) repeat 6 times around. (42 sc)Step by step: (Sc 6, inc) repeat 6 times around. (48 sc).
  8. Round 8(Sc 6, inc) repeat 6 times around. (48 sc) Checkpoint: After round 8, your oval bottom should measure approximately 3.5 inches (9 cm) in diameter. The piece should lie flat.

Outer Ear Panel (make 2, in MC)

  1. Round 1Chain 9. Sc in 2nd ch from hook and in each ch across. Turn. (8 sc)
  2. Round 2through 10: Ch 1, sc in each st across. Turn. (8 sc)
  3. Round 11Ch 1, sc2tog, sc 4, sc2tog. Turn. (6 sc)
  4. Round 12Ch 1, sc in each st across. Turn. (6 sc)
  5. Round 13Ch 1, sc2tog, sc 2, sc2tog. Turn. (4 sc)
  6. Round 14Ch 1, sc in each st across. Turn. (4 sc)
  7. Round 15Ch 1, sc2tog, sc2tog. Turn. (2 sc)
  8. Round 16Ch 1, sc2tog. (1 sc) Fasten off, leaving a long tail.

Lower Body Tube

  1. Round 9through 25: Sc in each st around. Work 17 rounds even. (48 sc each round) Checkpoint: After round 25, the cocoon body from the bottom point should measure approximately 7 inches (18 cm) tall. The tube should be snug and cylindrical.

Hood Facing Edge

  1. Round 24Working in back loops only , sc in each st around. This ridge creates a fold line for the facial frame. (72 sc)
  2. Round 25Sc in each st around. (72 sc)
  3. Round 26Sc in each st around. (72 sc) Slip stitch into the next stitch to close the round. Fasten off leaving a 24-inch (61 cm) tail for seaming. Set hood aside.

Upper Body Expansion

  1. Round 26(Sc 7, inc) repeat 6 times around. (54 sc)
  2. Round 27through 30: Sc in each st around. Work 4 rounds even. (54 sc each round)(54)
  3. Round 31(Sc 8, inc) repeat 6 times around. (60 sc)
  4. Round 32through 36: Sc in each st around. Work 5 rounds even. (60 sc each round)(60)
  5. Round 37(Sc 9, inc) repeat 6 times around. (66 sc)
  6. Round 38through 43: Sc in each st around. Work 6 rounds even. (66 sc each round)(66)
  7. Round 44(Sc 10, inc) repeat 6 times around. (72 sc)through 23: Sc in each st around. Work 11 rounds even. (72 sc each round) Checkpoint: After round 23, the hood should measure approximately 7 inches (18 cm) in diameter and approximately 5.5 inches (14 cm) tall from the top. The interior should be deep enough to cradle a newborn head with the hat pulled down to the eyebrows.
  8. Round 45through 52: Sc in each st around. Work 8 rounds even. (72 sc each round) Checkpoint: After round 52, the cocoon body should measure approximately 18 to 19 inches (46 to 48 cm) from the bottom. The widest circumference should measure approximately 17 inches (43 cm). The opening at the top should be fully open and circular.Fasten off with a slip stitch into the next stitch to close the final round cleanly. Leave a long tail of approximately 24 inches (61 cm) for seaming the hood to the body later. Set body aside.

Part 1: Cocoon Body

Step by step: Chain 7. Sc in 2nd ch from hook and in each ch across. Turn. (6 sc); through 7: Ch 1, sc in each st across. Turn. (6 sc).

The hood is a deep rounded cap worked in continuous rounds. The circumference matches the body opening.

Step by step: Using MC, make a MR. Work 6 sc into the ring. Pull tail to close. (6 sc).

The body begins at the bottom with a small oval, then expands into a full tube.

Part 3: Ears

Each ear consists of one outer panel and one inner panel, slip stitched together. Make 2 outer panels in mint (MC) and 2 inner panels in blush pink (CA).

Part 4: Facial Embroidery

Before attaching the hood to the body, embroider the face onto the front of the hood.

Eyes

If using safety eyes: Insert the 20 mm or 22 mm safety eyes approximately 1.5 inches (4 cm) apart, centered horizontally on the hood, positioned approximately 2.5 inches (6.5 cm) up from the facing edge. Secure backing washers on the inside.

If embroidering eyes: Using black yarn threaded on a yarn needle, embroider two filled oval shapes approximately 0.75 inches (2 cm) tall by 0.5 inches (1.5 cm) wide, spaced 1.5 inches (4 cm) apart. Add a small white highlight stitch in the upper right of each eye using white yarn.

Nose

Using blush pink yarn or floss, embroider a small upside-down triangle approximately 0.5 inches (1.5 cm) wide at the center of the hood, approximately 1 inch (2.5 cm) below the eye placement.

Whiskers

Using gray yarn or embroidery floss, make 3 long straight stitches radiating outward from each side of the nose, approximately 1 inch (2.5 cm) long each.

Attaching Hood to Body

Hold the hood and body with right sides facing out and openings aligned. The body has 72 stitches at its top edge. The hood has 72 stitches at its base edge. These match perfectly.

Using the long tail left on the body (or a length of MC threaded on a yarn needle), whip stitch or single crochet the two pieces together around all 72 stitches, matching stitch for stitch.

Position the face to the front of the cocoon opening so the bunny face frames the baby’s face correctly.

Attaching Ears

Fold the base of each ear slightly inward (about 0.25 inches / 0.5 cm on each side) to give a slight cup shape. Pin ears to the top of the hood, one on each side, positioned approximately 1.5 inches (4 cm) apart from center.

Angle them slightly outward and downward as seen in the reference photo. Using MC threaded on a yarn needle, sew through the bottom of each ear and through the hood stitches firmly at least 3 times around the base. Fasten off and weave in ends on the inside of the hood.

Pompom Tail

Using CB white yarn, make a full and fluffy pompom approximately 2 to 2.5 inches (5 to 6.5 cm) in diameter using a pompom maker or cardboard circles. Trim evenly. Tie off securely.

Using the long tail of the pompom, thread onto a yarn needle and insert through the bottom exterior of the cocoon at the center point (the tip of the oval bottom). Pull through and tie securely on the inside. Trim excess tail.
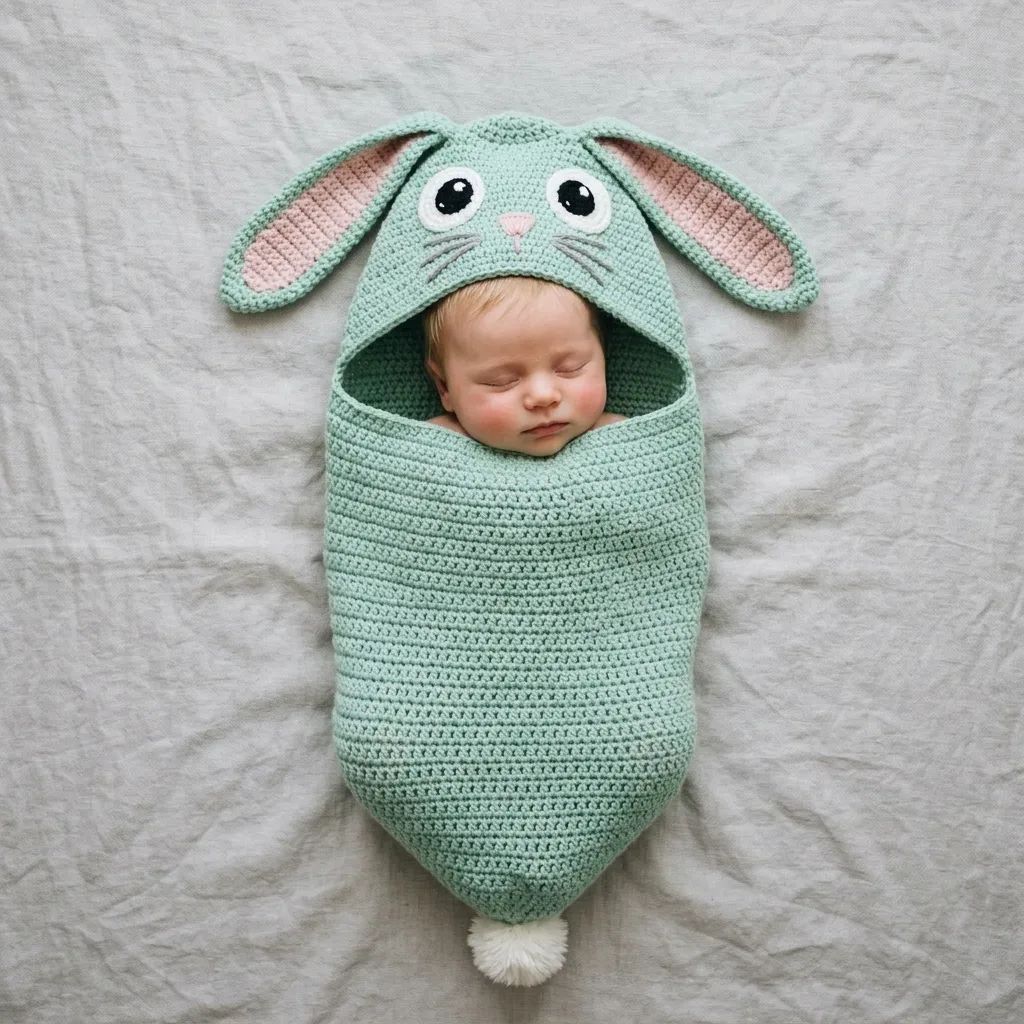
Putting it together

Step 1

Weave in all remaining yarn ends securely using a yarn needle. Bury tails through at least 1 inch of adjacent stitches.

Step 2

To block, soak the finished cocoon in cool water with a small amount of wool wash or gentle detergent for 15 minutes. Gently press out excess water without wringing. Lay flat on a blocking mat or clean towels.

Step 3

Shape the cocoon into its natural rounded pod form, gently patting the hood into a smooth dome and positioning the ears upright. Allow to dry completely before use. This may take 24 hours.

Step 4

Blocking evens the single crochet fabric and softens the yarn for newborn skin contact.

Marlene's notes

Note 01

This whole project is single crochet, but the shaping rounds come fast in the early oval, so count your stitches at the end of each round rather than trusting your eye.

Note 02

Keep your stitch marker moving with the first stitch of every round in the body sections; with no join, it's your only anchor for where a round begins.

Before you sit down

  • Check you have enough MC on hand, about 600 yards, since the body and outer ears both draw from it and running short mid-tube is no fun.
  • Set aside at least 4 stitch markers before you begin. You'll want one in that first stitch of Round 1 from the very start.
  • Work a quick swatch at 17 sc by 20 rows to 4 inches with your H-8 hook. A snug gauge here is what gives the cocoon its cozy, secure feel.
  • Read through the Lower Body Tube section before you start Round 9, so you know you're aiming for 17 even rounds at 48 sc and roughly 7 inches of height.

How the hours go

Bottom Oval Foundation and Lower Body Tube
about 3-4 hours because the oval shaping needs careful stitch counting and the tube alone runs 17 rounds even
Upper Body Expansion and Hood Facing Edge
about 3-4 hours because the increases widen the opening gradually across 8 rounds before the hood edge sets up
Ears, embroidery, and finishing
about 5-6 hours because the ear panels involve color changes and shaping, and the eyes, nose, and whiskers all take patient hand-stitching

Looking after it

  • Hand wash the finished cocoon in cool water with a gentle wool wash for about 15 minutes, then press out excess water without wringing, since worsted weight acrylic and wool blends hold their shape best when treated gently.
  • Lay the cocoon flat to dry on a blocking mat or clean towels, patting the hood into its dome shape and the ears upright, then store it flat or loosely folded rather than hung so the pod shape doesn't stretch out.
FAQs

Asked on the glider

the ones that come up on the glider

Why does the pattern say not to join each round?

Working in continuous, unjoined rounds keeps the fabric smooth and spiral rather than leaving a visible seam line up the back of the cocoon. That's why the stitch marker in the first stitch of Round 1 matters so much, it's your only way to track where each round starts.

How snug should the Lower Body Tube be?

After Round 25 the tube should measure about 7 inches tall and feel cylindrical and fairly firm, not loose or floppy. If yours feels baggy, check your gauge swatch against the 17 sc by 20 rows to 4 inches target before continuing.

Can I make the ears without the dusty rose lining color change?

You could work the Outer Ear Panel entirely in MC if you'd rather skip the color change, though you'll lose the two-tone bunny look the pattern is built around. The shaping rows, including the sc2tog decreases, stay the same either way.

What size baby does this fit?

The hood is sized for newborn to 3 months, with a circumference of about 14 inches, and the body measures roughly 20 inches long by 11 inches wide at its widest point. It's meant as a snug cocoon rather than a loose sleep sack.

How do I keep my stitch count accurate through the increase rounds?

Count your stitches at the end of every round in the Bottom Oval Foundation and Upper Body Expansion sections, since each increase round adds a predictable number and it's easy to lose track partway through. A stitch marker at the round start makes this much easier to check.

Is the embroidery difficult?

No, the facial features use only straight stitches and filled shapes for the eyes, nose, and whiskers, nothing more technical than that. It's simple work, just plan a little extra time since hand-stitching a face takes patience.