Intermediate 7-10 hours Worsted yarn

Worked on the glider, counted out loud —

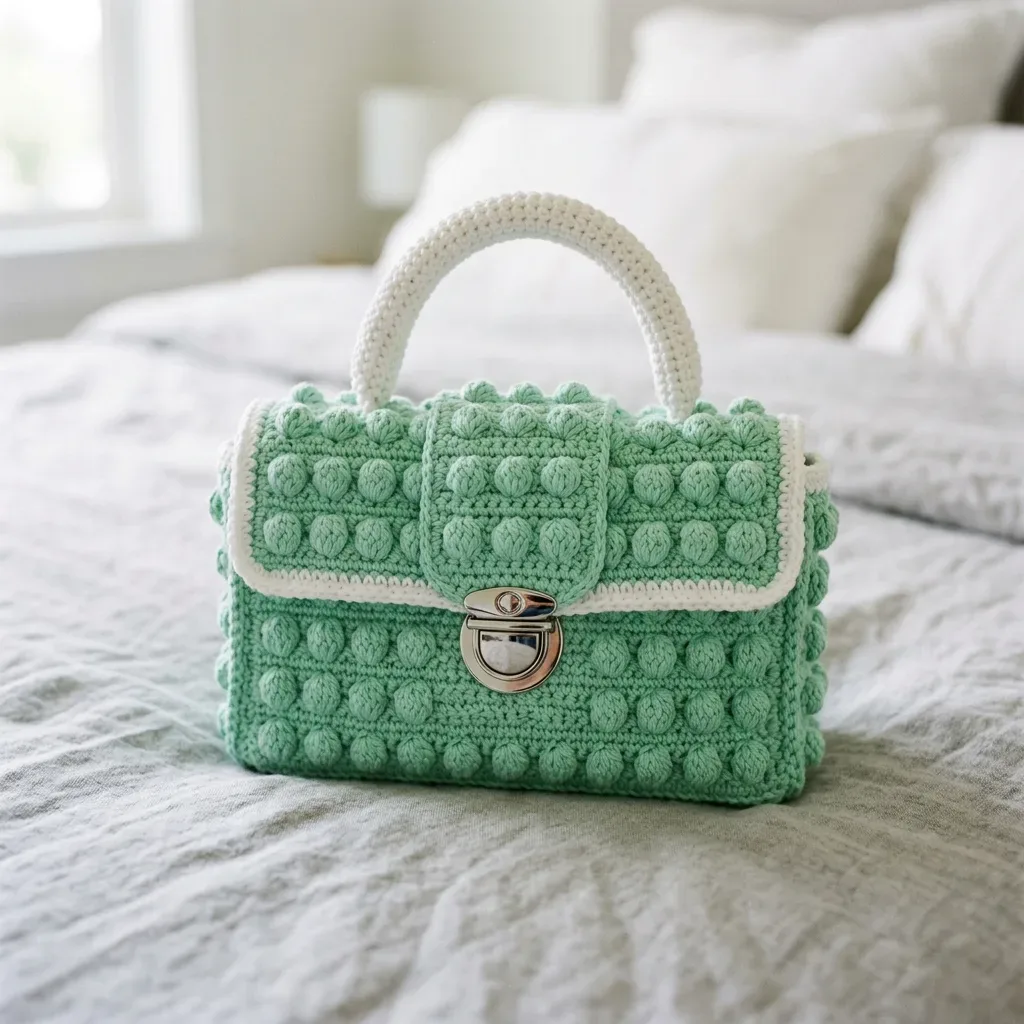
Mint bobble stitch purse with cream contrast edging

An intermediate bobble-stitch purse in mint and cream, built for structure, about 7 to 10 hours start to finish.

Jump to the rounds

What this one is

This is the purse you make when you're ready for something with a little more backbone than your usual tote. It's built for the crocheter who likes texture under her fingers and doesn't mind a bit of structure work, someone who wants a bag that holds its shape on a table instead of slumping sideways. The mint and cream combination keeps it quiet enough to carry with almost anything you own.

Your hands spend most of their time on bobbles here, pressing each one firmly forward and tightening the stitch that follows so the texture sits neat instead of leaning. Between the two body panels, the gusset, the flap, the tab, and the handle, you're looking at roughly 7 to 10 hours, with a fair bit of that going to seaming, lining, and getting the stabilizer fitted just right before the clasp goes on.

Try it another way

The size is easy to play with once you understand the repeat: each body panel is built on 26 stitches so the bobbles fit evenly, so if you want a wider bag, add in multiples of 4 stitches to keep the repeat intact, and adjust your gusset's 10-stitch width to match. Swap the cream contrast for a deeper tone if you want less polish and more drama against the mint main color, or flip it entirely and make the bobbled panels the contrast shade with a mint edging instead. If you're after a lighter everyday bag rather than a structured handbag, skip the plastic canvas stabilizer and lining fabric and let the crochet fall naturally, though you'll lose some of that crisp silhouette. The 7 to 8 inch clasp called for here is a guide rather than a rule; a slightly narrower or wider push-lock clasp will still work as long as it roughly matches your finished panel width. You could also use this same bobble and edging combination on a smaller pouch by shortening the panel rows, since the stitch logic doesn't change, only the count.

There's real satisfaction in a bobble repeat that lines up the way it's supposed to: twenty-six stitches per body panel, built on six clean four-stitch repeats with two edge stitches holding the line straight. Watching that texture march evenly across two full panels, then echo again in miniature on the gusset, flap, and tab, gives the whole piece a sense of craftsmanship you can feel with your thumb. The cream contrast round, worked evenly around each panel with three stitches tucked into every corner, is where the thing suddenly looks finished rather than homemade. And once the stabilizer goes in and the clasp gets sandwiched against a felt reinforcement, you've turned soft yarn into something with the posture of a real handbag.
The rounds, in full

Written out, round by round

Intermediate7-10 hours4.0 mmWorsted

Bring to the porch

Everything this one takes, in the order you will reach for it.

Yarn

  • Worsted weight / CYC 4 yarn in mint (main color): 230 yards / 210 meters
  • Worsted weight / CYC 4 yarn in cream (contrast color): 55 yards / 50 meters

Hook

  • 4.0 mm (G-6) hook, or size needed to match gauge

Notions

  • Yarn needle
  • Locking stitch markers
  • Sewing needle and thread
  • 7 to 8 inch / 18 to 20 cm purse clasp or push-lock clasp in silver tone

Optional

  • 9 x 14 inch / 23 x 36 cm lining fabric
  • Light plastic canvas or firm bag stabilizer

Body Panels

Make 2 in main color. Each panel uses 26 stitches so the 4-stitch bobble repeat fits perfectly: 2 edge sc + six 4-stitch repeats. Turn after every row.

  1. Round 1Ch 27. Sc in 2nd ch from hook and each ch across. (26 sc)
  2. Round 2Ch 1, sc in each st across. (26 sc)
  3. Round 3Ch 1, sc in first 2 sts, [bobble in next st, sc in next 3 sts] 6 times. (26 sts; 6 bobbles)
  4. Rounds 4–6Ch 1, sc in each st across. (26 sc)
  5. Round 7Ch 1, sc in first 2 sts, [bobble in next st, sc in next 3 sts] 6 times. (26 sts; 6 bobbles)
  6. Rounds 8–10Ch 1, sc in each st across. (26 sc)
  7. Round 11Ch 1, sc in first 2 sts, [bobble in next st, sc in next 3 sts] 6 times. (26 sts; 6 bobbles)
  8. Rounds 12–14Ch 1, sc in each st across. (26 sc)
  9. Round 15Ch 1, sc in first 2 sts, [bobble in next st, sc in next 3 sts] 6 times. (26 sts; 6 bobbles)
  10. Rounds 16–18Ch 1, sc in each st across. (26 sc)
  11. Round 19Ch 1, sc in first 2 sts, [bobble in next st, sc in next 3 sts] 6 times. (26 sts; 6 bobbles)
  12. Rounds 20–22Ch 1, sc in each st across. (26 sc) Fasten off after Row 22.
  13. Panel EdgingWith contrast color and right side facing, work 1 round sc evenly around each panel: 26 sc across top, 22 sc down side, 26 sc across bottom, 22 sc up side, placing 3 sc in each corner. Join with slip stitch. (104 sc including corner stitches) Fasten off.(104)

Gusset

The gusset wraps around both sides and the bottom of your purse. Work in main color.

  1. Round 1Ch 11. Sc in 2nd ch from hook and each ch across. (10 sc)
  2. Round 2Ch 1, sc in each st across. (10 sc)
  3. Round 3Ch 1, sc in first st, [bobble in next st, sc in next 3 sts] 2 times, sc in last st. (10 sts; 2 bobbles)
  4. Rounds 4–6Ch 1, sc in each st across. (10 sc)
  5. Round 7Ch 1, sc in first st, [bobble in next st, sc in next 3 sts] 2 times, sc in last st. (10 sts; 2 bobbles)
  6. Round 8Ch 1, sc in each st across. (10 sc) Continue in this established sequence. Work bobble rows on rows 3, 7, 11, 15, 19, 23, 27, 31, 35, 39, 43, 47, 51, 55, 59, 63, 67, 71, and 75.

All other rows are plain sc rows with 10 stitches.

Work until you have completed 75 rows total.

Fasten off.

Flap

Work in main color.

  1. Round 1Ch 27. Sc in 2nd ch from hook and each ch across. (26 sc)
  2. Round 2Ch 1, sc in each st across. (26 sc)
  3. Round 3Ch 1, sc in first 2 sts, [bobble in next st, sc in next 3 sts] 6 times. (26 sts; 6 bobbles)
  4. Rounds 4–6Ch 1, sc in each st across. (26 sc)
  5. Round 7Ch 1, sc in first 2 sts, [bobble in next st, sc in next 3 sts] 6 times. (26 sts; 6 bobbles)
  6. Rounds 8–10Ch 1, sc in each st across. (26 sc) Fasten off.

Flap Edge

With contrast color, sc evenly around flap, placing 3 sc in each corner. For a raised cream lip like the sample, work one optional round of reverse sc. Fasten off.

Cream Reverse Single Crochet Edge creates a beautiful corded finish: join contrast color with right side facing, then work left to right, backwards from normal. Insert hook into next stitch, yarn over, pull up a loop, yarn over and pull through both loops. Repeat around the edge for that raised rope-like trim. Left-handed makers: work in the opposite direction for the same effect.

Tab

Work in main color.

  1. Round 1Ch 9. Sc in 2nd ch from hook and each ch across. (8 sc)
  2. Round 2Ch 1, sc in each st across. (8 sc)
  3. Round 3Ch 1, sc in first 2 sts, bobble in next st, sc in next st, bobble in next st, sc in last 3 sts. (8 sts; 2 bobbles)
  4. Rounds 4–6Ch 1, sc in each st across. (8 sc)
  5. Round 7Ch 1, sc in first 2 sts, bobble in next st, sc in next st, bobble in next st, sc in last 3 sts. (8 sts; 2 bobbles)
  6. Rounds 8–10Ch 1, sc in each st across. (8 sc) Fasten off.

Handle

Work in contrast color.

  1. Round 1Ch 36. Sc in 2nd ch from hook and each ch across. (35 sc)
  2. Rounds 2–5Ch 1, sc across. (35 sc) Fasten off, leaving a long tail for seaming. Fold the handle piece lengthwise around a firm cord or doubled yarn strand. Whipstitch the long edges closed to create a tube.

Curve the handle into an arch shape. Sew ends securely to the inside top edge, positioning them 2 inches / 5 cm in from each side.

Putting it together

Step 1

Blocking: Pin panels flat to final measurements. Steam lightly through a cloth if your yarn allows, but do not flatten the bobbles.

Step 2

Structure: Insert plastic canvas or firm bag stabilizer cut slightly smaller than front, back, bottom, and side areas if you want that crisp handbag silhouette.

Marlene's notes

Note 01

Use a 4.0 mm (G-6) hook or whatever size gets you to gauge, and keep the same hook throughout the bobbles so the texture stays consistent across both panels.

Note 02

Tighten the single crochet right after each bobble and push it firmly to the right side as you go; this is the single biggest fix for bobbles that want to lean inward.

Note 03

If your yarn is on the soft side, don't skip the lining fabric and bag stabilizer; without them the finished purse can collapse instead of holding the structured shape the pattern is built for.

Note 04

Finished Size: 7.75 inches wide x 5.9 inches tall x 3.15 inches deep (20 x 15 x 8 cm).

Note 05

Gauge: 13 single crochet (sc) and 15 rows = 4 inches / 10 cm in single crochet, blocked lightly. Bobble repeat: 4 stitches x 4 rows.

Note 06

Panel checkpoint: before you start seaming, each body panel should measure about 7.75 inches / 20 cm wide x 5.9 inches / 15 cm tall before edging.

Note 07

Gusset checkpoint: 3.15 inches / 8 cm wide x 19.7 inches / 50 cm long before seaming.

Note 08

Chain 1 at the beginning of rows does not count as a stitch.

Note 09

Keep bobbles pushed to the right side as you go.

Note 10

Use markers at panel corners and at center front for clasp alignment.

Note 11

Weave in ends as you go where possible to save time later.

Note 12

left-handed crocheters: follow the same stitch counts, your working direction mirrors the sample, and place the clasp and tab by measuring from the center rather than counting from one side.

Before you sit down

  • Check you have the full 230 yards of mint and 55 yards of cream on hand before you start the first panel, since contrast yarn runs out fast on an edging round.
  • Set aside your locking stitch markers now so you can flag each corner as you work the 3-sc corner increases on the contrast edging round.
  • Swatch with your 4.0 mm hook first; bobbles are unforgiving if your tension runs loose, and a quick swatch will tell you before the panel does.
  • Read through Row 3 of the Body Panels before you cast on, since that's where the 4-stitch bobble repeat sets the rhythm you'll be repeating for the rest of the panel.

How the hours go

Body Panels
about 3 to 4 hours because you're working two full 12-round panels with a bobble repeat on alternating rows
Gusset, Flap, and Tab
about 1.5 to 2 hours because the gusset's 75 rows, the flap's 10 rows, and the tab's 10 rows are smaller but still carry their own bobble placement
Edging, lining, and clasp assembly
about 2 to 3 hours because fitting the stabilizer, seaming the 104-stitch contrast edging, and sandwiching the clasp hardware all take patience

Looking after it

  • Hand wash in cool water with a gentle detergent if the worsted yarn needs cleaning, since the bobble texture can felt or flatten under rough agitation.
  • Reshape the panels while damp and let the bag dry flat rather than hanging it, and store it stuffed lightly with tissue so the stabilizer-backed shape holds between wears.
FAQs

Asked on the glider

the ones that come up on the glider

Why do my bobbles keep leaning to one side?

This usually means the single crochet right after the bobble was left too loose. Tighten that stitch deliberately and push the bobble forward to the right side as you go, and the lean corrects itself within a row or two.

Do I really need the plastic canvas stabilizer?

If you're using a soft worsted yarn, yes, otherwise the bag tends to collapse rather than hold the structured handbag shape the pattern is designed for. Cut the stabilizer slightly smaller than your front, back, bottom, and side panels so it sits inside without poking through the seams.

What if my panels curl after blocking?

Try a slightly larger hook for your foundation chain next time, or block the panels firmly before seaming to flatten any curl. A light steam through a cloth, done without flattening the bobbles, usually settles the edges.

How much contrast yarn do I actually need for the edging?

The pattern calls for 55 yards of cream contrast color, which covers the single edging round of 104 stitches around each panel including the corner increases. It's worth having that full amount on hand before you start so you don't run short mid-round.

Can I use a different clasp than the push-lock one listed?

Yes, as long as it's roughly in the 7 to 8 inch range to match your panel width. Sandwich the crochet fabric between the clasp hardware and a small felt or fabric reinforcement either way, since that's what keeps the clasp from pulling at the stitches.

Is this a good first bobble-stitch project?

It's listed as intermediate, so some comfort with bobble stitches and basic seaming will help, but the repeat itself is very consistent once you've worked it a couple of times. A quick swatch with your 4.0 mm hook before you start the first panel will tell you if the technique feels manageable.