Intermediate 12-18 hours Worsted yarn

Worked on the glider, counted out loud —

Lavender Butterfly Purse Crochet Pattern

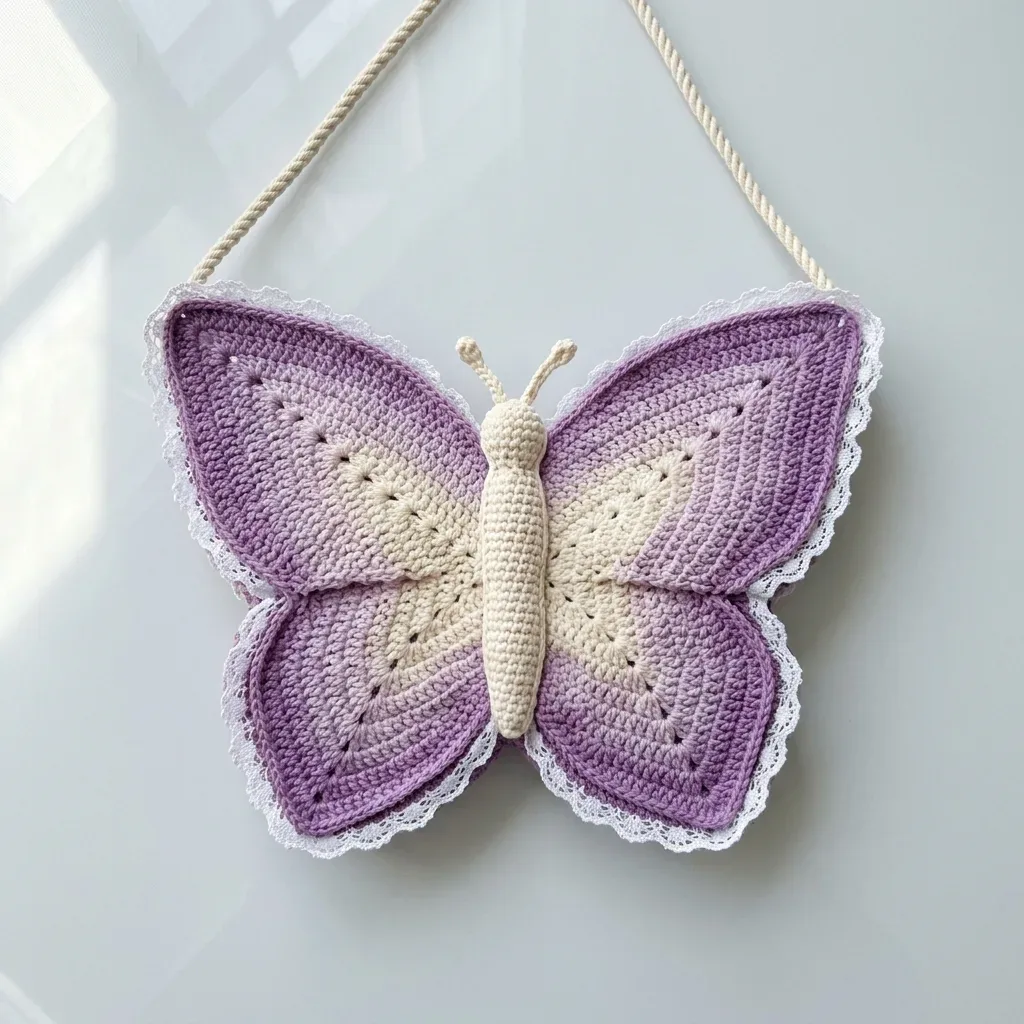
Intermediate ombre butterfly purse with lace trim and 3D body, about 12-18 hours for a crocheter with color-change experience.

Jump to the rounds

What this one is

You know those projects you save for when you actually have a stretch of free time, not just a stolen half hour. This is one of those. It's for the crocheter who wants a bag that doubles as a conversation piece, something you'd reach for on a night out rather than tuck under a coat. If you've been itching to try an ombre gradient and you're ready to commit to a project that rewards patience, this purse is waiting for you.

Your hands will spend most of the time on the four wing panels, working flat rows with shaping and color changes from pale cream through to deep purple. Then there's the small satisfying detour into amigurumi for the three-dimensional body, built in continuous rounds and stuffed before it's set down the center seam. All told, plan on something like 12 to 18 hours, spread across however many evenings suit you.

Try it another way

If 13 by 9 inches feels larger than you want to carry, you can scale the whole purse down by using a thinner cotton, like the fine sports-weight Drops Safran held single instead of doubled, which will shrink every panel proportionally while keeping the same stitch counts. For color placement, try reversing the gradient so the deepest purple sits at the body and the palest cream frames the outer wing edge, which changes the whole mood of the piece. Swapping the lace trim for a plain satin ribbon, or skipping it on one side only, gives you a less vintage, more modern look without touching the pattern itself. If you want a everyday bag rather than a statement piece, work all four wing panels in a single solid color and save the gradient instinct for the border instead. You could also lengthen the strap for a crossbody fit, or shorten it for a wristlet, since the strap is worked separately from the wings and body. For a different occasion entirely, consider working the whole thing in white cotton with just the lace trim for contrast, which keeps the butterfly shape but reads much quieter.

There's real pleasure in watching four flat panels become something sculptural. Each wing panel tapers through increase and shaping rows into a proper butterfly silhouette, and the gradient from Ecru through Lavender to Violet shifts so gradually you almost don't notice it happening until you step back. The shell-stitch scalloped border, worked by skipping two stitches, fanning five double crochet into the next, then slip stitching along, turns a plain seam into lace. Building the body separately in the round, stuffing it, then anchoring it down the center is the kind of small amigurumi detour that makes the whole piece feel dimensional rather than flat. Add the cotton lace trim around the edges and you get that vintage finish that photographs as well as it wears.

The rounds, in full

Written out, round by round

Intermediate12-18 hours18 mmWorsted

Bring to the porch

Everything this one takes, in the order you will reach for it.

  • Lion Brand 24/7 Cotton in Ecru, Lavender, and Violet works beautifully here. This mercerized cotton has excellent stitch definition and holds its shape well for structured bags.
  • Paintbox Yarns Simply DK Cotton in Vanilla Cream, Wisteria Purple, and Pansy Purple is another great choice. It’s a smooth, matte cotton that photographs beautifully and works up evenly.
  • Drops Safran in Off-White, Lavender, and Purple is a fine sports-weight cotton that, when doubled, gives the correct gauge and adds durability.

Important

  • Choose 100% cotton or cotton-blend yarn for structure. Acrylic yarn will produce a bag that stretches and loses shape over time. Avoid wool or animal fibers unless your finished bag is purely decorative.

Color A

  • Cream or off-white, worsted weight cotton, approximately 120 yards (110 m)

Color B

  • Soft lavender, worsted weight cotton, approximately 100 yards (91 m)

Color C

  • Medium purple, worsted weight cotton, approximately 100 yards (91 m)

Color D

  • Deep purple, worsted weight cotton, approximately 80 yards (73 m)

Additional Materials

  • White cotton crochet lace trim, approximately 60 inches (152 cm), 3/8 inch to 1/2 inch wide
  • Polyester fiberfill stuffing for body, small amount
  • Stitch markers, 4
  • Yarn needle
  • Scissors
  • Sewing needle and white thread for attaching lace
  • 1 magnetic snap closure, 3/4 inch (18 mm)
  • Removable locking stitch markers or safety pins for seaming

Hook

  • US size G-6 (4.0 mm)

Upper Wing Panel

Make 4 total: 2 identical panels, then 1 mirrored pair for front and back.

The upper wing is the larger, rounder portion of the butterfly wing. It tapers to a point where it meets the body center.

Foundation: With Color A, ch 5.

  1. Round 1(RS): sc in 2nd ch from hook, sc in next 3 ch, ch 1, turn. (4 sc)
  2. Round 2inc in first st, sc in 2 sts, inc in last st, ch 1, turn. (6 sc)
  3. Round 3inc in first st, sc in 4 sts, inc in last st, ch 1, turn. (8 sc)
  4. Round 4inc in first st, sc in 6 sts, inc in last st, ch 1, turn. (10 sc)
  5. Round 5inc in first st, sc in 8 sts, inc in last st, ch 1, turn. (12 sc) Change to Color B.
  6. Round 6inc in first st, sc in 10 sts, inc in last st, ch 1, turn. (14 sc)
  7. Round 7inc in first st, sc in 12 sts, inc in last st, ch 1, turn. (16 sc)
  8. Round 8inc in first st, sc in 14 sts, inc in last st, ch 1, turn. (18 sc)
  9. Round 9inc in first st, sc in 16 sts, inc in last st, ch 1, turn. (20 sc)
  10. Round 10inc in first st, sc in 18 sts, inc in last st, ch 1, turn. (22 sc) Change to Color C.
  11. Round 11inc in first st, sc in 20 sts, inc in last st, ch 1, turn. (24 sc)
  12. Round 12inc in first st, sc in 22 sts, inc in last st, ch 1, turn. (26 sc)
  13. Round 13sc across all 26 sts, ch 1, turn. (26 sc)
  14. Round 14inc in first st, sc in 24 sts, inc in last st, ch 1, turn. (28 sc)
  15. Round 15sc across all 28 sts, ch 1, turn. (28 sc)
  16. Round 16inc in first st, sc in 26 sts, inc in last st, ch 1, turn. (30 sc) Change to Color D.
  17. Round 17sc across all 30 sts, ch 1, turn. (30 sc)
  18. Round 18inc in first st, sc in 28 sts, inc in last st, ch 1, turn. (32 sc)
  19. Round 19sc across all 32 sts, ch 1, turn. (32 sc) Now begin upper wing taper on the right side (inner body edge):
  20. Round 20dec over first 2 sts, sc in rem 30 sts, ch 1, turn. (31 sc)
  21. Round 21sc in 29 sts, dec over last 2 sts, ch 1, turn. (30 sc)
  22. Round 22dec over first 2 sts, sc in rem 28 sts, ch 1, turn. (29 sc)
  23. Round 23sc in 27 sts, dec over last 2 sts, ch 1, turn. (28 sc)
  24. Round 24dec over first 2 sts, sc in rem 26 sts, ch 1, turn. (27 sc)
  25. Round 25sc in 25 sts, dec over last 2 sts, ch 1, turn. (26 sc)
  26. Round 26dec over first 2 sts, sc in rem 24 sts, ch 1, turn. (25 sc)
  27. Round 27sc in 23 sts, dec over last 2 sts, ch 1, turn. (24 sc)
  28. Round 28dec over first 2 sts, sc in rem 22 sts, ch 1, turn. (23 sc)
  29. Round 29sc in 21 sts, dec over last 2 sts, ch 1, turn. (22 sc)
  30. Round 30dec over first 2 sts, sc in rem 20 sts, ch 1, turn. (21 sc)
  31. Round 31sc in 19 sts, dec over last 2 sts, ch 1, turn. (20 sc)
  32. Round 32dec over first 2 sts, sc in rem 18 sts, ch 1, turn. (19 sc)
  33. Round 33sc in 17 sts, dec over last 2 sts, ch 1, turn. (18 sc)
  34. Round 34dec over first 2 sts, sc in rem 16 sts, ch 1, turn. (17 sc)
  35. Round 35sc in 15 sts, dec over last 2 sts, ch 1, turn. (16 sc)
  36. Round 36dec over first 2 sts, sc in rem 14 sts, ch 1, turn. (15 sc)
  37. Round 37sc in 13 sts, dec over last 2 sts, ch 1, turn. (14 sc)
  38. Round 38dec over first 2 sts, sc in rem 12 sts, ch 1, turn. (13 sc)
  39. Round 39sc in 11 sts, dec over last 2 sts, ch 1, turn. (12 sc)
  40. Round 40dec over first 2 sts, sc in rem 10 sts, dec over last 2 sts, ch 1, turn. (10 sc)
  41. Round 41dec over first 2 sts, sc in rem 6 sts, dec over last 2 sts, ch 1, turn. (8 sc)
  42. Round 42dec over first 2 sts, sc in rem 4 sts, dec over last 2 sts, ch 1, turn. (6 sc)
  43. Round 43dec over first 2 sts, sc in rem 2 sts, dec over last 2 sts, ch 1, turn. (4 sc)
  44. Round 44dec, dec. (2 sc)
  45. Round 45dec. (1 sc) Fasten off. To mirror for the opposite side: Reverse the taper direction in rows 20-45. Work decreases at the beginning of odd rows and the end of even rows.

Checkpoint: Each completed upper wing panel should measure approximately 7 inches wide at its widest point and 8 inches tall.

Lower Wing Panel

Make 4 total: 2 identical and 1 mirrored pair.

The lower wing is smaller, rounder at the outer bottom edge, and tapers sharply to points.

Foundation: With Color A, ch 4.

  1. Round 1(RS): sc in 2nd ch from hook, sc in next 2 ch, ch 1, turn. (3 sc)
  2. Round 2inc in first st, sc in 1 st, inc in last st, ch 1, turn. (5 sc)
  3. Round 3inc in first st, sc in 3 sts, inc in last st, ch 1, turn. (7 sc)
  4. Round 4inc in first st, sc in 5 sts, inc in last st, ch 1, turn. (9 sc)
  5. Round 5inc in first st, sc in 7 sts, inc in last st, ch 1, turn. (11 sc) Change to Color B.
  6. Round 6inc in first st, sc in 9 sts, inc in last st, ch 1, turn. (13 sc)
  7. Round 7inc in first st, sc in 11 sts, inc in last st, ch 1, turn. (15 sc)
  8. Round 8inc in first st, sc in 13 sts, inc in last st, ch 1, turn. (17 sc)
  9. Round 9sc across all 17 sts, ch 1, turn. (17 sc)
  10. Round 10inc in first st, sc in 15 sts, inc in last st, ch 1, turn. (19 sc) Change to Color C.
  11. Round 11sc across all 19 sts, ch 1, turn. (19 sc)
  12. Round 12inc in first st, sc in 17 sts, inc in last st, ch 1, turn. (21 sc)
  13. Round 13sc across all 21 sts, ch 1, turn. (21 sc)
  14. Round 14inc in first st, sc in 19 sts, inc in last st, ch 1, turn. (23 sc)
  15. Round 15sc across all 23 sts, ch 1, turn. (23 sc)
  16. Round 16inc in first st, sc in 21 sts, inc in last st, ch 1, turn. (25 sc) Change to Color D.
  17. Round 17sc across all 25 sts, ch 1, turn. (25 sc)
  18. Round 18inc in first st, sc in 23 sts, inc in last st, ch 1, turn. (27 sc)
  19. Round 19sc across all 27 sts, ch 1, turn. (27 sc) Now taper both sides to shape the lower lobe:
  20. Round 20dec over first 2 sts, sc in 23 sts, dec over last 2 sts, ch 1, turn. (25 sc)
  21. Round 21dec over first 2 sts, sc in 21 sts, dec over last 2 sts, ch 1, turn. (23 sc)
  22. Round 22dec over first 2 sts, sc in 19 sts, dec over last 2 sts, ch 1, turn. (21 sc)
  23. Round 23dec over first 2 sts, sc in 17 sts, dec over last 2 sts, ch 1, turn. (19 sc)
  24. Round 24dec over first 2 sts, sc in 15 sts, dec over last 2 sts, ch 1, turn. (17 sc)
  25. Round 25dec over first 2 sts, sc in 13 sts, dec over last 2 sts, ch 1, turn. (15 sc)
  26. Round 26dec over first 2 sts, sc in 11 sts, dec over last 2 sts, ch 1, turn. (13 sc)
  27. Round 27dec over first 2 sts, sc in 9 sts, dec over last 2 sts, ch 1, turn. (11 sc)
  28. Round 28dec over first 2 sts, sc in 7 sts, dec over last 2 sts, ch 1, turn. (9 sc)
  29. Round 29dec over first 2 sts, sc in 5 sts, dec over last 2 sts, ch 1, turn. (7 sc)
  30. Round 30dec over first 2 sts, sc in 3 sts, dec over last 2 sts, ch 1, turn. (5 sc)
  31. Round 31dec over first 2 sts, sc in 1 st, dec over last 2 sts, ch 1, turn. (3 sc)
  32. Round 32insert hook in all 3 sts together, YO, pull through, YO, pull through 2 loops (sc3tog). (1 sc) Fasten off.

Checkpoint: Each completed lower wing panel should measure approximately 6 inches wide and 6 inches tall.

Butterfly Body

The body is worked in continuous rounds in Color A using the magic ring method.

  1. Round 1MR, 6 sc into ring. (6 sc)
  2. Round 2inc in each st around. (12 sc)
  3. Rounds 3–8sc in each st around. (12 sc)
  4. Round 9dec 6 times evenly spaced. (6 sc) Do not fasten off. Stuff lightly with fiberfill.
  5. Round 10inc in each of 6 sts. (12 sc)
  6. Rounds 11–12sc around. (12 sc)
  7. Round 13dec 6 times evenly. (6 sc) Stuff head lightly. Slip stitch to close. Fasten off, leave a 12-inch tail for sewing.

The body should measure approximately 4 inches long and 1 inch wide.

Antennae (make 2)

With Color A, ch 18.

Sl st in 2nd ch from hook, sl st in next 2 ch (this forms the curled tip), sc in rem 15 ch. Fasten off leaving a 6-inch tail.

Sew the antennae tails to the top of the head, spacing them approximately 0.5 inches apart.

Strap

With Color A, cut 6 strands of yarn each measuring 120 inches long.

Fold all 6 strands in half to create 12 working strands each 60 inches long.

Attach the midpoint to one side of the body/seam at the top shoulder using a lark’s head knot.

Divide the 12 strands into 3 groups of 4 strands each.

Braid or twist the groups together firmly for the full length.

Knot securely at the end.

Attach the free end to the opposite shoulder point using an overhand knot or by stitching with yarn needle.

The finished strap should be approximately 48 inches long.

Alternative: Purchase a 48-inch twisted cotton rope in cream and attach at both shoulder points.
Putting it together

Step 1

Wet block all wing panels before assembly. Soak each panel in cool water for 10 minutes, gently squeeze out excess water, pin to a foam blocking board in the desired wing shape, and allow to dry completely. Blocking is especially important for the scallop border.

Step 2

After assembly and body attachment, lightly mist the finished bag and smooth into shape by hand. Allow to dry flat.

Step 3

Weave in all yarn ends on the interior using a yarn needle. Run each end through at least 1 inch of stitches in two directions before trimming.

Marlene's notes

Note 01

Use a US G-6 (4.0 mm) hook and confirm your gauge after blocking, not before, since the cotton yarns in this pattern relax and firm up differently once wet-blocked.

Note 02

The color changes aren't optional styling, they're structural to the gradient effect, so keep track of which round you're on across all four panels so the four pieces match.

Note 03

Stuff the Butterfly Body lightly rather than firmly during round 9, since an overstuffed center will distort the seam where it meets the wing panels.

Before you sit down

  • Check that you have enough of each color (120 yards Ecru, 100 yards each of Lavender and Medium purple, 80 yards Deep purple) before you start the gradient, since running short mid-panel means an awkward color swap.
  • Work and block a gauge swatch in single crochet with your G-6 hook; you're aiming for 18 sc and 20 rows over 4 inches, and finished size depends on hitting it.
  • Set aside your 4 stitch markers so you can mark the color-change rows across all four wing panels before you begin, since the gradient repeats on every piece.
  • Read through the scalloped border round once before you reach it, so the skip-2, 5-dc-shell, skip-2, slip-stitch rhythm is familiar when you're joining panels.

How the hours go

Wing panels (Upper and Lower, 4 of each)
about 7-9 hours because you're working 45 and 32 rows per panel across eight panels total with color changes to track
Scalloped border and panel assembly
about 3-4 hours because the shell-stitch border is fiddly to keep even across every seam
Butterfly Body, antennae, strap, and finishing
about 2-3 hours because the body is quick amigurumi but stuffing, attaching, and weaving in ends on a piece this size takes care

Looking after it

  • Hand wash the finished purse in cool water since it's built from cotton and cotton-blend yarns, which hold shape better than acrylic but can still felt or shrink with hot water or a machine cycle.
  • Reshape by hand while damp and let it dry flat on a towel, the same way you blocked the wing panels, then store the purse stuffed lightly with tissue paper so the three-dimensional body keeps its shape between uses.
FAQs

Asked on the glider

the ones that come up on the glider

Can I use acrylic yarn instead of cotton for this purse

The materials notes specifically warn against acrylic here, since it will stretch and lose its shape over time. Stick with 100% cotton or a cotton blend for the structure this bag needs.

Why does my gauge swatch matter so much for this pattern

The finished 13 by 9 inch size depends on hitting 18 sc and 20 rows over 4 inches after blocking. If your swatch comes out too big or small, adjust your hook size before you commit to all eight wing panels.

Do I really need to make four wing panels of each type

Yes, you need two identical panels plus a mirrored pair for both the Upper Wing and the Lower Wing, which gives you four of each for a front and back that mirror correctly. Skipping the mirroring will leave your butterfly looking lopsided.

How full should I stuff the Butterfly Body

Round 9 of the body calls for light stuffing, not firm. Too much fiberfill will pull on the seam where the body attaches down the center of the wings.

What is the scalloped border actually doing structurally

It's both decorative and the method that joins your wing panels together. The skip-2, 5-dc shell, skip-2, slip-stitch sequence repeats across 6 stitches at a time, so it needs to land evenly along each seam.

Can I skip the lace trim

You can, the trim is a finishing touch rather than a structural element. Leaving it off will give you a cleaner, more modern edge instead of the vintage look the pattern describes.