Intermediate 4-6 hours Worsted yarn

Worked on the glider, counted out loud —

Minion crochet booties with sole, body, and eye

Yellow and blue amigurumi booties with goggle eyes. Suits confident beginners; about 4-6 hours for the pair.

Jump to the rounds

What this one is

This is a project for whoever has a baby shower coming up and wants to bring something nobody else will. You know the type of gift that gets passed around the room before it even makes it to the diaper bag — that's these. Yellow, blue, and a pair of goggle eyes that make everyone grin. If you've got a little one of your own, or a niece, nephew, or friend's baby on the way, this pattern was built with them in mind.

Try it another way

The easiest way to make this your own is through sizing — work the sole a chain or two longer for an older toddler, or keep it right at the chain-10 start for a newborn-size bootie. If you want a subtler version, skip the black pupil and gray goggle rim and just use the white round for a simpler button-eye look, or swap black for navy if you're avoiding pure black near a baby's face. You can also flip the color logic: work the sole and overalls section in a different favorite color and save yellow only for the face rounds, so the Minion reference is more of a wink than a full costume. For yarn, this pattern reads well in any worsted weight, so leftover skeins from other baby projects are fair game as long as your gauge stays snug enough to hold stuffing. If you're making a set as a gift, consider working one bootie exactly to pattern and the second with the goggle placed slightly off-center or doubled up, for a fun mismatched pair. These also make sturdy nursery decor or photo props if you skip stuffing and mount them on a shelf instead of a foot.

What makes this one satisfying is the shaping in the sole — three rounds of increases that turn a flat chain of 10 into a proper foot-shaped base, growing from 20 to 26 to 36 stitches without you ever having to count fussy repeats. Then there's the color story: yellow for the Minion body, a stretch of blue for the overalls, then back to yellow for the face, all worked in plain single crochet so the color changes do the visual work for you. The small separate piece — the white and gray goggle with its black pupil — is a nice little detour from the main tube, and sewing it onto the front is the moment the whole thing suddenly reads as Minion rather than just a yellow bootie.
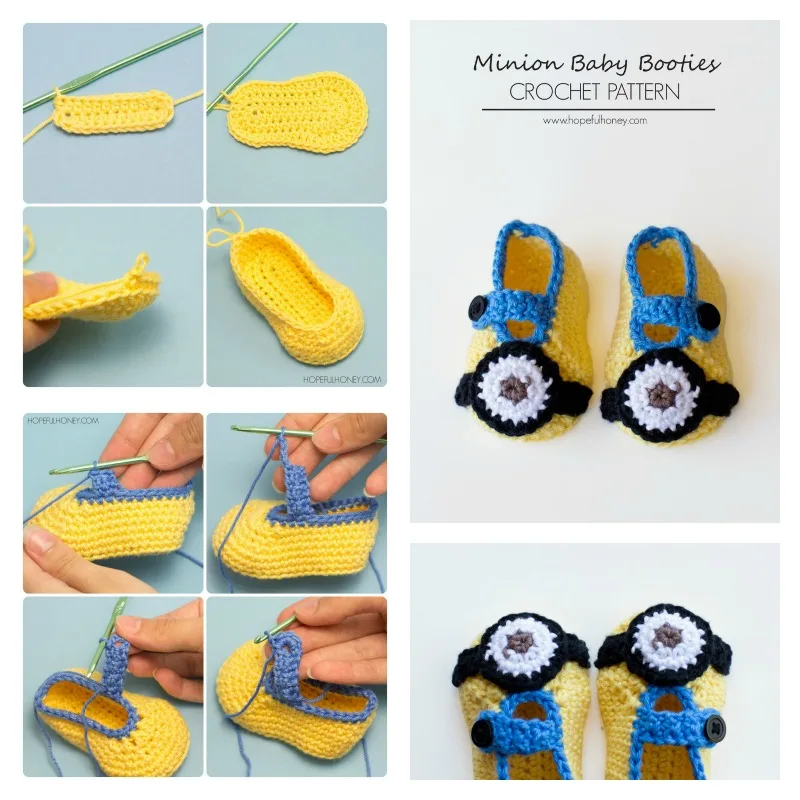
The rounds, in full

Written out, round by round

Intermediate4-6 hoursWorsted

Bring to the porch

Everything this one takes, in the order you will reach for it.

  • Worsted weight yarn in yellow, blue, white, gray, and black
  • Crochet hook (size to suit your yarn)
  • Darning needle (for weaving in ends and sewing the goggle and mouth on)

Step 1: The Bootie Sole

The sole is the base of your Minion bootie. Begin with yellow yarn.

Ch 10: This forms the length of the sole.

  1. Round 1Starting in the second chain from the hook, 2 sc, sc in the next 7 ch, 3 sc in the last ch. Now, working along the other side, sc in the next 7 ch, and 2 sc in the last ch. Join with sl st. (20 stitches)(20)
  2. Round 2Ch 1, inc in the first two sts, sc in the next 7 sts, inc in the next 3 sts, sc in the next 7 sts, inc in the last two sts. Join with sl st. (26 stitches)(26)
  3. Round 3Ch 1, sc, inc in the first two sts, sc in the next 9 sts, sc, inc in the next 5 sts, sc in the next 9 sts, sc, inc in the last two sts. Join with sl st. (36 stitches)(36)

Step 2: Building the Bootie

Switch to blue yarn to make the Minion “overalls.”

  1. Round 4Sc in each stitch around. This forms the body of the bootie. Join with sl st. (36 stitches)(36)
  2. Rounds 5–7Continue with sc in each stitch around for a total of three rounds. Change to yellow yarn: This color change is where the “face” of the Minion will start.
  3. Rounds 8–10Sc in each stitch around with yellow yarn. (36 stitches)(36)

Step 3: Creating the Minion Face

This section involves adding the Minion face details.

  1. Round 11Switch to black yarn and sc in each stitch around once to create a “goggle strap.”
  2. Rounds 12–13Return to yellow yarn: Continue with two more rounds of sc stitches.

Step 4: Adding the Goggle and Eye

To create the iconic Minion eye, follow these steps with white, gray, and black yarn.

With white yarn: Ch 4 and join to form a ring.

  1. Round 1Make 6 sc into the ring, then pull tight to close. (6 stitches)(6)
  2. Round 2Switch to gray yarn: Inc in each stitch around (12 stitches). Fasten off and leave a long tail for sewing onto the bootie.Black pupil: With black yarn, make a small magic ring and place 3 sc inside. Pull tight and attach to the center of the white goggle.Sew the eye onto the front of the bootie, aligning it with the black strap.(12)

Putting it together

Step 1

Add a mouth : Using black yarn, stitch a small line or smile below the eye.

Step 2

Secure all loose ends : Use the darning needle to weave in and trim any extra yarn.

Step 3

Repeat the pattern for the second bootie, and your Minion-inspired crochet booties are complete!

Step 4

Enjoy!

Marlene's notes

Note 01

Keep your tension on the firmer side throughout — a looser single crochet will leave gaps once the bootie is stuffed and shaped.

Note 02

Mark the start of each round as you go, especially through the increase rounds of the sole, since it's easy to lose your place when the stitch count keeps changing.

Before you sit down

  • Check you have yellow, blue, white, gray, and black yarn on hand before you begin — the color changes happen at specific rounds, so having every shade ready saves a mid-project scramble.
  • Read through Round 1 of the sole first, since the stitch counts in the toe and heel increases (2 sc, 3 sc) set the shape for everything that follows.
  • Work a small swatch in your yarn and hook to make sure your single crochet is dense enough that the stuffing won't peek through.
  • Have a stitch marker ready for the start of each round, since these are worked in continuous rounds rather than turned rows.

How the hours go

The Bootie Sole
about 45 minutes because of the three increase rounds and getting the stitch counts to land exactly at 20, 26, and 36
Building the Bootie
about 1.5 hours because it's seven straight rounds of single crochet plus two color changes to track
Goggle, Eye, and Assembly
about 1 hour because the goggle and pupil are worked separately, then everything gets sewn and secured by hand

Looking after it

  • Hand wash in cool water with a mild detergent and lay flat to dry, since machine washing can felt or mat worsted-weight yarn over time and distort the sole shape.
  • Reshape the booties gently while still damp, easing the sole flat and the goggle eye centered, then store them stuffed with tissue paper in a drawer to help them hold their form between wears.
FAQs

Asked on the glider

the ones that come up on the glider

What size baby will these booties fit?

The pattern doesn't state an exact foot length, but the chain-10 sole with three increase rounds is sized for a typical newborn to small infant foot. You can lengthen the starting chain slightly if you need a bigger sole.

Do I need to stuff the booties?

The pattern doesn't call for stuffing explicitly, but a light fill helps the sole hold its shape once you're wearing it or displaying it as a prop. Keep your single crochet tension firm so stuffing doesn't show through the stitches.

Can I make just one bootie to test the pattern first?

Yes, that's a smart way to check your gauge and color placement before committing to the second. The assembly steps confirm you simply repeat the whole process for the matching bootie.

Why does the sole start with a chain of 10 instead of a magic ring?

Working the sole flat from a starting chain gives you that oval foot shape with a distinct toe and heel, which a round magic ring wouldn't produce. The increases in Rounds 1 through 3 build the curve at each end.

How do I attach the goggle eye neatly?

Leave a long tail when you fasten off the gray round of the goggle, then use that same tail to sew it onto the front of the bootie. Center the black pupil first so your placement guide is set before you stitch the whole piece down.

What if I don't have gray yarn for the goggle rim?

You can substitute a similar light neutral, since the gray round is really just there to frame the white base and black pupil. The overall goggle effect will still read clearly as long as there's contrast between the three colors.