Intermediate 4-6 hours Worsted yarn

Worked on the glider, counted out loud —

Minimalist Crochet Cross-Body Bag With Strap

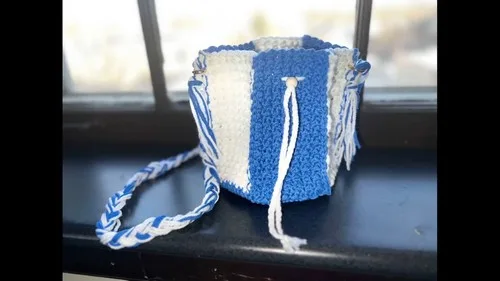
A two-color crochet cross-body bag for confident beginners—panels, rounds, and a strap in one unhurried weekend project.

Jump to the rounds

What this one is

You know that bag you reach for without thinking, the one that goes with everything because it doesn't try too hard? That's what this one's for. I made it with the person who wants a handmade accessory that reads as considered, not crafty, in mind—someone who'll sling it crossbody on a grocery run or a gallery wander and never once think twice about it.

Your hands will spend most of their time in two very different modes here: first the steady rhythm of hdc rows across six rectangular panels, then the gentle widening of single crochet rounds that builds the bag's body from a flat center outward. Between the panel work and the shaping rounds, plan on an afternoon, maybe stretched over two sittings if you like to savor it.

Try it another way

The blue and white combination is lovely, but this structure is really a blank canvas. Swap in a single solid color across all six Part 2 panels for a cleaner, monochrome look, or go the other direction and give each of the six marked sections its own color for a patchwork effect. Since the Main Pattern builds by increasing evenly—14 stitches at Round 2, 21 at Round 3, 28 at Round 4—you can track exactly where you are if you want to experiment with where the color changes land within those rounds instead of alternating every row. If you'd like a smaller version, remember the panel rows and round increases both scale down proportionally, so working fewer repeats on both Part 2 and the Main Pattern will shrink the finished bag evenly. The wooden beads are optional, so leave them off for a sleeker, more minimal strap, or add a second pair for symmetry on both ends. You could also skip the metal rings in favor of sewing the strap directly to the panels if you'd rather not source hardware. Whatever you change, keep the panel count and round sequence as your anchor—that's what keeps the shaping honest.

There's real satisfaction in watching six flat panels—each one 29 rows of half double crochet—turn into something dimensional once you sew the edges together. It's a lesson in how simple rectangles become structure. Then the Main Pattern flips the logic entirely: you're increasing in single crochet rounds, watching stitch counts climb from 14 to 21 to 28, feeling the base grow under your hook rather than off to the side. Alternating blue and white as you go gives you a built-in color-change drill without any charting required. And finishing with metal rings and a strap means you walk away with hardware-grade function, not just a pretty swatch. Few projects let you practice flat-panel assembly and in-the-round shaping back to back like this one does.
The rounds, in full

Written out, round by round

Intermediate4-6 hours4 mmWorsted

Bring to the porch

Everything this one takes, in the order you will reach for it.

  • 4mm crochet hook
  • Blue yarn
  • White yarn
  • Yarn needle
  • Scissors
  • Stitch markers (or contrasting yarn as markers)
  • Two small metal rings
  • Two wooden beads (optional)

Part 2

  1. Round 1Slip stitch into the first stitch. Make 13 half double crochets (hdc) across the section.
  2. Round 2to 29 Chain 1 and turn. Slip stitch into the first stitch. Work 13 hdc across. Repeat for a total of 29 rows per panel.Repeat for All Panels Work the same process for each of the 6 marked sections.

Alternate colors (blue and white) if desired.

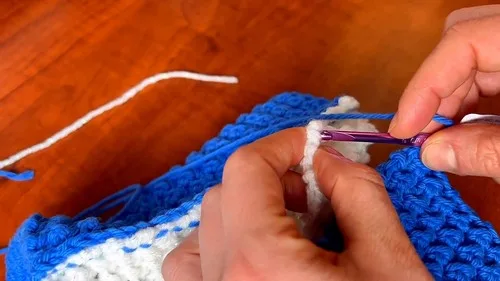
Assembling the Bag Sewing Panels Together Align and sew the edges of each rectangular panel together using a yarn needle.

Alternate colors for visual appeal if following the original design.

Main Pattern

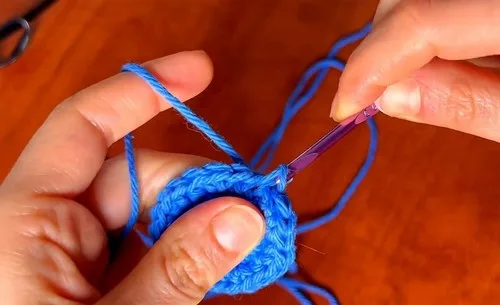
  1. Round 2Chain 1. Make 2 sc in each stitch around. Total stitches: 14
  2. Round 3Chain 1. 1 sc, 2 sc in next stitch ; repeat around. Total stitches: 21 For Round 4Chain 1.1 sc, 1 sc, 2 sc in next stitch ; repeat around.

Total stitches: 28

  1. Round 5Chain 1. 3 sc, 2 sc in next stitch ; repeat around. Total stitches: 35
  2. Round 6Chain 1. 2 sc, 2 sc in next stitch, 2 sc ; repeat around. Total stitches: 42 For Round 7Chain 1.5 sc, 2 sc in next stitch ; repeat around.

Total stitches: 49

  1. Round 8Chain 1. 3 sc, 2 sc in next stitch, 3 sc ; repeat around. Total stitches: 56
  2. Round 9Chain 1. 7 sc, 2 sc in next stitch ; repeat around. Total stitches: 63 For Round 10Chain 1.4 sc, 2 sc in next stitch, 4 sc ; repeat around.

Total stitches: 70

  1. Round 11Chain 1. 9 sc, 2 sc in next stitch ; repeat around. Total stitches: 77
  2. Round 12Chain 1. 5 sc, 2 sc in next stitch, 5 sc ; repeat around. Total stitches: 84 Dividing for PanelsSectioning the Base Divide the 84 stitches into 6 equal sections of 14 stitches each.Use stitch markers to separate each section.

Each section will form one panel of the bag.

Creating Side Panels Working Each Panel Begin with one 14-stitch section.

Putting it together

Step 1

Align and sew the edges of each rectangular panel together using a yarn needle.

Step 2

Alternate colors for visual appeal if following the original design.

Marlene's notes

Note 01

A 4mm hook with worsted-weight yarn should give you a firm, bag-worthy fabric—if your hdc rows feel loose or floppy, consider sizing down slightly.

Note 02

Keep your stitch markers on the six sections of Part 2 as you work; it's easy to lose track of which panel you're on once you start alternating blue and white.

Note 03

Watch your stitch count at the end of each round in the Main Pattern (14, then 21, then 28, and onward)—catching a miscount early is far easier than unpicking rounds later.

Porch photos

Before you sit down

  • Check that you've got enough blue and white yarn to alternate across all six panels plus the Main Pattern rounds—this project leans on having both colors on hand throughout, not just at the start.
  • Set out your stitch markers before you begin; you'll want them ready to flag the six marked sections mentioned in Part 2.
  • Work a quick hdc swatch with your 4mm hook to confirm your gauge feels snug enough to hold a bag's shape, since this isn't a stretchy, drapey fabric you're after.
  • Read through Round 2 through Round 4 of the Main Pattern once before casting on, so the increase pattern (2 sc in each stitch, then spaced increases) makes sense before your stitch count starts climbing.

How the hours go

Part 2 panels
about 90 minutes to 2 hours, because you're repeating 29 rows of hdc across six separate sections
Main Pattern rounds
about 1.5 to 2 hours, because the increase rounds need careful counting as stitches climb from 14 to 28 and beyond
Assembly and strap
about 45 minutes to an hour, because sewing six panels together and attaching rings takes a steady, unhurried hand

Looking after it

  • Hand wash your finished bag in cool water with a gentle detergent, since blocking a structured hdc-and-sc piece like this by machine can distort the panel seams.
  • Lay it flat to dry, reshaping the panels and rounds gently with your hands as it dries, then store it stuffed lightly with tissue so the shape holds between uses.
FAQs

Asked on the glider

the ones that come up on the glider

Can I use a different hook size than the 4mm called for?

You can, but keep in mind the fabric needs to stay firm enough to hold the bag's shape, so swatch first if you go up a size. A smaller hook will tighten your stitches and make the panels sturdier, which some makers prefer for a bag.

Do I really need six stitch markers for Part 2?

Markers (or contrasting scrap yarn) make it much easier to track which of the six panels you're on, especially once you start alternating blue and white. You can work without them, but you risk losing count partway through.

What if I only want one color instead of alternating blue and white?

That's an easy swap—just work all six panels and the Main Pattern rounds in a single color. The construction and stitch counts stay exactly the same, you simply skip the color-change steps.

Are the wooden beads necessary?

No, they're listed as optional in the materials. They add a nice finishing detail to the strap ends, but the bag is fully functional and complete without them.

How do the Main Pattern's increase rounds work exactly?

Each round adds evenly spaced increases, taking you from 14 stitches at Round 2 to 21 at Round 3 to 28 at Round 4, and so on through the remaining rounds. Reading ahead a round or two helps you anticipate where the increases fall before you reach them.

What's the best way to attach the metal rings for the strap?

Once your panels are sewn together and the Main Pattern rounds are complete, the rings attach at the points where the strap meets the bag body, following the assembly steps. A yarn needle and sturdy stitching through a few layers of fabric will keep them secure under everyday use.