Intermediate 4-6 hours Worsted yarn

Worked on the glider, counted out loud —

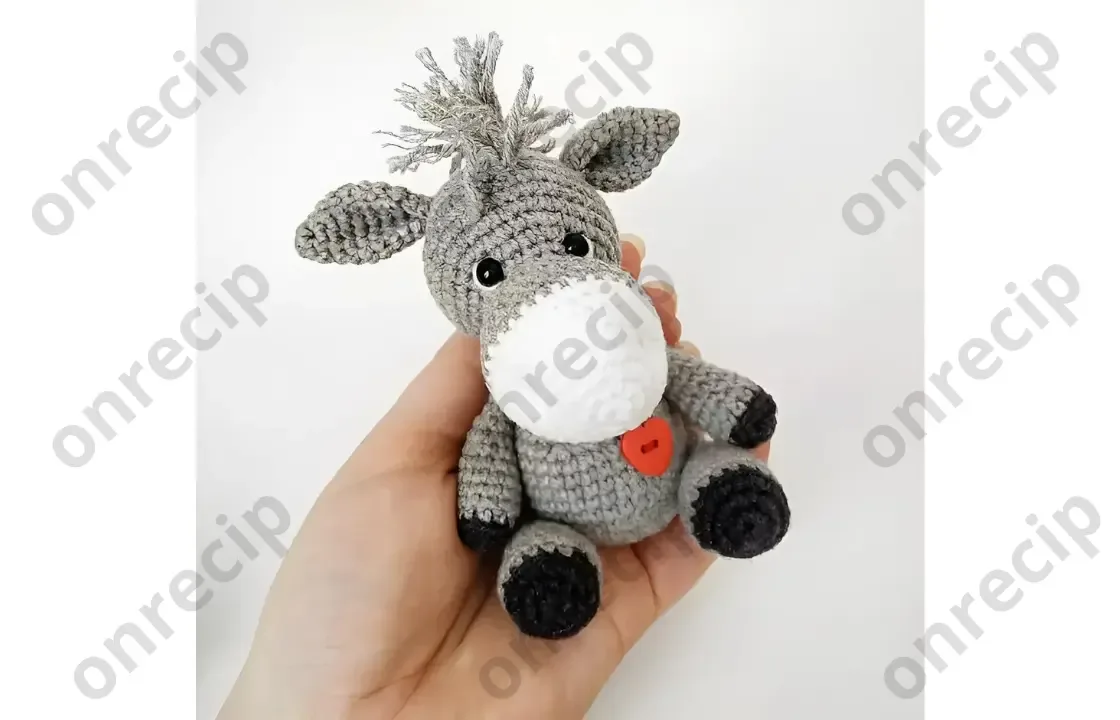
Little donkey amigurumi with heart button saddle

A 9.5 cm donkey amigurumi with gray tail tufts, suited to confident beginners with a free evening or two.

Jump to the rounds

What this one is

You know the evening I mean — the one where the lamp's on, there's a cup of something within reach, and you just want your hands busy on something small and kind. This little donkey is made for that evening, and for whoever's waiting on the other end of it: a grandchild, a shelf of odd little creatures, or just you, because you liked the heart-shaped button in the materials list and couldn't walk past it.

Your hands will spend most of their time on single crochet in the round, shaping the head over 29 rounds before anything else gets this much attention, then working down through a 20-round body, two 8-round ears, a 14-round pair of arms, and a 16-round pair of legs. Between the parts, the eye placement, and sewing everything together, you're looking at a few sittings rather than one long stretch — call it an afternoon plus an evening.

The rounds, in full

Written out, round by round

Intermediate4-6 hoursWorsted

Bring to the porch

Everything this one takes, in the order you will reach for it.

  • Yarn
  • Hook
  • Eyes for toys
  • Stuffing for toys
  • Button shaped like a heart
  • Needle for sewing details
  • Scissors

Head

Start with white yarn.

Switch to gray yarn at round 9.

Insert eyes between rows 15 and 16, 6 sc apart.

For nostril shaping: insert the needle from the bottom of the head between rows 15 and 16, pull out between rows 5 and 6. Insert back 2 sc away, exit 1 sc from the yarn. Tie a knot. Repeat for the other nostril, twice for each.

  1. Round 16 sc into KA. (6)
  2. Round 26 inc. (12)
  3. Round 3(1 sc, inc) x 6. (18)
  4. Round 4(2 sc, inc) x 6. (24)
  5. Round 5(3 sc, inc) x 6. (30)
  6. Rounds 6–830 sc. (30)
  7. Rounds 9–1130 sc. (30)
  8. Round 12(3 sc, dec) x 6. (24)
  9. Round 13(2 sc, dec) x 6. (18)
  10. Round 1418 sc. (18)
  11. Round 15(2 sc, inc) x 6. (24)
  12. Round 16(3 sc, inc) x 6. (30)
  13. Round 17(4 sc, inc) x 6. (36)
  14. Round 18(5 sc, inc) x 6. (42)
  15. Rounds 19–2342 sc. (42)
  16. Round 24(5 sc, dec) x 6. (36)
  17. Round 25(4 sc, dec) x 6. (30)
  18. Round 26(3 sc, dec) x 6. (24)
  19. Round 27(2 sc, dec) x 6. (18)
  20. Round 28(1 sc, dec) x 6. (12)
  21. Round 296 dec. (6)

Body

Secure the yarn, leaving 30-40 cm for sewing.

  1. Round 16 sc into KA. (6)
  2. Round 26 inc. (12)
  3. Round 3(1 sc, inc) x 6. (18)
  4. Round 4(2 sc, inc) x 6. (24)
  5. Round 5(3 sc, inc) x 6. (30)
  6. Round 6(4 sc, inc) x 6. (36)
  7. Rounds 7–1236 sc. (36)
  8. Round 13(7 sc, dec) x 4. (32)
  9. Round 14(6 sc, dec) x 4. (28)
  10. Round 15(5 sc, dec) x 4. (24)
  11. Round 16(4 sc, dec) x 4. (20)
  12. Rounds 17–1820 sc. (20)
  13. Round 19(3 sc, dec) x 4. (16)
  14. Round 2016 sc. (16)

Ears

Make 2

Fold in half and crochet through both edges, 5 sc, leaving yarn for sewing.

The ears are not stuffed.

  1. Round 16 sc into KA. (6)
  2. Round 26 sc. (6)
  3. Round 3(1 sc, inc) x 3. (9)
  4. Round 4(2 sc, inc) x 3. (12)
  5. Round 5(3 sc, inc) x 3. (15)
  6. Rounds 6–815 sc. (15)
  7. Round 7(1 sc, dec) x 5. (10)

Arms

Make 2

Start with black yarn.

Switch to gray yarn at round 3.

Stuff the lower part with hollow fiber. Fold in half, and crochet through both sides, 4 sc. Leave yarn for sewing.

  1. Round 16 sc into KA. (6)
  2. Round 26 inc. (12)
  3. Round 3work in back loops only, 12 sc. (12)
  4. Rounds 4–812 sc. (12)
  5. Round 9dec, 10 sc. (11)
  6. Round 1011 sc. (11)
  7. Round 116 sc, dec, 3 sc. (10)
  8. Round 1210 sc. (10)
  9. Round 13dec, 8 sc. (9)
  10. Round 149 sc. (9)

Legs

Make 2

Start with black yarn.

  1. Round 16 sc into KA. (6)
  2. Round 26 inc. (12)
  3. Round 3(1 sc, inc) x 6. (18)Switch to gray yarn at round 4.
  4. Round 4work in back loops only, 18 sc. (18)
  5. Rounds 5–618 sc. (18)
  6. Round 7(4 sc, dec) x 3. (15)
  7. Rounds 8–915 sc. (15)
  8. Round 10(3 sc, dec) x 3. (12)
  9. Rounds 11–1212 sc. (12)
  10. Round 13(2 sc, dec) x 3. (9)
  11. Rounds 14–169 sc. (9)Stuff the lower part with hollow fiber. Fold in half, crochet through both edges, 4 sc. Leave yarn for sewing.

Tail

At the back, between rows 6-7, pull through a loop, and crochet 4 chains using the four resulting yarn strands. Pull all ends through the last chain, tighten and trim to the desired length. Fluff the yarn ends.

Putting it together

Step 1

Sew the body to the head between rows 15 and 20.

Step 2

Fold the ears in half, sew with 2-3 stitches, and attach to the head between rows 22 and 24.

Step 3

Sew the arms to rows 17 and 18, at a slight angle, so they "face" forward.

Step 4

Sew the legs between rows 4 and 9 so the donkey sits. Attach with one or two stitches to the body at around row 12 of the leg (to prevent them from sticking out).

Step 5

Prepare gray yarn strands, 5-7 cm long. Fold two strands together. Insert each bunch on the head into a chain loop, pull through the ends, and tighten. Once done, trim to the desired length and fluff the yarn.

Step 6

Sew the heart-shaped button to the body of the donkey. Alternatively, you can crochet a small heart.

Marlene's notes

Note 01

Keep your tension snug and consistent through the increase rounds on the head and body — a loose round 2 or 3 will show once the stuffing goes in.

Note 02

The color change at round 9 on the head is the one place to slow down; weave in the white end neatly so it doesn't peek through the gray.

Note 03

Leave the 30-40 cm yarn tail suggested for the body when you finish it — you'll need that length for sewing the head on cleanly.

Note 04

The finished toy measures about 9.5 cm.

Note 05

Author: Elena Androsova – @handicraft_corner

Before you sit down

  • Set a stitch marker in round 1 of whatever part you're on; with 29 rounds on the head alone, it's easy to lose your place.
  • Read through the eye placement note before you reach round 15 — the eyes go in between rounds 15 and 16, spaced 6 sc apart, so you want both hands and eyes ready, not scrambling.
  • Check your hook gives you a fabric tight enough to hide the stuffing; amigurumi this small shows every gap if the tension's loose.

How the hours go

Head
about 1.5 to 2 hours, because 29 rounds plus the color change and eye placement take patience
Body, arms, and legs
about 2 hours, because the body alone is 20 rounds and you're repeating shaping across two arms and two legs
Ears, tail, and assembly
about 1 hour, because the ears fold rather than stuff, and sewing on the legs, arms, and gray tail strands takes a careful hand

Looking after it

  • If you've used acrylic or cotton yarn, a gentle hand wash in cool water is safest — lay the donkey flat to dry rather than hanging it, so the stuffing doesn't settle to one side.
  • Once dry, reshape the ears and gently fluff the gray tail strands with your fingers, then store the finished piece somewhere it won't get squashed, like a shelf rather than the bottom of a bag.
FAQs

Asked on the glider

the ones that come up on the glider

Can I use a different yarn weight than worsted?

The pattern works with acrylic, cotton, or semi-cotton yarn, so you have some flexibility there. Just match your hook to whatever weight you choose, keeping the stitches tight enough to hold the stuffing in.

Why does the head take so many more rounds than the body?

The head is 29 rounds against the body's 20 because it carries more detail — the color change at round 9 and the eye placement between rounds 15 and 16 both need the extra room to shape properly.

Do the ears need stuffing?

No, the ears are left unstuffed on purpose. You fold them in half and crochet through both edges instead, which keeps them soft and gives them a nice flat fold.

How far apart should the eyes go?

Space them 6 sc apart between rounds 15 and 16 on the head, as the pattern specifies. Pin them in place first and check they sit evenly before sewing or securing for good.

What is the tail made from?

The tail is made from short gray yarn strands, cut 5-7 cm long, folded in pairs, and inserted into the head to form a fringe. It is not crocheted in rounds like the other parts.

How big is the finished donkey?

The finished toy measures about 9.5 cm, so it is a small, tabletop-sized piece. If you want something larger, sizing up your yarn and hook together is the easiest route without changing the round counts.