Intermediate 4-6 hours Worsted yarn

Worked on the glider, counted out loud —

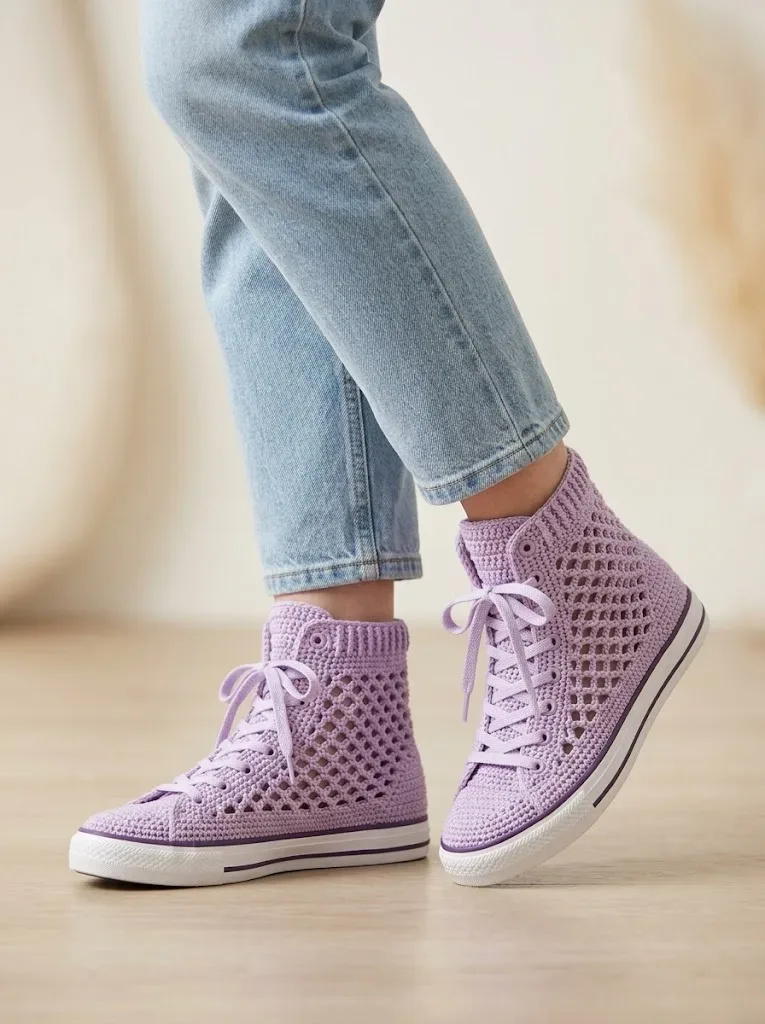
Lavender mesh crochet high-top sneakers with a ribbed cuff

A lavender cotton crochet high-top pattern for confident stitchers, with a ribbed cuff and rubber sole, roughly a weekend project.

Jump to the rounds

What this one is

This pair is for the quiet stretch of the week when you want your hands busy and your feet eventually cozy in something you made yourself. I designed these high tops for anyone who loves the look of knit sneakers but wants a sturdier, washable cotton version. They are a good match for a crocheter who already knows single crochet well and is ready to build something three-dimensional, from flat sole to shaped heel to a long ribbed cuff that wraps the ankle.

Try it another way

If the swatch tells you 16 sc and 18 rows over 4 inches is coming up different for you, adjust your hook size half a step before you commit to the full 72-stitch sole, since the fit depends on it more than on anything else. For color, you could swap the lavender for any solid worsted cotton and keep the white only on the sole stripe, or flip it so white becomes the main shade and lavender takes the stripe instead. The ribbed cuff strip is a natural spot for a second color too, since it is a separate sixty-row piece you can work in a contrasting cotton before sewing it on. If you want a lower-profile shoe, you could stop the ribbed strip a few rows short of sixty, though check the fit against your ankle first. Laces are flat and about 45 inches each, so a bold contrasting lace color is an easy swap that changes the whole look without touching a single stitch count. For indoor-only use, skip the glued rubber sole and crochet a plain fabric backing instead, which keeps the shoes soft and quiet on hardwood.

The rounds, in full

Written out, round by round

Intermediate4-6 hours4.0 mmWorsted

Bring to the porch

Everything this one takes, in the order you will reach for it.

Yarn

  • Worsted weight cotton yarn (approximately 300 yards for one pair)
  • 100% cotton or cotton blend recommended for structure and washability

Main Color

  • Lavender or light purple
  • Small amount of white for sole stripe detail

Hook

  • 4.0mm (G/6) crochet hook for main construction
  • 3.5mm (E/4) hook for tighter sole work (optional but recommended)

Notions

  • Flat rubber shoe soles or flip flop bases in your size
  • Fabric glue or hot glue gun
  • Tapestry needle for weaving ends
  • Stitch markers
  • Flat shoelaces in coordinating color (approximately 45 inches each)
  • Scissors

Gauge

  • 16 single crochet stitches and 18 rows = 4 inches in single crochet using 4.0mm hook
  • Check your gauge! Shoe fit depends heavily on accurate sizing.

Skill Level

  • Intermediate

Sole (Make 2)

The sole creates the foundation. We're working in continuous rounds with a sturdy single crochet stitch.

Foundation: Using smaller hook if desired, ch 25.

  1. Round 1Starting in 2nd ch from hook, work 2 sc in first ch, sc in next 22 ch, 4 sc in last ch. Working along opposite side of foundation chain, sc in next 22 ch, 2 sc in last ch, sl st to first sc to join. (52 sts)
  2. Round 2Ch 1, 2 sc in same st, 2 sc in next st, sc in next 22 sts, 2 sc in each of next 4 sts, sc in next 22 sts, 2 sc in each of last 2 sts, sl st to join. (62 sts)
  3. Round 3Ch 1, sc in same st, 2 sc in next st, sc in next st, 2 sc in next st, sc in next 22 sts, *sc in next st, 2 sc in next st* repeat 4 times, sc in next 22 sts, *sc in next st, 2 sc in next st* repeat twice, sl st to join. (72 sts)
  4. Round 4Ch 1, sc in each st around, sl st to join. (72 sts)
  5. Round 5Repeat Round 4. (72 sts)Fasten off, leaving a long tail for attaching to rubber sole later.

Don't worry if your sole isn't perfectly flat. It will shape itself once attached to the base and worn.

Toe Box

The toe box uses a denser stitch to protect your toes and create that classic sneaker look.

Pick up yarn at center front of sole.

  1. Row 1Working into front loops only of sole stitches, join yarn, ch 1, sc in same st, sc in next 17 sts. Turn. (18 sts)
  2. Row 2Ch 1, sc2tog, sc to last 2 sts, sc2tog. Turn. (16 sts)
  3. Row 3Ch 1, sc in each st across. Turn. (16 sts)
  4. Rows 4–5Repeat Rows 2-3. (14 sts after Row 4)(14)
  5. Row 6Ch 1, sc2tog, sc to last 2 sts, sc2tog. Turn. (12 sts)
  6. Row 7Ch 1, sc in each st across. (12 sts)Do not fasten off. Continue to side panel.

Side Panels (Mesh)

This is where the magic happens! The mesh creates that beautiful open lattice pattern visible in the design.

Setting Up the Mesh Foundation:

  1. Row 1 (Right Side)Ch 1, sc evenly along right edge of toe box (approximately 7 sts), sc in each remaining sole stitch around heel and up left side of toe box (approximately 40 sts), sl st to first sc of toe box top edge to join round. Place marker.
  2. Round 1Ch 1, sc in each st around entire shoe opening. Sl st to join. (approximately 59 sts total, adjust as needed for your size)(59)
  3. Round 2Ch 1, sc in each st around. Sl st to join.Creating the Mesh Pattern: the mesh is worked in rows on each side panel separately.

Right Side Panel:

  1. Row 1Working along right side of shoe, join yarn at toe box edge, ch 3 (counts as first dc), skip 2 sts, dc in next st, *ch 2, skip 2 sts, dc in next st* repeat across side panel to heel area. Turn. (approximately 8 mesh spaces)
  2. Row 2Ch 3, dc in first ch-2 space, *ch 2, dc in next ch-2 space* repeat across, dc in top of turning chain. Turn.
  3. Rows 3–6Repeat Row 2.
  4. Row 7 (Closing)Ch 1, sc in each dc and 2 sc in each ch-2 space across. Fasten off.Repeat for left side panel, starting from heel and working toward toe.

If your mesh looks uneven, don't panic. The laces will pull everything together and hide small inconsistencies.

Tongue

Foundation: Ch 14.

  1. Row 1Sc in 2nd ch from hook, sc in each ch across. Turn. (13 sts)
  2. Rows 2–20Ch 1, sc in each st across. Turn. (13 sts)
  3. Row 21Ch 1, sc2tog, sc to last 2 sts, sc2tog. Turn. (11 sts)
  4. Rows 22–24Repeat Row 21. (5 sts after Row 24)(5)
  5. Row 25Ch 1, sc in each st across. Fasten off. (5 sts)

Ribbed Cuff

The cuff gives these high tops their signature look. Working in back loops only creates that stretchy ribbed texture.

Foundation: Ch 10.

  1. Row 1Sc in 2nd ch from hook, sc in each ch across. Turn. (9 sts)
  2. Row 2Ch 1, sc in BLO of each st across. Turn. (9 sts)
  3. Rows 3–60Repeat Row 2. (9 sts)This creates a long ribbed strip. Fasten off, leaving a long tail.

Decorative Tab

That cute little tab at the back adds authentic sneaker detail.

Foundation: Ch 8.

  1. Row 1Sc in 2nd ch from hook, sc in each ch across. Turn. (7 sts)
  2. Rows 2–10Ch 1, sc in each st across. Turn. (7 sts)Fasten off.

Sole Stripe Detail

Using white yarn, ch 80 (or length needed to go around sole edge).

  1. Row 1Sl st in each ch across. Fasten off.

Assembly Instructions

Now comes the satisfying part where everything comes together!

Step 1: Attach Tongue Position tongue at center front, overlapping bottom edge with top of toe box. Using tapestry needle and matching yarn, whip stitch bottom 2 inches of tongue to inside of toe box.

Step 2: Join Ribbed Cuff Wrap ribbed strip around top opening of shoe. The ribbing should sit vertically. Whip stitch short ends together first, then stitch bottom edge of cuff to top edge of mesh panels and toe box.

Step 3: Add Back Tab Fold decorative tab in half. Position at center back of heel, tucked just under cuff edge. Stitch securely in place.

Step 4: Attach White Stripe Using fabric glue or stitching, attach white chain stripe around the bottom edge of crocheted upper, just where it meets the sole.

Step 5: Attach to Rubber Sole Apply fabric glue liberally to top of rubber sole. Press crocheted sole firmly onto rubber base. Allow to dry completely (at least 24 hours) before wearing. For extra security, stitch through rubber sole with sturdy thread if sole allows.

Step 6: Add Eyelets and Laces Using tapestry needle, create 6-8 evenly spaced holes along each side of the front opening for laces, then thread the flat shoelaces through the eyelets and lace up to secure the fit.

Marlene's notes

Note 01

Tension matters more here than in most projects, since the gauge swatch of 16 sc and 18 rows over 4 inches is tied directly to the rubber soles you are gluing onto.

Note 02

The ribbed strip works every row in the back loop only, so keep an eye on which loop you are catching across all sixty rows or the rib pattern will drift.

Note 03

This pattern is written for a Women's US size 7-8. For smaller sizes (5-6), reduce sole rows by 2 and side panel rows by 1. For larger sizes (9-10), add 2 rows to the sole and 1 row to the side panels. Always measure against your actual foot or the base sole you're using.

Porch photos

Before you sit down

  • Measure out your yarn before you start the first sole round — this pattern uses about 300 yards of worsted cotton for one finished pair, so you want enough on hand for both shoes.
  • Work a quick gauge swatch and check it against 16 single crochet stitches and 18 rows over 4 inches, since the shoe fit depends heavily on this.
  • Have your stitch markers nearby before Round 1 of the sole, since you will be joining each round and want to track the join point every time.
  • Read through the sole's Round 1 once before you pick up the hook, since the 2 sc and 4 sc increase pattern at each end sets the whole foot shape.

How the hours go

Sole foundation
about 45 minutes to 1 hour because the five rounds involve several increase points to track before it settles at 72 stitches
Toe box and heel
about 1 to 1.5 hours because the sc2tog shaping across rows 2-6 needs careful counting to taper evenly
Mesh side panels
about 1 to 1.5 hours per shoe because the chain-and-dc repeat across each 7-row panel takes a little extra attention to keep the mesh spaces even
Ribbed cuff strip
about 2 to 2.5 hours because sixty rows of back-loop-only single crochet take time even though each row is simple
Assembly and sole
about 1 to 1.5 hours for whip stitching the tongue, cuff, and tab in place, gluing the white stripe and rubber sole, and adding eyelets and laces, plus at least 24 hours of drying time for the glue
Looking after it

  • Hand wash the cotton upper in cool water and avoid soaking the glued rubber sole for long stretches, since the adhesive holds up best when it stays mostly dry.
  • Lay the shoes flat to air dry away from direct heat, and reshape the ribbed cuff by hand while damp so it keeps its stretch instead of drying stiff.
FAQs

Asked on the glider

the ones that come up on the glider

Can I resize these for a different shoe size?

Yes, start from your gauge swatch, since 16 sc and 18 rows over 4 inches is what the whole sole and panel counts are built on. Adjust your hook up or down slightly rather than changing stitch counts, and compare the sole length to your rubber sole base before you finish it.

Why does the pattern call for two different hook sizes?

The 4.0mm hook is for the main body of the shoe, while the smaller 3.5mm hook tightens up the sole work so it holds its shape better once glued to the rubber base. You can skip the second hook if your 4.0mm fabric already feels dense enough.

What yarn works best for this pair?

I recommend 100% cotton or a cotton blend, since it gives the structure and washability this style needs, and plan on about 300 yards total for one pair. Worsted weight is what the gauge is built around, so stick close to that weight for predictable results.

How do I attach the crocheted upper to the rubber sole?

Use fabric glue or a hot glue gun to secure the finished upper to a flat rubber shoe sole or flip-flop base in your size. The long tail left after fastening off the sole foundation is there for stitching through the edge before gluing, which helps everything stay put.

My shoe feels too tight once I try it on. What should I check?

Go back to your gauge swatch first, since a too-tight shoe almost always traces back to tension that ran tighter than 16 sc and 18 rows over 4 inches. Sizing up your hook slightly for the next pair is simpler than reworking stitch counts mid-pattern. Also double check that the ribbed cuff was worked in back loops only, since that's what gives it the stretch to pull on over your foot.

What is the ribbed strip actually for?

That sixty-row, back-loop-only strip becomes the stretchy cuff that wraps the ankle and gives the shoe its knit-sneaker look. Working every row in the back loop only is what gives it that ribbed stretch instead of a flat, stiff band.