Intermediate 60-90 hours Worsted yarn

Worked on the glider, counted out loud —

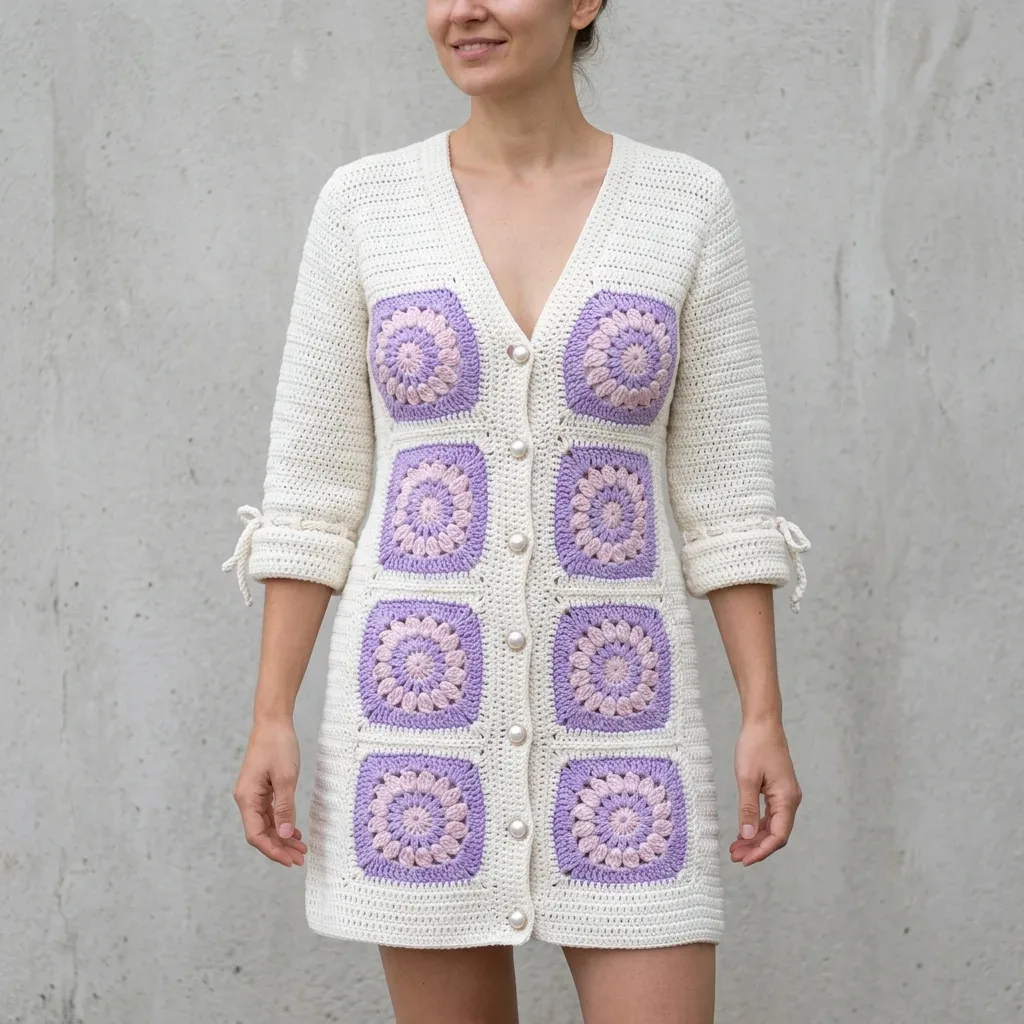
Lavender floral granny square cardigan dress pattern

An intermediate to advanced crochet cardigan dress with granny square florals. Plan for 60-90 hours of satisfying, unhurried work.

Jump to the rounds

What this one is

You know the kind of evening this is for: the one where you want to walk in somewhere and have people ask where you got your dress, only to tell them you made it yourself. This cardigan dress is for the crocheter who has a couple of garments under her belt already and is ready to put real time into something that earns its keep in the closet, worn as a mini dress on its own or layered long over jeans.

Your hands will spend most of their time in dense single crochet, building two straight back and front panels before turning to eight separate granny squares, each one centered with a dimensional sunburst made from puff stitches worked in the round. Expect somewhere between 60 and 90 hours total, spread across panels, squares, sleeves, seaming, and a button band at the end.

Try it another way

The easiest change is where you stop: hem the back and front panels a few rows shorter if you want this as a true mini, or leave them at full length and wear it as a longline cardigan over jeans the way the pattern intends. If Color A's cream reads too stark against your skin tone, Option 3's cotton worsted in off-white gives the same stitch definition with a softer, drapier hand, which also suits the garment for warmer-weather wear. You can shift the lilac and blush balance too: work more of the eight granny squares in Color B for a cooler, more purple-forward cardigan, or lean into Color C's blush pink for a warmer palette, since both colors are already stocked at 200-300 yards and the squares are worked as separate motifs you place yourself. If you want a plainer finish, you could set the floral squares aside entirely for a future project and work the front panels straight in Color A alone, though you would want to recalculate your yardage down from the full 1,900 yards. The ten pearl shank buttons can be swapped for a different diameter as long as they are still substantial enough to anchor a single crochet band without pulling through.

There is real satisfaction in watching two kinds of crochet live on the same garment: the meditative, almost mechanical rhythm of single crochet rows stacking into a tailored panel, and then the fussier, more absorbing work of a granny square with a puff stitch floral center, built round by round in Color C with a magic ring start. You get to practice sc2tog shaping through the sleeve cap and armhole decreases, then shift gears entirely into seaming eight motifs onto the front panels with precision. By the time you are sewing on ten pearl shank buttons and tying off the cuffs, you have touched nearly every skill a garment maker needs, and the finished piece looks like it took exactly as long as it did.
The rounds, in full

Written out, round by round

Intermediate60-90 hours6.0 mmWorsted

Bring to the porch

Everything this one takes, in the order you will reach for it.

  • Color A (Cream/Off-White): approximately 1,400 yards / 1,280 meters
  • Color B (Lilac/Soft Purple): approximately 300 yards / 275 meters
  • Color C (Blush Pink/Pale Mauve): approximately 200 yards / 183 meters

Total yarn needed

  • approximately 1,900 yards / 1,738 meters across all three colors.
  • Option 1: Lion Brand Pound of Love in Fisherman for Color A, with Paintbox Yarns Simply DK held double in Lilac and Ballet Pink for Colors B and C. Holding DK double approximates worsted weight, but always verify your gauge.
  • Option 2: Paintbox Yarns Simply Worsted in Champagne White, Wisteria Purple, and Dusty Rose. This is 100% acrylic with excellent stitch definition.
  • Option 3: Drops Safran cotton worsted in Off-White, Lavender, and Old Rose. The cotton gives a slightly drapey, summer-weight feel.
  • Whatever you choose, look for smooth, evenly plied yarn. Avoid textured or loosely spun yarn, which will muddy your floral motif.
  • US size J / 6.0 mm for the body and granny squares
  • US size I / 5.5 mm for the button band only
  • 10 pearl shank buttons, 18 mm diameter
  • Yarn needle for seaming
  • At least 8 stitch markers
  • Scissors
  • Measuring tape
  • Rust-proof pins for blocking

Foundation

With Color A and J hook, ch 64.

Step by step: With Color A and J hook, ch 33.

  1. Round 1(WS): Sc in second ch from hook and in each ch across. Ch 1, turn. (63 sc)Step by step: 64 Sc across. Ch 1, turn. (32 sc per row).
  2. Round 2128 Sc in each st across. Ch 1, turn at end of each row. (63 sc per row) The back is worked straight with no waist shaping. After Row 128, fasten off leaving a long tail for shoulder seaming.

Foundation and Body Rows

With Color A and J hook, ch 33.

  1. Round 1(WS): Sc in second ch from hook and in each ch across. Ch 1, turn. (32 sc)
  2. Round 264 Sc in each st across. Ch 1, turn. (32 sc per row)(32)

Sleeve Cap

With Color A and J hook, ch 33.

  1. Round 1Sc in second ch from hook and in each ch across. Ch 1, turn. (32 sc)
  2. Round 2Sc2tog at beg, sc across to last 2 sts, sc2tog. Ch 1, turn. (30 sc)
  3. Round 3Sc across. Ch 1, turn. (30 sc)
  4. Round 4Sc2tog at beg, sc across to last 2 sts, sc2tog. Ch 1, turn. (28 sc)
  5. Round 5Sc across. Ch 1, turn. (28 sc)
  6. Round 6Sc2tog at beg, sc across to last 2 sts, sc2tog. Ch 1, turn. (26 sc)
  7. Round 7Sc across. Ch 1, turn. (26 sc)
  8. Round 8Sc2tog at beg, sc across to last 2 sts, sc2tog. Ch 1, turn. (24 sc)
  9. Rounds 9–12Sc across. Ch 1, turn. (24 sc per row) Fold the cap so the two short ends meet. Join with sl st to form a ring. Sew the cap into the armhole opening using mattress stitch. Pin carefully, easing any fullness evenly.

Sleeve Body

Join Color A at the underarm point with sl st. Work sc in the round, using a stitch marker at the beginning of each round.

  1. Round 1Sc around entire lower edge of sleeve cap. (24 sc)
  2. Rounds 2–8Sc in each st around. (24 sc per round)(24)
  3. Round 9Increase 2 sc in first st, sc in each remaining st. (25 sc)
  4. Round 10Sc around. (25 sc) Continue increasing 1 st at the beginning of every other round (Rounds 9, 11, 13, 15, 17, 19, 21, 23, 25, 27) until you have (34 sc) .Continue working even until the sleeve measures 15 inches from the underarm join.(34)

Left Front Band (No Buttonholes)

With RS facing, join Color A at the hem of the left front center edge with sl st.

  1. Round 1Ch 1, sc evenly up the entire left center front edge and across the back neck, ending at the right shoulder seam. Pick up approximately 3 sc for every 4 rows along vertical edges, and 1 sc per stitch across the back neck.Continue adding rows to create a band approximately 1 inch wide, ending with a final row of sc.

Cuff Section

Round 1: Work 1 esc in each st around. (34 sts)

  1. Rounds 2–5Sc in each st around. (34 sc)
  2. Round 6Sl st in each st around to create a fold line. (34 sl sts)
  3. Rounds 7–8Sc around. (34 sc) Fasten off and weave in ends.

Armhole Shaping

  1. Round 97Sl st across first 3 sts. Sc in each remaining st. Ch 1, turn. (13 sc)
  2. Round 98Sc across to last 2 sts. Sc2tog. Ch 1, turn. (12 sc)
  3. Round 99Sc2tog at beg. Sc across. Ch 1, turn. (11 sc)
  4. Round 100Sc across to last 2 sts. Sc2tog. Ch 1, turn. (10 sc)
  5. Round 101Sc2tog at beg. Sc across. Ch 1, turn. (9 sc)
  6. Round 102128 Sc across all sts with no further shaping. (9 sc per row) Fasten off, leaving a long tail.

Armhole Shaping (Mirrored)

  1. Round 97Sc across to last 3 sts. Leave last 3 sts unworked. Ch 1, turn. (13 sc)
  2. Round 98Sc2tog at beg of row. Sc across. Ch 1, turn. (12 sc)
  3. Round 99Sc across to last 2 sts. Sc2tog. Ch 1, turn. (11 sc)
  4. Round 100Sc2tog at beg. Sc across. Ch 1, turn. (10 sc)
  5. Round 101Sc across to last 2 sts. Sc2tog. Ch 1, turn. (9 sc)
  6. Round 102128 Sc across. Ch 1, turn. (9 sc per row) Fasten off, leaving a long tail.

Putting it together

Step 1

Sew on all 10 pearl shank buttons opposite the buttonholes. Block the entire finished garment lightly, paying attention to the button band lying flat.

Marlene's notes

Note 01

Gauge is mandatory here, not a suggestion. The pattern notes that even a half-stitch difference over 4 inches will change your finished bust circumference noticeably, so do not skip the swatch.

Note 02

Mark the edges of your front panels before attaching the eight granny squares, since the squares are worked separately and then joined, and uneven placement is much harder to fix after seaming.

Before you sit down

  • Confirm you have enough of each color before you cast on: roughly 1,400 yards of Color A, 300 yards of Color B, and 200 yards of Color C, about 1,900 yards total.
  • Set out at least 8 stitch markers now, since you will need them for tracking rows through long straight panels and for placing the granny squares evenly later.
  • Work a gauge swatch in single crochet with your J hook and check it against 14 sc and 16 rows over 4 inches before committing to the full 128-row back panel.
  • Read through the Foundation round once fully, including the magic ring and puff stitch sequence, so the rhythm of sc, puff stitch, ch 1 is familiar before your yarn is committed to the first square.

How the hours go

Back and front panels (Foundation and Body Rows)
about 15-20 hours each, because the back alone runs 128 rows of single crochet worked straight with no shaping
Eight granny squares with sunburst centers
about 1-2 hours per square, because each one involves a magic ring start, a puff stitch and chain-1 floral round, and careful color changes
Sleeves, armhole shaping, and button band
about 10-15 hours total, because the sleeve cap alone has 9 rounds of sc2tog shaping and the armhole shaping is mirrored on the second side

Looking after it

  • If you worked this in acrylic or acrylic-blend yarn, machine wash on a gentle cold cycle and lay the pieces flat to dry, since the dense sc fabric holds a lot of water and will stretch if hung wet.
  • the cotton version, hand wash in cool water and reshape the panels and granny squares gently while damp, pinning the button band flat as you did during blocking so it dries lying straight rather than curled.
FAQs

Asked on the glider

the ones that come up on the glider

Can I make this in a different size than Small/Medium?

The pattern is written for one finished size with a 36 inch bust and 32 inch total length. You would need to recalculate stitch and row counts yourself if you want a different fit, since no other sizes are included here.

Do I need to know how to set in sleeves before starting?

Yes, the pattern assumes comfort with setting in sleeves along with flat panel shaping and seaming. If you have not done this before, it is worth practicing on a smaller project first, as the source intro itself suggests.

Why does the pattern use two different hook sizes?

The J / 6.0 mm hook is used for the body panels and granny squares to match the garment gauge, while the smaller I / 5.5 mm hook is reserved for the button band so it sits snug and does not flare.

How many granny squares do I actually need to make?

You need eight large granny squares total, each with a dimensional sunburst floral center worked from a magic ring with puff stitches, which are then attached to the front panels.

What happens if my gauge is off?

Even a half-stitch difference over 4 inches against the 14 sc / 16 row gauge will noticeably change your finished bust measurement. Swatch first and adjust your hook size before committing to the 128-row back panel.

Can I substitute the yarn options listed?

Yes, the pattern offers three tested options including a worsted-weight acrylic and a cotton worsted for a drapier finish, but whatever you choose should be smooth and evenly plied so the floral motifs stay crisp rather than muddy.