Intermediate 4-6 Hours Bulky yarn

Worked on the glider, counted out loud —

Koi Carp Amigurumi Crochet Pattern: Plush Pond Buddy

Crochet a plush koi carp amigurumi with a flowing tail, fins, and comb worked directly onto the body. A cozy, detailed written pattern for confident stitchers.

Jump to the rounds

Before you sit down

Start the body with a magic ring and work continuous spiral rounds, increasing steadily to shape the rounded koi form.

Insert the safety eyes between the early rounds, spacing them evenly before continuing to build up the head and body.

Keep stuffing the body firmly in stages as you crochet through all the rounds so the shape stays smooth throughout.

Finish the main body shaping and taper the final rounds down to the small base where the tail will attach.

Crochet the two tail lobes directly onto that base, alternating front-loop and back-loop rows to create a rippled, flowing fin shape.

Attach the paired large fins using slip stitches and taller treble and double-treble stitches positioned back from the eyes.

Add the smaller fins further back and slightly lower, followed by the single comb piece worked over the top of the head.

Weave in all remaining ends and give the plush yarn tails a careful trim for a clean, finished look.

What this one is

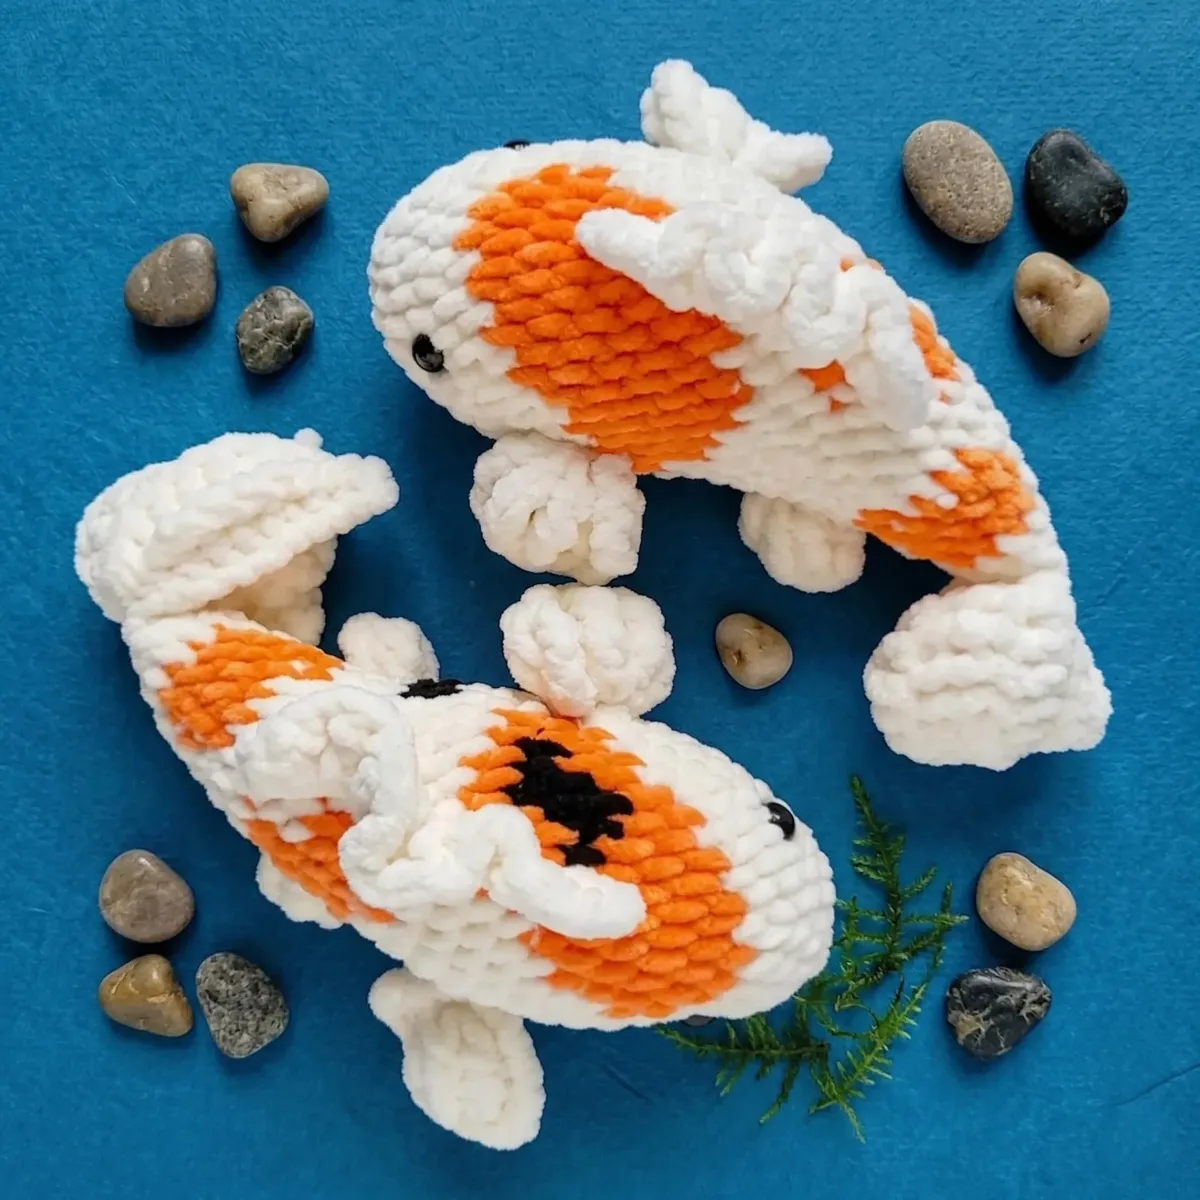
This koi carp amigurumi turns a single ball of plush yarn into a plump, smiling pond fish with a dramatic flowing tail, paired fins, and a jaunty little comb on top. It's the kind of make that feels special the moment the first orange spots go in, and it's perfect for crocheters who love toys with personality — something a little different from the usual bear or bunny shape, but still built on familiar amigurumi bones.

The body is worked in continuous spiral rounds over 27 rounds, shaping smoothly from a flat starting chain into a rounded fish form, with stuffing added gradually as you go for even firmness. The real fun comes with the tail, fins, and comb, which are crocheted directly onto the finished body using rows, slip stitches, and taller stitches like treble and double treble crochet — no separate sewing required. Expect an intermediate-level project, roughly 4 to 6 hours depending on your stuffing pace and how fussy you get with fin placement.

When it's all stitched together, you'll have an 8-inch plush koi with a soft, huggable belly, a wavy two-lobed tail that has real movement, and delicate ruffled fins that catch the eye from any angle. It's substantial enough to sit proudly on a shelf yet soft enough to be a genuine cuddle toy, making it a lovely handmade gift for koi pond enthusiasts, nursery decor, or anyone who appreciates a fish with more charm than your average goldfish.

Variations

I adore how this koi carp manages to feel elegant and playful at the same time. Working the body in one continuous spiral is so satisfying — no seams, just smooth growth from a tiny magic ring start into a full round belly, stuffed as you go so it never feels like an afterthought. What really won me over, though, is how the tail, fins, and comb attach directly onto the body using slip stitches and rows of treble and double treble crochet. There's no sewing marathon at the end, just building texture right where you need it. Placing the safety eyes between rounds 5 and 6 gives the koi such an expressive, curious little face before you've even finished the head shaping. And those two tail lobes worked in front-loop-only and back-loop-only give the fin an actual ripple, like it's caught mid-swim. It's a project that rewards patience with a genuinely dynamic, sculptural result — not just a stuffed blob, but a fish that looks like it's gliding through water, frozen in a happy little moment.

Common mistakes

  • Losing track of the beginning of the round during the 27-round spiral body.Place a contrasting stitch marker in the first stitch of each round and move it up every round without fail — this one habit prevents the whole shape from drifting off-center.
  • Inserting the safety eyes too early or in the wrong spot relative to the rounds.Wait until you've completed Round 5 and count roughly 10 sc apart before placing eyes, then confirm placement looks even before working Round 6 onward — eyes are much harder to reposition once secured.
  • Understuffing the body, leading to a lumpy or floppy finished koi.Stuff firmly and evenly in small amounts as you complete each few rounds rather than cramming it all in at the end, checking that the shape stays smooth and rounded.
  • Working the tail lobes with inconsistent tension between the FLO and BLO rows.Keep your stitches snug but not tight across all three rows of each lobe so the tail keeps its intended ripple and doesn't pucker or curl unevenly.
  • Placing the Large Fins and Small Fins without measuring back from the eyes first.Count rounds carefully — Large Fins sit 6-7 rounds back from the eyes along the lower eye line, and Small Fins sit 5 rounds further back and 3 sc lower — mark these spots before attaching.
  • Rushing the taller stitches (tr, dtr) in the fins and comb, causing loose or twisted loops.Slow down on treble and double treble stitches, keeping an even number of yarn overs each time so the fin edges stay crisp and symmetrical.

The rounds, in full

Written out, round by round

Intermediate4-6 Hours4.0 mmBulky

Materials

Everything this one takes, in the order you will reach for it.

  • Bulky/Super Bulky (Weight 5/6) plush yarn (e.g., Himalaya Dolphin Baby, YarnArt Dolce)

Main Color

  • Approximately 100g (e.g., milk/white)

Accent Color

  • Small amount (e.g., orange) for spots
  • 4.0 mm crochet hook
  • 10 mm safety eyes
  • Polyester fiberfill for stuffing
  • Stitch marker (thin contrasting yarn recommended)
  • Scissors
  • Yarn needle for weaving in ends
  • Lighter (optional, for carefully sealing plush yarn ends)

keep this to hand

Abbreviations

US crochet terms, as used in this pattern.

  1. chChain
  2. sl stSlip Stitch
  3. scSingle Crochet
  4. hdcHalf Double Crochet
  5. dcDouble Crochet
  6. trTreble Crochet (yarn over 2 times)
  7. dtrDouble Treble Crochet (yarn over 3 times)
  8. incIncrease (2 sc in same stitch)
  9. decDecrease (invisible decrease recommended for amigurumi)
  10. mrMagic Ring
  11. BLOBack Loop Only
  12. FLOFront Loop Only
  13. st(s)Stitch(es)
  14. RndRound
  15. RowRow

Body

Start with main color. Stuff as you go, ensuring even firmness.

Insert safety eyes between Rnds 5 and 6, approximately 10 sc apart, before working Round 8.

  1. Round 1Ch 3, sc in 2nd ch from hook, 3 sc in next ch, working on opposite side of ch, 2 sc in last ch. (6)
  2. Round 26 inc. (12)
  3. Round 3(1 sc, inc) x 6. (18)
  4. Round 418 sc. (18)
  5. Round 5(2 sc, inc) x 6. (24)
  6. Round 6With main color, 16 sc; with orange, 3 sc; with main color, 5 sc. (24)
  7. Round 7With main color, (3 sc, inc) x 3, 3 sc; with orange, inc, 3 sc, inc; with main color, 3 sc, inc. (30)
  8. Round 8With main color, 17 sc; with orange, 8 sc; with main color, 5 sc. (30)
  9. Round 9With main color, 16 sc; with orange, 8 sc; with main color, 6 sc. (30)
  10. Round 10With main color, 16 sc; with orange, 8 sc; with main color, 6 sc. (30)
  11. Round 11With main color, 15 sc; with orange, 8 sc; with main color, 7 sc. (30)
  12. Round 12With main color, 14 sc; with orange, 8 sc; with main color, 8 sc. (30)
  13. Round 13With main color, 13 sc; with orange, 9 sc; with main color, 8 sc. (30)
  14. Round 14With main color, 15 sc; with orange, 5 sc; with main color, 10 sc. (30)
  15. Round 15With main color, (3 sc, dec) x 6. (24)
  16. Round 16With main color, 19 sc; with orange, 2 sc; with main color, 3 sc. (24)
  17. Round 17With main color, 17 sc; with orange, 6 sc; with main color, 1 sc. (24)
  18. Round 18With main color, (6 sc, dec) x 2, 2 sc; with orange, 4 sc, dec. (21)
  19. Round 19With main color, 18 sc; with orange, 3 sc. (21)
  20. Round 20With main color, (5 sc, dec) x 2, 4 sc; with orange, 1 sc, dec. (18)
  21. Round 21With main color, 18 sc. (18)
  22. Round 22With main color, 10 sc; with orange, 2 sc; with main color, 6 sc. (18)
  23. Round 23With main color, 4 sc, dec, 3 sc; with orange, 1 sc, dec; with main color, 4 sc, dec. (15)
  24. Round 24With main color, 9 sc; with orange, 6 sc. (15)
  25. Round 25With main color, (3 sc, dec) x 2; with orange, 3 sc, dec. (12)
  26. Round 26With main color, 12 sc. (12)
  27. Round 27With main color, (1 sc, dec) x 4. (8) Work 4 additional sc to bring the stitch marker to the side. Fold the opening flat and sc through both layers with 4 sc. Do not cut yarn. This creates the base for the tail.

Large Comb

Work with main color.

Position: Locate in the middle of the body, spanning Rnds 11 to 21 from the beginning of the head.

Cut yarn, pull through, tie ends together, and weave inside the body.

  1. Round 1Sl st along the body (along the desired length for the comb base, covering Rnds 11-21).
  2. Round 2Ch 2, turn. Work 3 dc into each sl st from Row 1. When you reach the end, work 1 hdc and 1 sl st.

Tail

Continue with main color.

Cut yarn, fasten off, and weave in ends.

First Tail Lobe - Row 1: Ch 10. Starting in 2nd ch from hook, sl st, sc, hdc, 4 dc, hdc, sc. Sl st into the first of the 4 sc base stitches on the body. Ch 1, turn.

First Tail Lobe - Row 2 (FLO): Sc, hdc, 4 dc, hdc, sc, sl st. Ch 1, turn.

First Tail Lobe - Row 3 (BLO): Sl st, sc, hdc, 4 dc, hdc, sc. Sl st into the second of the 4 sc base stitches on the body.

Second Tail Lobe - Row 1: Sl st into the third of the 4 sc base stitches on the body. Ch 10. Starting in 2nd ch from hook, sl st, sc, hdc, 4 dc, hdc, sc. Sl st into the same third sc base stitch on the body. Ch 1, turn.

Second Tail Lobe - Row 2 (FLO): Sc, hdc, 4 dc, hdc, sc, sl st. Ch 1, turn.

Second Tail Lobe - Row 3 (BLO): Sl st, sc, hdc, 4 dc, hdc, sc. Sl st into the fourth of the 4 sc base stitches on the body.

Large Fins

Make 2

Work both fins with main color.

Position: Locate 6-7 rounds back from the eye, along the lower edge line of the eye.

After each fin, cut yarn, pull through, tie ends together, and weave inside the body.

Right Fin: Sl st 2 stitches along the body. Ch 5. Into the first sl st on the body: 3 tr. Ch 1. Into the second sl st on the body: 2 dtr. Ch 6. Sl st into the body (to secure the ch-6 loop).

Left Fin: Sl st 2 stitches along the body. Ch 6. Into the first sl st on the body: 2 dtr. Ch 1. Into the second sl st on the body: 3 tr. Ch 5. Sl st into the body (to secure the ch-5 loop).

Small Fins

Make 2

Work both fins with main color.

Position: Locate 5 rounds back from the large fins, approximately 3 sc lower.

After each fin, cut yarn, pull through, tie ends together, and weave inside the body.

First Small Fin: Sl st 2 stitches along the body. Ch 5. Into the first sl st on the body: 2 tr. Into the second sl st on the body: 2 tr. Ch 5. Sl st into the body (to secure the ch-5 loop).
Second Small Fin: Sl st 2 stitches along the body. Ch 5. Into the first sl st on the body: 2 tr. Into the second sl st on the body: 2 tr. Ch 5. Sl st into the body (to secure the ch-5 loop).

Assembly

Step 1

After completing the main body, create the two lobes of the tail directly onto the 4-sc base formed at the end of Rnd 27. Ensure your tension remains consistent during this process to maintain the fluidity of the tail's shape.

Step 2

Position the Large Fins approximately 6-7 rounds back from the safety eyes, aligning them with the lower edge of the eyes, working the right and left fins for a symmetrical appearance.

Step 3

Place the Small Fins 5 rounds further back from the Large Fins and 3 sc lower, providing subtle balance.

Step 4

Work the distinctive Large Comb along the top of the body, spanning Rnds 11 to 21.

Step 5

For all attached components, secure the yarn ends carefully by tying them and weaving them deeply inside the body to prevent unraveling and create a clean, professional finish.

Important notes

Note 01

This pattern uses US crochet terminology throughout, so double check abbreviations like dc and hdc match what you expect if you usually crochet in UK terms.

Note 02

The body is worked in a continuous spiral, not joined rounds, so a stitch marker isn't optional — it's essential for keeping your round count accurate over all 27 rounds.

Note 03

Stuff the body gradually as you crochet each section rather than waiting until the end, which gives a much more even, professional-looking firmness throughout the fish.

Note 04

Fins, tail, and comb are all worked directly onto the finished body via slip stitches, which means careful stitch placement matters more than sewing skill here.

Note 05

A lighter can be used to carefully seal the cut ends of plush yarn to prevent fraying, but always work in a well-ventilated space and keep flame contact brief.

Note 06

Because the finished size depends heavily on tension and the specific bulky yarn used, expect some natural variation from the approximate 8-inch finished height.

Note 07

This pattern uses US crochet terminology.

Note 08

The finished Koi Carp will measure approximately 8 inches (20 cm) tall when using the specified materials and a tight tension. Your size may vary depending on yarn, hook, and personal tension.

Note 09

The body is worked in continuous spiral rounds unless otherwise specified. Use a stitch marker to keep track of the beginning of each round.

Note 10

Fins, tail, and comb are crocheted directly onto the body, eliminating the need for extensive sewing.

Note 11

Stuff the body firmly as you go, ensuring a smooth and even shape.

Note 12

Color changes are indicated within the rounds. To change color, work the last yarn over of the stitch before the color change with the new color.

FAQs

Asked on the glider

the ones that come up on the glider

What yarn weight works best for this koi carp pattern?

A bulky to super bulky (weight 5/6) plush yarn like Himalaya Dolphin Baby or YarnArt Dolce is ideal for the soft, huggable texture this pattern is designed around. Using a much thinner yarn will change your gauge significantly, so adjust your hook size and expect a different finished measurement.

Do I need to sew the fins and tail on separately?

No — one of the best parts of this design is that the tail, fins, and comb are crocheted directly onto the body using slip stitches, rows, and taller stitches. This eliminates most traditional sewing, though you'll still weave in a few ends at the finish.

How do I know where exactly to place the safety eyes?

Insert the eyes between Rounds 5 and 6, spacing them approximately 10 single crochet stitches apart, and do this before you begin Round 8. Take a moment to check the placement looks balanced from the front before securing, since safety eyes are tough to remove once fully attached.

Is this pattern beginner-friendly?

It's best suited to an intermediate crocheter who already feels comfortable with amigurumi basics like magic ring, invisible decrease, and continuous spiral rounds. The taller stitches (tr, dtr) and the technique of crocheting fins directly onto the body add a bit of a learning curve beyond a first amigurumi project.