Intermediate 6-9 hours Worsted yarn

Worked on the glider, counted out loud —

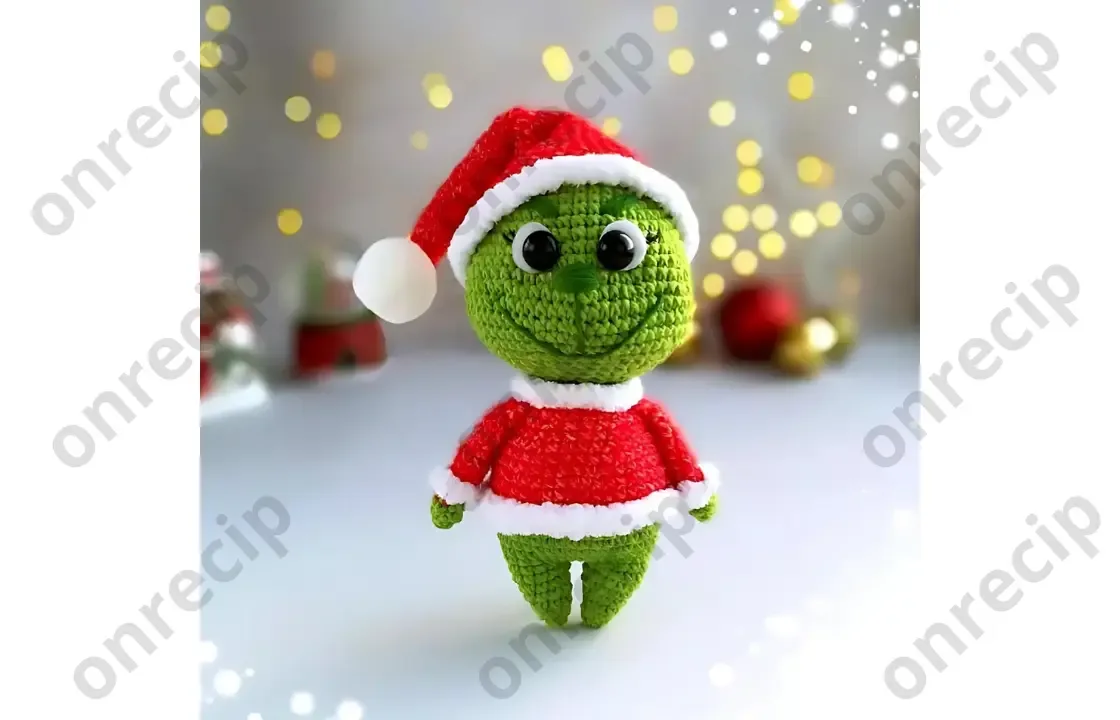
Grumpy green critter amigurumi crochet pattern

A grumpy green amigurumi pattern for confident beginners, with a pointy hat and fuzzy trim, done in about a weekend.

Jump to the rounds

What this one is

I think of this grumpy green fellow as the project for a quiet evening when you want a character with real personality waiting at the end of your hook. He's got oversized ears made for a tall pointy hat, a round soft belly, and a face that turns mischievous the moment you embroider on the eyebrows. He suits anyone who's made an amigurumi head before and is ready for a project with more pieces and more fuss over the small details.

Try it another way

Once you've made this doll once, there's plenty of room to play. Go up a hook size and a heavier yarn for a bigger, huggable version of the same 22-round head and 15-round body shaping — the stitch counts will still land the same way, just at a larger scale. Swap the red in the hat or body for a different accent color, or use it for the nose and eyebrow embroidery instead of dark green for a softer look. You can also add a second round of white Softy trim to the hat brim beyond what's already there, echoing the fluffy cuffs on the arms. If you want a quicker gift-sized version, stop after the Head and Body and skip the Arms and Legs, turning it into a simple seated figure you finish with the same 12 mm toy eyes and felt backing. The small pompom can move too — try it on the hat tip instead of wherever the main pattern places it, or swap it for a tiny tassel in the leftover red yarn.

What I love about this one is how many small techniques get to show off in a single doll. The head's long, steady increase sequence builds a believably round shape before you ever reach the eye placement at round 13, and the legs fasten off on one side while staying live on the other so the body grows straight out of them with no extra seam. The arms get a back-loop-only round that leaves a crisp ridge for the white Softy trim to sit against, almost like a real cuff. Add in felt-backed toy eyes, a tiny pompom, and dark green embroidery for the nose and eyebrows, and you end up with a face that looks hand-drawn rather than stitched. It's the kind of piece where every part teaches you something slightly different.
The rounds, in full

Written out, round by round

Intermediate6-9 hours2 mmWorsted

Bring to the porch

Everything this one takes, in the order you will reach for it.

  • Yarn Alize Cotton Gold : green, red, dark green

Yarn Alize Softy

  • white (for trim)
  • 2 mm crochet hook
  • 12 mm toy eyes
  • Stuffing for toys
  • White felt
  • Small pompom
  • Needle for sewing parts
  • Scissors

Head

Insert toy eyes into felt circles, then insert eyes into the holes made in round 13.

Fasten off, leaving a tail for sewing.

Fasten off after the first leg, but don't cut the yarn on the second leg. You'll continue crocheting the body from here.

Step by step: Switch to the sweater color before round 7; Make slip stitches in the 15th row to ensure the marker is in the middle of the back; Fasten off and cut the yarn; Make the fluffy trim using Alize Softy in rounds 8 and 18, working 1 sc into each stitch.

Join the legs together with 1 ch; 12 sc on the first leg, inc (from 3 ch), 12 sc on the second leg, inc (from 3 ch). (30)

  1. Round 16 sc in MR. (6)
  2. Round 26 inc. (12)
  3. Round 3(1 sc, inc) x 6. (18)
  4. Round 4(2 sc, inc) x 6. (24)
  5. Round 5(3 sc, inc) x 6. (30)
  6. Round 6(4 sc, inc) x 6. (36)
  7. Rounds 7–836 sc. (36)
  8. Round 9(5 sc, inc) x 6. (42)
  9. Rounds 10–1142 sc. (42)
  10. Round 12(6 sc, inc) x 6. (48)
  11. Round 1320 sc, ch, skip 1 stitch, 5 sc, ch, skip 1 stitch, 21 sc. (48)
  12. Round 14(7 sc, inc) x 6. (54)
  13. Round 1554 sc. (54)
  14. Round 16(3 sc, inc, 4 sc, inc) x 6. (66)
  15. Rounds 17–1866 sc. (66)
  16. Round 19(9 sc, dec) x 6. (60)
  17. Round 20(8 sc, dec) x 6. (54)
  18. Round 21(2 sc, dec, 3 sc, dec) x 6. (42)
  19. Round 22(5 sc, dec) x 6. (36)
  20. Round 23(4 sc, dec) x 6. (30)
  21. Round 24(3 sc, dec) x 6. (24)Step by step: Attach the arms, 4 sc, 4 sc along with the arm, 8 sc, 4 sc along with the arm, 4 sc. (24); 24 sc. (24); (2 sc, dec) x 6 working in back loops. (18).
  22. Round 25(2 sc, dec) x 6. (18)

Arms

Make 2

Switch to the sweater color before round 5.

Stuff only the part made with the body color. Fold the arm in half and work 4 sc through both layers.

Make the white fluffy trim using Alize Softy in round 6, working 1 sc into each stitch.

  1. Round 16 sc in MR. (6)
  2. Round 2(1 sc, inc) x 3. (9)
  3. Rounds 3–49 sc. (9)
  4. Round 59 sc. (9)
  5. Round 6Working in back loops: 9 sc. (9)
  6. Rounds 7–139 sc. (9 rounds)

Hat

Make the fluffy trim using Alize Softy on the front loops of round 35, working 1 sc into each stitch.

  1. Round 16 sc in MR. (6)
  2. Rounds 2–46 sc. (6)
  3. Round 5(1 sc, inc) x 3. (9)
  4. Rounds 6–89 sc. (9)
  5. Round 9(2 sc, inc) x 3. (12)
  6. Rounds 10–1212 sc. (12)
  7. Round 13(3 sc, inc) x 3. (15)
  8. Rounds 14–1615 sc. (15)
  9. Round 17(4 sc, inc) x 3. (18)
  10. Rounds 18–1918 sc. (18)
  11. Round 20(5 sc, inc) x 3. (21)
  12. Round 2121 sc. (21)
  13. Round 22(6 sc, inc) x 3. (24)
  14. Round 23(7 sc, inc) x 3. (27)
  15. Round 24(8 sc, inc) x 3. (30)
  16. Round 2530 sc. (30)
  17. Round 26(4 sc, inc) x 6. (36)
  18. Round 2736 sc. (36)
  19. Round 28(5 sc, inc) x 6. (42)
  20. Round 2942 sc. (42)Step by step: 42 sc working in back loops. (42).
  21. Round 30(6 sc, inc) x 6. (48)
  22. Rounds 31–3248 sc. (48)
  23. Round 33(7 sc, inc) x 6. (54)
  24. Rounds 34–3554 sc. (54)

Putting it together

Step 1

Embroider the nose, eyebrows, and smile using dark green yarn.

Step 2

Embroider the eyelashes in black.

Marlene's notes

Note 01

The 2 mm hook paired with Cotton Gold gives a dense, firm fabric, which matters most across the Head's 22 rounds — keep your tension even so the finished shape stays round rather than lumpy.

Note 02

the Legs, you fasten off after the first one but leave the yarn live on the second so the Body can grow directly from it; keep that working yarn untouched until you're ready to continue.

Before you sit down

  • Count out your yarn before you begin: you'll need green, red, and dark green Alize Cotton Gold plus white Alize Softy for the trim, and it helps to know you have enough of each before you commit to a color.
  • Read through the Head instructions as far as round 13 before you start that part, so you know exactly where the felt circles and 12 mm toy eyes will sit once you get there.
  • Set stitch markers aside for every part of this doll — with 22 rounds on the Head and 24 on the Hat, a marker at the start of each round saves you from losing your place.
  • Work a small swatch with your 2 mm hook and Cotton Gold first, just a magic ring and a round or two of increases, to make sure your tension gives a fabric tight enough to hold stuffing without gaps.

How the hours go

Head
about 2 hours because of the full 22 rounds plus the careful felt-and-eye placement at round 13
Body and hat
about 3 hours because together they run 39 rounds and include the fluffy white trim and final face embroidery

Looking after it

  • Hand wash in cool water if needed, since the cotton-acrylic blend in the body holds its shape best without a washing machine's agitation.
  • Reshape the ears, hat point, and limbs gently while damp and let the doll air dry flat on a towel, then store it away from direct sun so the red and green stay bright.
FAQs

Asked on the glider

the ones that come up on the glider

Why does round 6 on the Arms work in back loops only?

Working in back loops only leaves a visible ridge on the front side of the stitch, which gives the fluffy white Softy trim a clean edge to sit against. It's a small detail but it makes the cuff look intentional rather than just glued on.

Why fasten off the first Leg but leave yarn live on the second?

The second Leg's live yarn is what you use to start crocheting straight into the 15-round Body, so the two pieces join without an extra seam. The first Leg gets fastened off because it's sewn on separately once the Body is complete.

What are the 12 mm toy eyes and white felt for?

The felt circles sit behind the toy eyes as a backing disc, which is inserted together into the holes made at round 13 of the Head. It gives the eyes a cleaner, slightly recessed look against the green.

Where does the small pompom go?

It's one of the finishing touches alongside the sewn eyes and embroidered face, meant to sit as a little accent once the main pieces are assembled. Attach it last, after you've embroidered the nose, eyebrows, smile, and eyelashes.

Can I use a different color for the eyelash embroidery?

Yes, black is the suggested color for the eyelashes and dark green for the nose, eyebrows, and smile, but you can swap either for brown or another dark shade you have on hand. Just keep enough contrast against the green head so the features read clearly.

Do I need stitch markers if I can count rounds by eye?

You can skip them if you're confident, but with 22 rounds on the Head and 24 on the Hat, it's easy to lose track partway through. A simple marker at the start of each round makes checking your place much faster.