Intermediate 4-6 hours Worsted yarn

Worked on the glider, counted out loud —

Granny stitch crochet bucket hat for sunny days

An easy worsted cotton bucket hat with granny stitch crown. Suits beginners through intermediates, about 4-6 hours.

Jump to the rounds

What this one is

You know the kind of warm afternoon that calls for shade and a little bit of personality at the same time. This hat is for you if you want something that looks pulled-together without fuss, the sort of piece you grab on your way out the door and still feel good wearing. It's a forgiving make too, friendly to crocheters who've done a few projects but haven't tackled shaping like this before.

Your hands will spend most of their time working double crochets into that early ring, then settling into the rhythm of chaining three and filling in spaces between posts. It's repetitive in the best way, the kind of stitching you can do with the TV on and still keep track of. Set aside a few hours, maybe split across two sittings, and you'll have a crown well underway before you know it.

Try it another way

Once you've got the rhythm of alternating four and three double crochets in each space, there's a lot of room to make this hat your own. Try working each round in a different shade for a bold striped crown, or keep it in one color and save the contrast for a brim edge. If you want a slouchier fit, add an extra round or two of double crochets before you start decreasing or straightening for the sides, since the granny stitch pattern is easy to extend. A plain worsted cotton gives you crisp stitch definition, but swapping in a cotton blend can soften the drape if you want a gentler brim. For gifting, work the crown in a size up and let the recipient fold the brim to taste. You could also use leftover shades from other projects, letting each round use up what you have, which turns this into a nice stash-buster without any planning required. However you shade it, the structure stays the same, so the only real decision is how playful you want the color placement to be.

There's real satisfaction in watching that first ring of double crochets become a flat, sturdy disc, especially once you start working between the posts instead of into the stitches themselves. That small shift in where you place your hook changes the whole texture of the fabric, giving you the bumpy, cozy look granny stitch is known for. Alternating four and three double crochets in each space is where the shaping magic happens, and it's satisfying to feel the piece widen round by round without ever having to count increases the usual way. It's a technique that rewards patience and a steady hook, and once it clicks, you'll find yourself reaching for it again on other projects.
The rounds, in full

Written out, round by round

Intermediate4-6 hours5 mmWorsted

Bring to the porch

Everything this one takes, in the order you will reach for it.

  • 5 mm crochet hook
  • Shades of yarn (worsted weight cotton #4)
  • Scissors

Starting the Crown

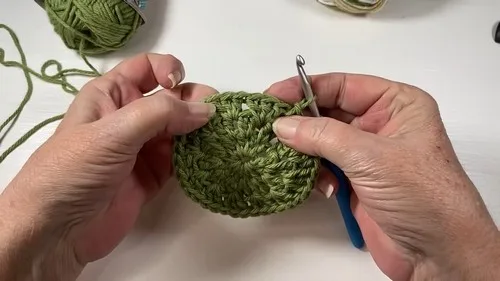
Make a slip knot and chain four Slip stitch to your first chain to form a circle Chain three (this counts as a double crochet)

Put 11 double crochets into the center of the ring (for a total of 12 double crochets including the chain)

Slip stitch to the top of your chain three to join

  1. Round 2(Work Between Posts): Slip stitch over to the space between the posts of the double crochetsChain three (counts as a double crochet)Put one more double crochet into that same space In the next space between posts, put two double crochets Repeat around, two double crochets between each stitchSlip stitch to join to the top of your chain three For Round 3: Slip stitch over to the space between the two double crochet clustersChain up three and place two more double crochets into that same space Do three double crochets in each space between the clusters around the circleSlip stitch to join to the top of your chain threeRound 4 (Alternating Pattern): Alternate between putting four and three double crochets in each space around Slip stitch to join to the top of the chain three
  2. Round 5Last Increase for Crown Slip stitch over to the middle of a four-stitch cluster from the previous roundChain up three and place two more double crochets into that spot In the next space, put a cluster of three double crochetsSkip the clusters of three from the previous round and continue the pattern around Slip stitch to join and that ends the increase rounds for the crownIn Rounds 6-10 (Body of Hat): Repeat the pattern of three double crochets in each space around for the next five rows After completing round ten, slip stitch to join and fasten off
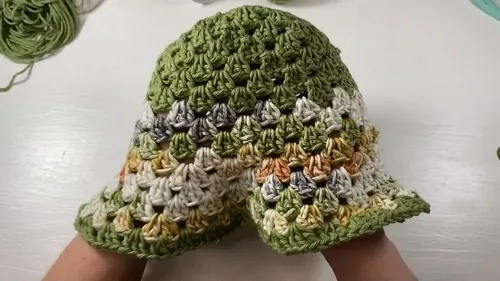
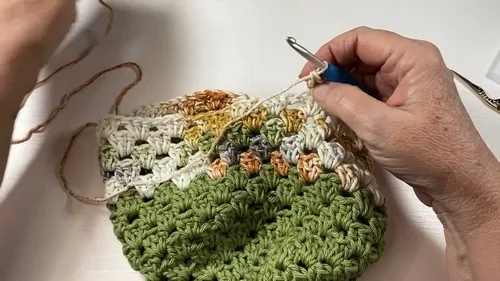
  3. Rounds 11–15Color Change and Building Hat Body Join new variegated yarn color with a standing double crochetDo five more rounds just like the previous five rounds with three double crochet clusters into each space Fit the hat as you go to ensure proper sizing

Marlene's notes

Note 01

Cotton yarn is slippery and has little stretch, so keep your tension even and snug, particularly in that first ring of 12 double crochets, or the center can gape.

Note 02

A stitch marker on the top of your starting chain three makes the slip stitch join much easier to find round after round.

Porch photos

Before you sit down

  • Check that your worsted weight cotton #4 yarn and 5 mm hook are a comfortable match, since cotton has less give than wool and your gauge will show it quickly.
  • Lay out your yarn shades ahead of time if you're working with more than one color, so you know your order before you start the crown.
  • Read through Round 2 before you dive in, since working between the posts rather than into the stitch tops is a different motion than the first round.
  • Keep a stitch marker handy for the join at the top of each chain three, especially once the rounds get longer and busier.

How the hours go

Round 1, the opening ring
about 10-15 minutes because you're working 12 double crochets into a small space and getting your tension settled
Round 2, working between the posts
about 20-30 minutes because the new stitch placement takes a little getting used to
Remaining rounds of the crown
about 3-4 hours total because the alternating four and three double crochet pattern repeats across all 11 rows

Looking after it

  • Hand wash your finished hat in cool water with a mild soap, since worsted cotton holds its shape best when it isn't agitated or wrung out.
  • Lay it flat on a towel to dry and gently reshape the crown and brim while damp, then store it flat or stuffed loosely with tissue paper to keep its form.
FAQs

Asked on the glider

the ones that come up on the glider

What hook size and yarn do I need for this bucket hat?

You'll want a 5 mm hook paired with worsted weight cotton #4 yarn. Cotton gives the hat structure, which is what helps it hold its bucket shape.

Why do I work between the posts in Round 2 instead of into the stitches?

Working between the posts rather than into the stitch tops is part of what gives granny stitch its signature textured look. It also makes the increases in later rounds easier to place evenly.

How do I know where to put four double crochets versus three?

The pattern has you alternate four and three double crochets in each space around every round. A stitch marker at your starting point helps you keep track of where the alternation begins.

Is this pattern good for someone who has only made a few crochet projects?

It's a good next step up, since the stitches themselves are basic double crochets but the between-the-posts placement and alternating counts take a bit of attention. Reading through Round 2 before you start helps a lot.

How long does the crown portion take to finish?

Plan on roughly 4 to 5 hours total for the three rounds described, with the bulk of that time in the later, longer rounds. Working in a couple of sittings makes it feel less like a marathon.