Intermediate 6-9 hours Worsted yarn

Worked on the glider, counted out loud —

Granny square pants pattern for playful crochet style

A relaxed granny square pants pattern for confident intermediate crocheters, worked across a few sittings over several hours.

Jump to the rounds

What this one is

I made this pair for the kind of evening when you want to wear something handmade without overthinking it—loose, playful granny square pants that feel more like a soft house layer than fitted clothing. They're for anyone who already loves the classic granny square motif and wants to see what happens when you let it grow past a blanket square into something wearable. If you've got a stash of worsted acrylic and a 5 mm hook sitting around, this is the project that finally puts both to good use.

Your hands start with a magic ring and four quick DC clusters to build the granny square base, then shift into turning rows that stack shell after shell until the leg reaches full length—thirty-five rows total for Part 2 alone. Once both legs are finished, you flip one inside out, nest it inside the other, and single crochet the two crotch slits together to close the shape. Plan on spreading this across a few sittings, since between the granny rounds and all those row repeats, you're looking at several hours of steady, repetitive stitching rather than one quick sit-down.

Try it another way

Once you've got the basic granny square pants down, there's plenty of room to play. Stop Part 2 a few rows short of the full 35 for cropped or capri-length pants, or keep going longer than written if you've got extra main-color yarn on hand—remember you're working with 400-800g of Weight 4 acrylic, so there's some room to stretch. Swap the secondary border color between legs for a mismatched look, or keep every corner Chain-2 space in one accent shade so the granny motif really pops against the main color. A smaller hook than the 5 mm called for will give you a denser, warmer fabric, good for cooler weather, while sizing up will make a looser, drapier pair. You can also stop after the Main Pattern's 2 rounds and skip straight to a matching granny square top or blanket square using the same four-corner method, since the base construction is identical. If you want a more subtle finish, work the border color only into the final corner round instead of scattering it throughout Part 2.

There's something deeply satisfying about watching a flat granny square refuse to stay flat—once Part 2 picks up those skipped-chain foundation rows and keeps building shell clusters row after row, the motif stops looking like a blanket piece and starts looking like fabric with drape. The corner increases from the Main Pattern give you a clean square start, and then the steady 3-DC, skip-2 rhythm of Part 2 turns repetitive but never boring, since every row ends with a slip stitch closing the gap. The real payoff comes at assembly: turning one leg inside out and tucking it into the other to form the crotch seam feels like a trick, and seeing two flat granny panels become a three-dimensional pair of pants makes the whole project worth the row count.

The rounds, in full

Written out, round by round

Intermediate6-9 hours5 mmWorsted

Bring to the porch

Everything this one takes, in the order you will reach for it.

Yarn

  • Weight 4 Acrylic Yarn (Main color: 400-800g; Secondary/Border color)

Hook

  • 5 mm hook

Other

  • Scissors, Darning Needle

Main Pattern

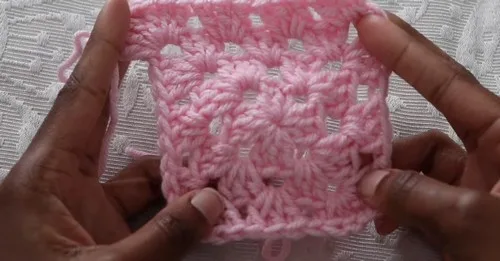
Making the Granny Squares (4 per Leg)

Create a Magic Ring (or Magic Circle).

  1. Round 1Chain 3 (counts as 1st DC), then work 2 DC into the ring. Chain 2. Repeat ( 3 DC , Chain 2 ) three more times (4 clusters total).Chain 1, and Slip Stitch (SS) to the top of the starting Chain 3 to close.Round 2 and Beyond (Granny Square Repeat)(4)
  2. Round 2Chain 3, and work 2 DC in the gap you just slip-stitched into.Work 3 DC (a "shell") in every side gap.Work a Corner in every corner gap: ( 3 DC, Chain 2, 3 DC ).Repeat this pattern around, ending the round by working the final shell (3 DC) into the starting gap, Chain 2, and SS to the top of the Chain 3.

Part 2

Making the Granny Stitch Panels (2 per Leg)

Calculate Starting Chain

Count the number of 3-DC clusters along one side of your finished granny square (between the corners).

Formula: (Number of Clusters in side x 3 ) + 6 = Total Starting Chains.

  1. Row 1Starting the Pattern Skip 3 chains. In the 4th chain, work 3 DC . Skip 2 chains, work 3 DC in the next chain. Repeat from * until 2 stitches are left.Skip the second-to-last stitch. Work 1 DC in the very last stitch.
  2. Row 2Working in Gaps Chain 3, turn your work. Work 1 DC in the top of the last DC from the previous row.Work 3 DC in each gap across the row.End the row by skipping the last 3 stitches of the cluster and SS to the top of the chain 3.

Building Height Repeat Row 2 until the panel is the desired height (creator used 8 rows).

Last Row (Creating a Border)

Complete the last side row, but in the final stitch, work ( 3 DC, Chain 2, 3 DC ) to create a corner.

Work 2-4 clusters along the short side, putting a corner ( 3 DC, Chain 2, 3 DC ) in the next corner.

Work 3 DC clusters across the long bottom edge into each gap (matching the cluster count on your granny square side).

Continue adding corners and clusters around the perimeter, matching the cluster count on all sides. SS to join.

Assembly and Finishing the Legs

Joining the Squares and Panels

Attach secondary color yarn to a corner of the first square.

Chain 3, 2 DC in the corner gap.

Work 3 DC in each side gap until the next corner.

To attach the second piece (square or panel), work the first half of the corner in the current piece (3 DC), then Chain 2 .

Pick up the new piece , work 3 DC into its corner.

Slip Stitch into the next gap of the current piece . Work 3 DC into the next gap of the new piece .

Repeat this alternating pattern (SS in old piece, 3 DC in new piece) until the end of the side.

Seaming the Inner Leg

Turn the finished tube wrong side out.

Using single crochet (SC) , seam the long open edge closed, starting from the ankle opening and working up, leaving an opening at the top (creator left 9 stitches open).

Optional: Adding Ankle Length

Attach yarn at the ankle. Chain 3, 2 DC in the first gap.

Work 3 DC in each gap around the ankle, skipping the chain-2 spaces on the granny squares to maintain structure.

SS to the top of the Chain 3.

Repeat for the desired number of rows (creator did 2 rows total).

Joining the Legs and Waistband

Joining the Legs (Crotch)

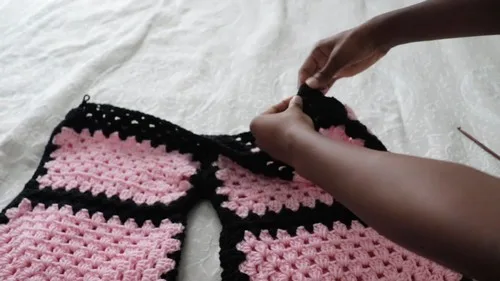
Turn one leg inside out and leave the other leg right side out .

Stuff the right-side-out leg into the inside-out leg.

Single Crochet (SC) the two open slits (crotch seams) together to form a complete pant shape.

Waistband

The waistband is created by alternating decrease rows and stable rows until the pants fit correctly.

Start Row (Stable): Attach yarn to the top edge.

Chain 3, 2 DC in the gap.

Work 3 DC clusters in each gap all the way around.

Decrease Row (DC3TOG): Work a Double Crochet Three Together (DC3TOG) across 3 gaps to create a sharp decrease at the center points (where the legs were joined).

Stable Row: Work a row of regular 3 DC clusters in every gap, with no decreases.

Final Waist Finish

Work a round alternating 2 Single Crochets (SC) and a Single Crochet Decrease (SC DEC) to cinch the waist.

Finish with one or more rounds of regular SC, followed by two rounds of Double Crochet (DC) .

Add a drawstring to complete the waistband.
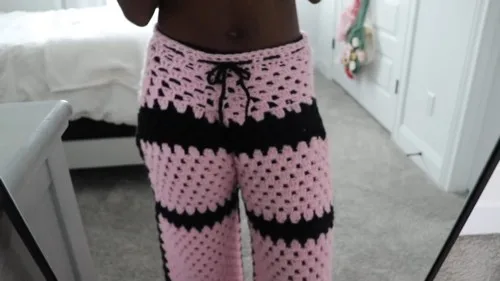
Putting it together

Step 1

Turn one leg inside out and leave the other leg right side out .

Step 2

Stuff the right-side-out leg into the inside-out leg.

Step 3

Single Crochet (SC) the two open slits (crotch seams) together to form a complete pant shape.

Marlene's notes

Note 01

Keep your 5 mm hook tension consistent across both legs—since you're making two identical pieces that get joined, a looser leg two will throw off the whole fit.

Note 02

Use a stitch marker in the corner Chain-2 spaces of the granny square rounds; it's easy to mistake a side shell for a corner once you're several rounds in.

Note 03

The secondary border color only needs to cover the corner accents and any border rows you choose to add, so a small amount goes a long way next to the 400-800g of main color.

Porch photos

Before you sit down

  • Weigh out your main-color acrylic before you start the legs—plan for 400-800g depending on how long you want the pants, plus a smaller amount of the secondary border color for the corners.
  • Swatch the granny square Main Pattern first with your 5 mm hook, since the gauge of those four corner clusters determines how wide the waist of each leg will sit.
  • Set a stitch marker in each corner gap of Round 1 before you start Round 2, so you never lose track of where the (3 DC, Chain 2, 3 DC) corners belong.
  • Read through the Part 2 notes on skipping stitches at the start and end of Row 1 before you pick up your hook, since that shaping sets the width you'll repeat for all 35 rows.

How the hours go

Main Pattern (granny square base)
about 45 minutes, because it's only 2 rounds but the four corners need careful counting to stay even.
Part 2 (leg rows)
about 3-4 hours per leg, because it runs 35 rows total of repeated 3-DC shell clusters.
Assembly (turning and SC crotch seam)
about 20-30 minutes, because the inside-out stuffing trick and single crochet seam go quickly once both legs are done.

Looking after it

  • Machine wash your finished pants cold and gentle, then lay them flat to dry—acrylic doesn't like high heat, so skip the dryer to protect those DC clusters and corner shells.
  • Store folded rather than hung, since the granny square motif can stretch under its own weight; a quick reshape by hand after washing is usually all the Weight 4 acrylic needs to look crisp again.
FAQs

Asked on the glider

the ones that come up on the glider

Do both legs need to be identical?

Yes, you want both legs worked the same way through the Main Pattern and all 35 rows of Part 2 so the finished pants are symmetrical. Any difference in row count or tension between the two will show up at the crotch seam.

Can I make the pants longer or shorter?

Part 2 is written as 35 rows, but you can stop earlier for shorts or capris, or add a few extra rows if you've got enough main-color yarn left from your 400-800g. Just make sure both legs match.

How do I keep track of the corners in the granny square rounds?

A stitch marker dropped into each Chain-2 corner space before you start the next round makes it easy to spot the (3 DC, Chain 2, 3 DC) corners at a glance. It also helps you confirm you still have four clusters total after Round 1.

Why do I turn one leg inside out before joining?

Turning one leg inside out and nesting it inside the right-side-out leg lines up the two crotch slits so you can single crochet them together from the right side. It is the step that turns two flat granny panels into an actual three-dimensional pant shape.

How much of the secondary border color do I need?

Since the secondary color is only used for corner accents and any border detailing, you need far less of it than the 400-800g of main color. A single skein is usually plenty for both legs.