Intermediate 4-6 Hours Worsted yarn

Worked on the glider, counted out loud —

Free Crochet Beaver Pattern – Cute Amigurumi Tutorial

Make an adorable amigurumi beaver with this free crochet pattern featuring a flat tail, chubby body, and rounded ears. Beginner-friendly fun!

Jump to the rounds

Before you sit down

Begin with the flat paddle tail, working it separately in Secondary Color 2 to build its signature wide, tapered shape.

Set the tail aside and start the main body in your Main Color, working continuous spiral rounds from a magic ring.

Shape the body through a series of increases and decreases across all 14 rounds, watching your stitch counts closely.

Crochet the rounded ears separately in the Main Color, keeping them small and neat for proportion.

Stuff the body firmly with fiberfill before closing the final rounds to lock in a smooth, rounded shape.

Attach the safety eyes, glue-on nose, and embroidered teeth to bring the beaver's face to life.

Sew the tail and ears onto the body, checking placement and symmetry before securing everything permanently.

What this one is

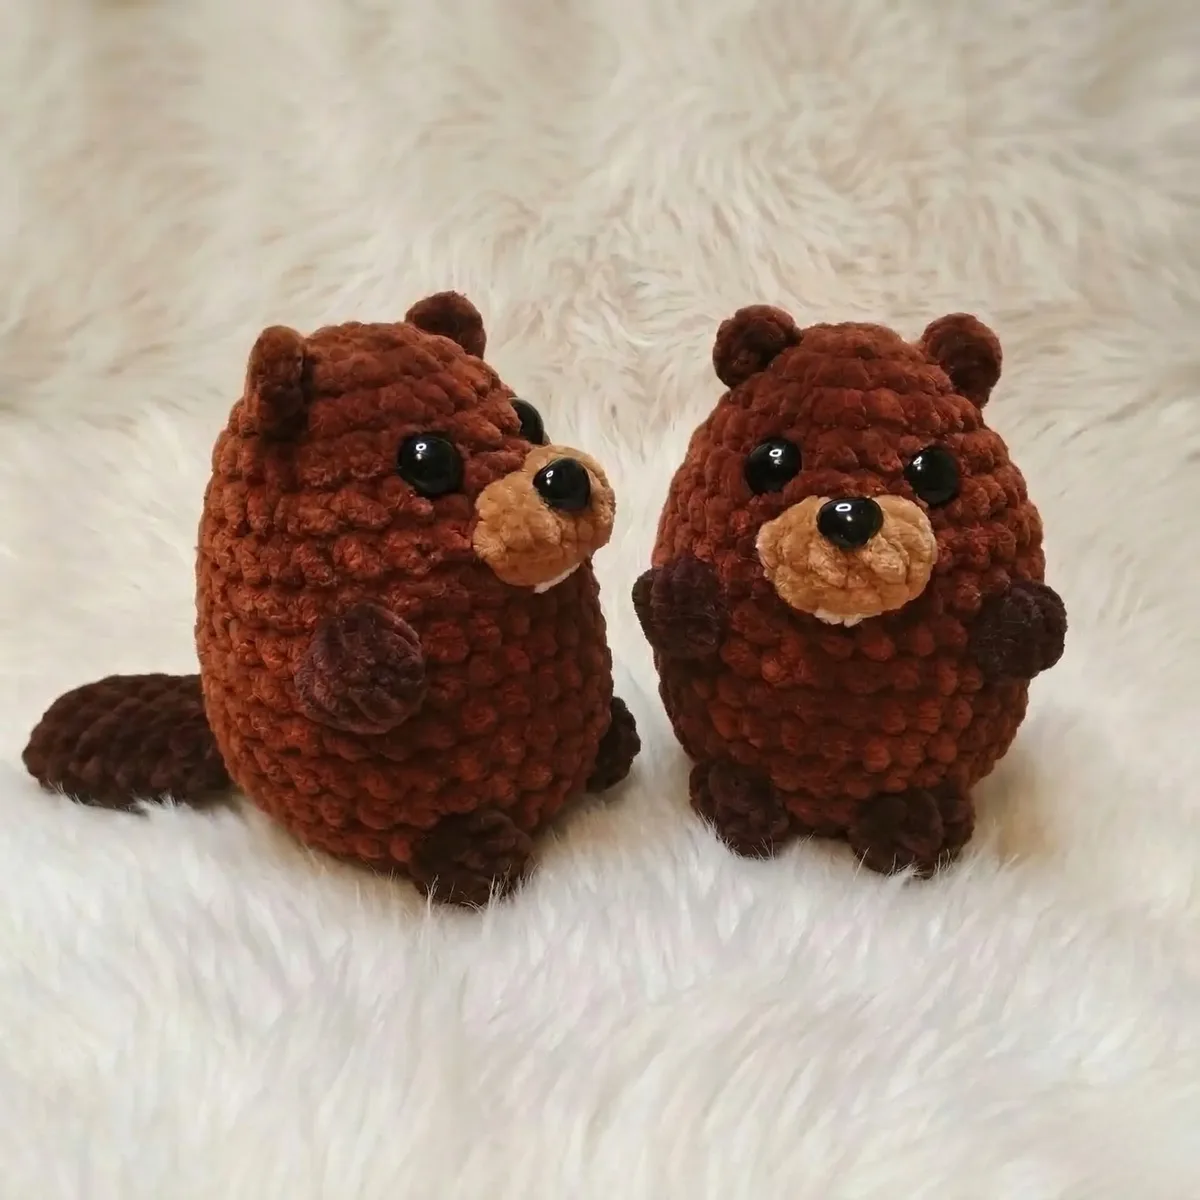
This free crochet beaver pattern brings one of nature's most industrious critters to life in soft, huggable yarn form. With its signature flat paddle tail, rounded body, and perky ears, this amigurumi captures everything that makes beavers so lovable and recognizable. It's a wonderful project for anyone who adores woodland-themed crochet toys, nursery decor, or simply wants to add a quirky new friend to their amigurumi shelf. The distinctive tail shape sets this pattern apart from typical bear or bunny amigurumi, giving you a fun new stitch challenge.

You'll work through 8 rounds to shape the beaver's signature flat tail, then move into the 14-round body worked in continuous spiral rounds using stitch markers to track your progress. Expect to use core amigurumi techniques including magic rings, single crochet increases and decreases, and clean color changes between your main and secondary yarn colors. This pattern suits confident beginners and intermediate crocheters who've practiced basic amigurumi shaping before. Plan for roughly 4-6 hours total, including stuffing and assembly time.

Once assembled, you'll have a plump, tight-stitched beaver with a broad flat tail, a cream muzzle, safety eyes, and a sweet embroidered or glued-on nose. The finished size works beautifully as a shelf sitter, a nursery accent, or a thoughtful handmade gift for nature lovers, teachers, or kids who adore quirky animals. Its dense stuffing gives it a satisfying weight and huggable feel, making it just as fun to squeeze as it is to display.

Variations

Want to make this beaver truly your own? Start with color: swap the light brown/beige main color for a rich chocolate brown (like Wool-Ease in Coffee) for a more realistic look, or go playful with a soft gray or even lavender for a whimsical nursery version. The cream muzzle color is a great spot to experiment too — try a warm oatmeal or pale gold Super Saver for subtle contrast. For a mini version, drop down to a 3.5mm hook and use DK weight yarn, which will shrink your finished beaver by roughly 20-25% — perfect for keychains or ornaments (just skip the glue-on nose in favor of embroidery for safety on small versions). Going bigger? Size up to a 5mm hook with bulky yarn for a chunky, huggable beaver that works beautifully as a floor cushion companion for kids. Seasonal fans can have fun here too: add a tiny knit scarf around the neck for a cozy autumn look, or tuck a small stick prop between the paws to lean into the "busy beaver" theme. If you want a family set, whip up a second beaver in a slightly smaller size using fewer rounds in the body for an adorable parent-and-baby pairing. You can also experiment with the ears — slightly elongating them changes the whole expression and can nudge the design toward otter or muskrat territory if you want to explore more woodland friends using this same base body shape.

I fell in love with this pattern the moment I finished that flat, paddle-shaped tail — it's such a fun departure from the usual round amigurumi tails, and it instantly makes this little guy read as "beaver" rather than a generic critter. Working the 14-round body in continuous spirals is deeply satisfying once you get into a rhythm, and using stitch markers keeps you from ever losing your place. I love how the cream muzzle color change adds dimension without being fussy, and the glue-on nose and safety eyes give him so much personality in just a few small steps. This pattern strikes that perfect balance of being engaging enough to keep you interested but not so complicated that you lose momentum halfway through. Stuffing him firmly and watching his shape fill out is honestly one of my favorite parts of any amigurumi project. Whether you're making him for a nursery shelf or a gift for a fellow crochet-loving friend, there's something so rewarding about seeing that tail take shape round by round.
Common mistakes

  • Losing track of the round when workingPlace a stitch marker in the first stitch of every round and move it up each time you complete a round — this small habit prevents the dreaded re-counting later.
  • Stuffing too loosely, causingUse tight, dense stitches (consider sizing down your hook slightly) and stuff firmly in small handfuls, checking for lumps or gaps as you go.
  • Attaching the flat tail at the wrong angle or position.Pin the tail in place with stitch markers before sewing, checking that it sits centered and flat against the body for that authentic paddle-tail look.
  • Rushing the increase and decreaseCount your stitches at the end of every round during shaping sections to make sure your increases and decreases match the pattern before moving on.
  • Placing safety eyes or the glue-on noseInsert eyes loosely first, then step back and check both sides match before securing permanently — small placement shifts make a big difference in expression.

The rounds, in full

Written out, round by round

Intermediate4-6 Hours10 mmWorsted

Materials

Everything this one takes, in the order you will reach for it.

Super Bulky (weight 6) plush yarn, 100g/120m

  • Main Color (e.g., light brown/beige)
  • Secondary Color 1 (e.g., cream/off-white) for muzzle
  • Secondary Color 2 (e.g., darker brown) for tail and popcorn stitch limbs

Safety eyes

  • 10mm or 12mm
  • Glue-on nose: 10x11mm
  • Fiberfill stuffing
  • Crochet hook: 4mm
  • Yarn needle
  • Stitch markers
  • Scissors
  • White embroidery floss for teeth

keep this to hand

Abbreviations

US crochet terms, as used in this pattern.

  1. chChain
  2. sl stSlip Stitch
  3. scSingle Crochet
  4. hdcHalf Double Crochet
  5. dcDouble Crochet
  6. trTreble Crochet
  7. incIncrease (2 sc in same stitch)
  8. decDecrease (invisible decrease recommended for amigurumi)
  9. mrMagic Ring
  10. BLOBack Loop Only
  11. FLOFront Loop Only
  12. st(s)Stitch(es)
  13. RndRound
  14. PC (4dc): Popcorn Stitch (4 dc cluster)Work 4 dc in the indicated stitch. Remove hook from loop, insert hook into the top of the first dc, then insert hook back into the dropped loop and pull it through the first dc. Ch 1 to secure (ch 1 does not count as a stitch).
  15. PC (3tr): Popcorn Stitch (3 tr cluster)Work 3 tr in the indicated stitch. Remove hook from loop, insert hook into the top of the first tr, then insert hook back into the dropped loop and pull it through the first tr. Ch 1 to secure (ch 1 does not count as a stitch).

Tail (using Secondary Color 2)

  1. Round 17 sc in a mr (7)
  2. Round 2inc in each st around (14)
  3. Round 3-4sc in each st around (14)
  4. Round 5(dec, 5 sc) * 2 (12)
  5. Round 6sc in each st around (12)
  6. Round 7(dec, 4 sc) * 2 (10)
  7. Round 8sc in each st around (10)
  8. Round 9(dec, 3 sc) * 2 (8)Fold the tail flat and sc through both layers 4 times to close. Fasten off, leaving a long tail for sewing.

Do not stuff the tail.

Body (using Main Color)

  1. Round 16 sc in a mr (6)
  2. Round 2inc in each st around (12)
  3. Round 3(1 sc, inc) * 6 (18)
  4. Round 4(2 sc, inc) * 6 (24)
  5. Round 5sc in each st around (24)
  6. Round 6(3 sc, inc) * 6 (30)
  7. Round 714 sc, switch to Secondary Color 1 for the muzzle , PC (4dc) in next st, PC (4dc) in next st, switch back to Main Color , 14 sc (30)
  8. Round 8sc in each st around (30)Insert safety eyes between Rnds 5 and 6, with approximately 4 stitches between the posts of the eyes.
  9. Round 91 sc, inc, 8 sc, using Secondary Color 2 , PC (4dc) in next st (Arm), using Main Color , 8 sc, using Secondary Color 2 , PC (4dc) in next st (Arm), using Main Color , 8 sc, inc, 1 sc (32)
  10. Round 10-13sc in each st around (32) (4 rounds)Begin stuffing the body firmly, continuing to stuff as you go.
  11. Round 142 sc, dec, 9 sc, using Secondary Color 2 , PC (3tr) in next st (Leg), using Main Color , 4 sc, using Secondary Color 2 , PC (3tr) in next st (Leg), using Main Color , 9 sc, dec, 2 sc, then work 2 sc into the first 2 stitches of the Tail (already closed and folded flat) to attach it to the body. (30)
  12. Round 15Work 2 sc into the next 2 stitches of the Tail, then continue into the body , 1 sc, dec, (3 sc, dec) * 5 (24)
  13. Round 1612 dec (12)
  14. Round 176 dec (6)Fasten off, leaving a long tail. Weave the tail through the front loop of the remaining 6 stitches and pull tight to close the opening. Weave in the end.

Ears (using Main Color)

Hold the toy facing you. Join Main Color yarn with a sl st to Rnd 4 of the Body.

Ch 3, then in the 3rd ch from hook, make 1 hdc, then sl st into Rnd 3 of the Body.

Fasten off, leaving a tail. Secure the tail inside the toy.

Repeat for the second ear, placing it symmetrically on the other side.

Assembly

Step 1

Attach the Tail: The tail was partially attached in Rnd 14 and 15 of the body. Use the remaining yarn tail from the tail piece to securely sew any gaps and reinforce its attachment to the back of the body.

Step 2

Facial Features:

Step 3

Safety Eyes: You should have inserted the safety eyes between Rnds 5 and 6 of the Body during the crocheting process. Ensure they are securely fastened.

Step 4

Nose: Glue the 10x11mm glue-on nose onto the center of the muzzle, between the two Popcorn Stitches for the muzzle.

Step 5

Teeth: Using white embroidery floss, embroider two small vertical stitches below the nose to create the beaver's characteristic front teeth.

Step 6

Ears: The ears are crocheted directly onto the body. Ensure the yarn ends are neatly hidden.

Step 7

Final Stuffing Check: Give your beaver a gentle squeeze to check for any under-stuffed areas. Add more fiberfill if needed, especially around the neck and head, to maintain a firm shape.

Step 8

Weave in Ends: Carefully weave in any remaining yarn tails using a yarn needle to hide them within the amigurumi.

Important notes

Note 01

💡 Use a 4mm hook and aim for tight, even stitches throughout the body — this keeps your fiberfill stuffing from peeking through, especially around the increase rounds.

Note 02

💡 Keep a stitch marker in the first stitch of every round since this pattern is worked in continuous spirals with no joining or turning.

Note 03

💡 Stuff the body firmly but gradually in small sections, checking the shape often so it stays rounded rather than lumpy or lopsided.

Note 04

💡 Test the placement of the 10mm or 12mm safety eyes and the 10x11mm glue-on nose before locking them in, since amigurumi expressions change dramatically with tiny shifts.

Note 05

💡 Save the white embroidery floss teeth for last so you can position them precisely against the finished muzzle for the most charming beaver smile.

Note 06

💡 This pattern uses US crochet terminology throughout.

Note 07

💡 The arms and legs are created directly on the body using Popcorn Stitches (PC) rather than as separate attached limbs; the muzzle is also formed by two PC stitches.

FAQs

Asked on the glider

the ones that come up on the glider

What size hook and yarn weight does this beaver pattern use?

This pattern calls for a 4mm crochet hook paired with worsted weight yarn. That combination gives you tight, sturdy stitches ideal for amigurumi stuffing.

Can I use a different yarn color than the suggested light brown?

Absolutely — the main color is easily swapped for any brown, gray, or even fantasy color you love. Just keep the cream muzzle contrast for that classic beaver look.

How much fiberfill stuffing will I need?

The exact amount depends on your tension, but plan for a generous handful for the body and smaller amounts for the tail and ears. Stuff firmly to avoid a lumpy or saggy finished shape.

Is this pattern beginner-friendly?

It's best suited for confident beginners or intermediate crocheters who already know magic rings, increases, decreases, and basic color changes. If you've completed one or two amigurumi projects before, you'll do great here.

Do I need safety eyes, or can I embroider them instead?

The pattern calls for 10mm or 12mm safety eyes for a classic amigurumi look, but embroidered eyes work as a safe alternative for gifts intended for very young children. Either option gives the beaver plenty of personality.