Intermediate 4-6 Hours Bulky yarn

Worked on the glider, counted out loud —

Four Tiny Chenille Amigurumi Animals — Free Crochet Pattern

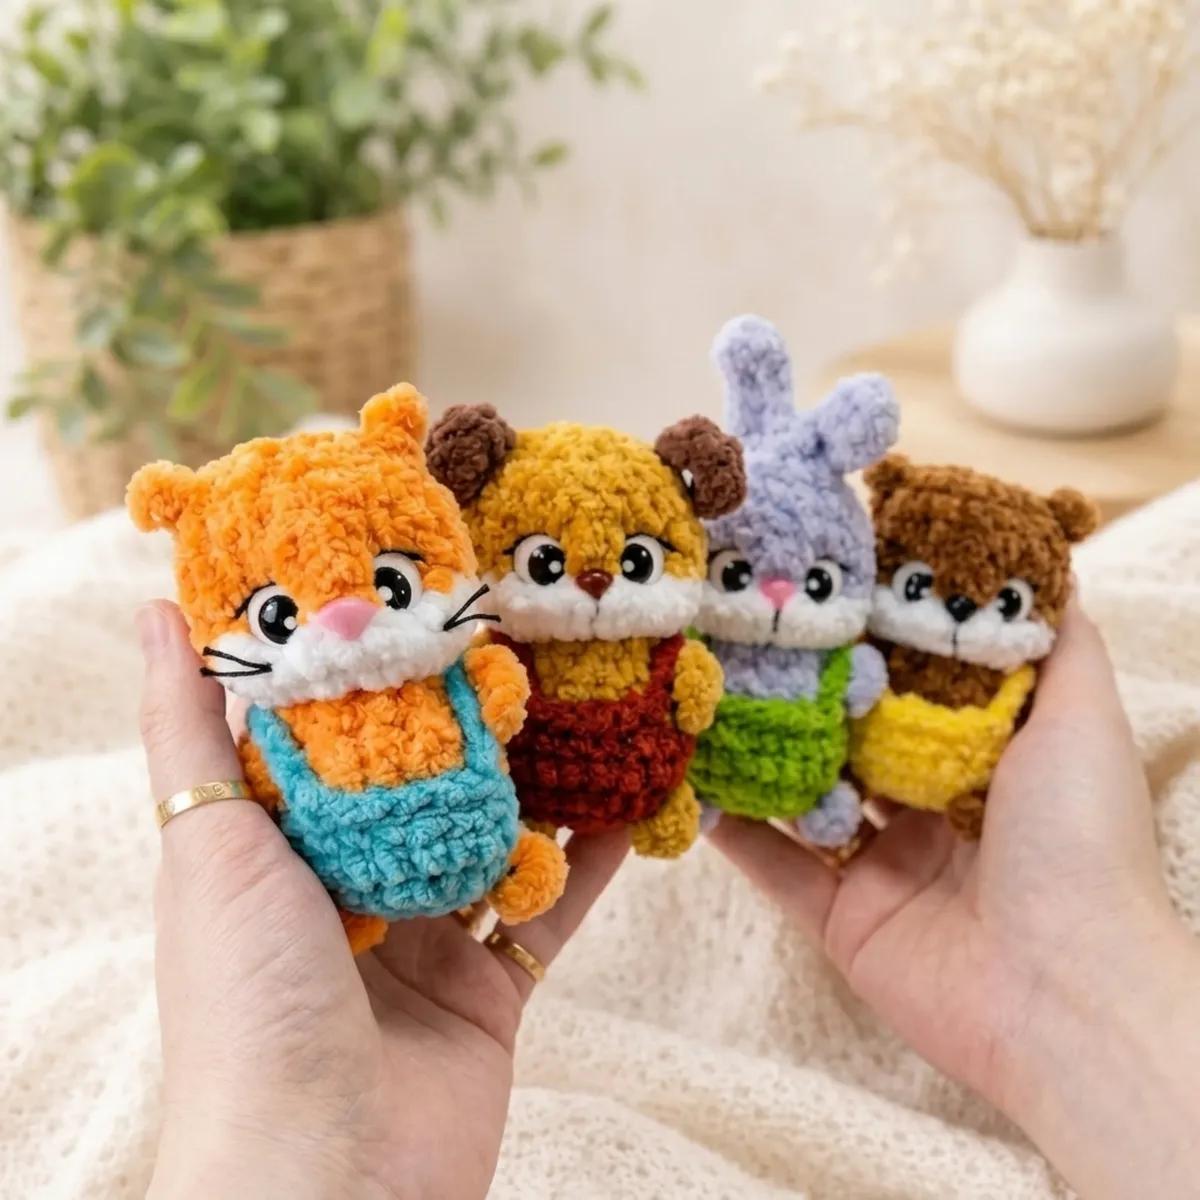
Make four adorable chenille amigurumi animals with this free crochet pattern featuring suspenders, kitty whiskers, and bunny ears in one easy body pattern.

Jump to the rounds

Before you sit down

Crochet the main body in continuous spiral rounds, increasing and decreasing to shape it over seventeen total rounds.

Stuff the body gradually as you close in the top, keeping the fill even and firm throughout.

Work the eye indentation using doubled fingering weight yarn to create depth before placing the safety eyes.

Insert and secure the twelve millimeter safety eyes into the indented sockets for an expressive, dimensional face.

Choose your character path and add either the crocheted suspenders, kitty whiskers, or bunny ears.

Attach the bunny ears only after the head is fully closed so you can adjust their final position.

Embroider any remaining face details like the nose or whiskers using the tapestry needle and contrast yarn.

Assemble all finished pieces following the five assembly steps to complete your chosen tiny animal.

What this one is

This pattern gives you one adorable chenille body that transforms into four completely different tiny animals depending on how you finish the face and add the little extras. Work up a kitten with delicate whiskers, a bunny with tall ears, or dress your creature in sweet crocheted suspenders for extra charm. It's the kind of clever, resourceful design that crocheters who love efficiency will adore, and it's perfect for anyone who wants a whole menagerie without learning four separate patterns.

You'll be working in continuous spiral rounds throughout, so comfort with single crochet increases and invisible decreases will serve you well. The eye indentation technique and embroidered details like whiskers add a lovely finishing touch that takes this from basic amigurumi to genuinely expressive character work. Expect to spend an evening or two per animal, with the 17-round body coming together fairly quickly once you find your rhythm with the plush yarn.

The finished result is a soft, huggable little creature with a plush, velvety texture thanks to the chenille yarn — the kind of toy that begs to be squeezed. Each animal sits comfortably in your palm, sturdy enough for shelf display but soft enough for a child's grip. These make wonderful handmade gifts, nursery decor, or a sweet addition to a growing amigurumi collection, and the interchangeable details mean no two need ever look exactly alike.

Variations

I fell hard for this pattern because one simple 17-round body becomes four totally different personalities depending on how you dress it up. There's something so satisfying about crocheting that eye indentation technique and watching a flat, blank face suddenly gain expression and character. The suspenders are my favorite tiny detail — they turn a basic body into a fully dressed little character in just a few extra stitches, and the kitty whiskers embroidered with doubled fingering-weight yarn add just enough realism without fuss. Working with bulky chenille yarn is genuinely relaxing too; it's forgiving, plush, and grows so fast under your hook that you'll see real progress within the first few rounds. I also love that the bunny ears attach after the head is closed, which means you can commit to your animal choice partway through instead of deciding everything upfront. This is the kind of pattern that rewards a little patience with the invisible decreases but never feels tedious, and by the time you're stuffing that last round closed, you'll already be planning which friend to make next.

Common mistakes

  • Losing track of the beginningPlace a stitch marker in the very first stitch of round one and move it up into the new first stitch every single round without skipping — treat it as a non-negotiable habit, not an optional step.
  • Chenille yarn splitting or frayingWork decreases slowly and insert your hook fully through both stitch loops before yarning over; if the yarn is splitting, try a slightly larger hook or work the stitch more loosely to avoid catching only partial plies.
  • Stuffing showing through the fabricGo down a hook size from what you'd normally use, and check your fabric every few rounds by holding it up to light — if you see gaps, tighten your tension before continuing.
  • Attaching the safety eyes at the wrongComplete the eye indentation step first using doubled fingering weight yarn to create the socket, then place your 12mm safety eyes into the indentation and check placement against the muzzle before locking the backs in place.
  • Attaching bunny ears before the head isFollow the pattern order exactly — close the head completely first, then attach the bunny ears afterward so you can adjust their angle and placement on a finished, stable surface.
  • Uneven suspender straps that twistKeep consistent tension throughout the suspender rows and pin or hold them in place against the body before your final sewing pass to check symmetry from the front.

The rounds, in full

Written out, round by round

Intermediate4-6 Hours4.5 mmBulky

Materials

Everything this one takes, in the order you will reach for it.

Yarn

  • Bulky chenille or plush yarn, approximately 100 g / 120 m; you’ll need a main body color, a pants/overalls color, white for the muzzle, and a contrast color for the ears

Hook

  • US size G-6 / 4.5 mm, or size appropriate to your yarn

Safety eyes

  • 2 per animal, 12 mm diameter

Safety nose

  • 1 per animal, 6 × 9 mm oval

Stuffing

  • Polyfill fiberfill

Black cotton yarn

  • Doubled (fingering weight works well), for eye indentation and face embroidery
  • Stitch marker
  • Tapestry needle
  • Scissors

keep this to hand

Abbreviations

US crochet terms, as used in this pattern.

  1. BLOBack Loop Only
  2. chChain
  3. dcDouble Crochet
  4. decInvisible Decrease
  5. hdcHalf Double Crochet
  6. incIncrease (2 sc in same stitch)
  7. scSingle Crochet
  8. sl stSlip Stitch

Body (Make 1 per character)

Begin with pants/overalls color yarn.

  1. Round 1Ch 2; 6 sc in 2nd ch from hook. (6)
  2. Round 2Inc in each st around. (12)Change to main body color on the last st of Rnd 2. Before working Rnd 3, read the inline lower paw and tail instructions below.Inline Lower Paws (all characters): Ch 5; 3 hdc starting in 3rd ch from hook.Inline Tail — Puppy: Ch 6; 5 sc starting in 2nd ch from hook.Inline Tail — Bunny & Bear: Ch 2; 1 sc in 2nd ch from hook.Inline Tail — Kitty: Ch 6; 5 sl st starting in 2nd ch from hook.
  3. Round 31 sc, inc, 1 sc, [work lower paw], 1 sc, 4 inc, 1 sc, [work lower paw], 1 sc, inc, 1 sc, [work tail]. (18) Do not cut main color.
  4. Round 44 sc (before first paw), 10 sc (between paws), 4 sc (to end of rnd). (18)
  5. Round 518 sc. (18)Cut and fasten pants color yarn.
  6. Round 6(BLO): Join main color in BLO; 18 sc BLO. (18) This round creates the waistband ridge. Rnds 7 onward work through both loops.
  7. Round 7(1 sc, dec) × 6. (12)Inline Upper Paws: Ch 5; 3 hdc starting in 3rd ch from hook.

Before working Rnd 8, position the upper paws evenly on both sides. Shift your start point if needed.

  1. Round 84 sc, [work upper paw], 6 sc, [work upper paw], 2 sc. (12)
  2. Round 94 sc (before first paw), 6 sc (between paws), 2 sc (to end of rnd). (12)

Before working Rnd 10, confirm the white muzzle section will land centered on the front. Shift your start point if needed.

  1. Round 104 inc (main color), 6 inc (white), 2 inc (main color). (24)
  2. Round 118 sc (main color), 12 sc (white), 4 sc (main color). (24)Cut and fasten white yarn.
  3. Round 128 sc, 12 sc BLO (across white muzzle section only), 4 sc. (24)
  4. Round 1324 sc. (24)
  5. Round 14(2 sc, dec) × 6. (18)Inline Ears — Puppy (chocolate yarn): Ch 6; 4 dc starting in 3rd ch from hook.Inline Ears — Bear: Ch 3; 1 dc in 3rd ch from hook.Inline Ears — Kitty: Ch 3; 1 sc in 2nd ch from hook, 1 hdc.

Before working Rnd 15, read the inline ear instructions below. Ears must sit evenly on both sides; shift your start point if needed. Bunny ears are worked separately after the head is closed — see Bunny Ears section.

  1. Round 157 sc, [work ear], 9 sc, [work ear], 2 sc. (18) Cut and fasten ear color yarn.Insert safety nose between Rnds 11–12, centered on the white muzzle. Insert safety eyes between Rnds 12–13, 4 stitches apart. Begin stuffing the body and base of the head firmly.
  2. Round 16(1 sc, dec) × 6. (12)
  3. Round 176 dec. (6)Finish stuffing. Pull closed with tapestry needle. Fasten and bury yarn end.

Eye Indentation

Work each eye separately using doubled black cotton yarn and a tapestry needle.

Insert needle below the eye; bring out on the outer edge of the eye.

Re-insert on the inner edge of the eye; bring out below the muzzle in the adjacent stitch.

Pull tight; tie a secure knot. Cut yarn; bury end inside the head.

Repeat for the second eye.

Embroider one straight stitch above each eye. Optionally, embroider one horizontal straight stitch across the muzzle.

Suspenders

Use pants color yarn. Suspenders cross at the back and should be worked taut.

Join pants color yarn at the back of the body between Rnds 5–6. Ch 9.

Sl st to the front of the body between Rnds 5–6. Work 3–4 sl st along the front edge.

Ch 9; sl st back to the body crosswise, forming an X at the back.

Fasten and bury all ends.

Kitty Whiskers

Cut a length of black cotton yarn; thread through the muzzle with a tapestry needle.

Bring one end back through the same entry point.

Pull both ends through the resulting loop and pull tight.

Trim evenly to your preferred length.

Mirror on the opposite side of the muzzle.

Bunny Ears (attached after head is closed)

Join new yarn to the top of the head; ch 7; starting in 3rd ch from hook: 4 dc, 1 hdc.

Sl st 1 along the head; repeat the full ear sequence for the second ear; end with 1 sl st along the head.

Fasten and bury yarn ends inside the head.

Assembly

Step 1

All paws, tails, and ears for the puppy, bear, and kitty are worked inline — no additional sewing is required for those elements.

Step 2

Complete eye indentation on both eyes before moving on to the face embroidery.

Step 3

Add suspenders after all body yarn ends are buried, as the last finishing step before bunny ears.

Step 4

For the bunny: attach ears after the head is fully closed and stuffed.

Step 5

Weave in all remaining ends securely on every piece.

Important notes

Note 01

💡 Use a US G-6 / 4.5mm hook as your starting point, but don't hesitate to size down if your chenille yarn is producing a loose, gappy fabric — tight tension is what keeps the fiberfill from peeking through.

Note 02

💡 Since every piece is worked in a continuous spiral with no joining, your stitch marker is your lifeline — move it up at the start of every single round, even when you're tempted to skip it because you're 'sure' you know where you are.

Note 03

💡 The doubled fingering weight yarn called for in the eye indentation and face embroidery is a different weight than your bulky main yarn, so keep a small separate ball wound and ready before you start assembly.

Note 04

💡 Stuff firmly but in small increments as you go rather than cramming fiberfill in all at once at the end — this keeps the chenille fabric smooth and prevents lumpy, uneven shaping.

Note 05

💡 Read through the stitch counts in parentheses at the end of each round before you start each one; catching a miscount early saves you from unraveling several rounds of plush chenille later.

Note 06

💡 Keep your main body color, pants color, white muzzle color, and contrast ear color all wound and accessible before you begin — chenille color changes are easiest when you're not hunting for yarn mid-round.

Note 07

💡 This pattern is written in US crochet terminology.

Note 08

💡 Insert safety eyes and nose before closing the head. For children under 3, substitute embroidered features using black cotton yarn.

Note 09

💡 Use the invisible decrease on every dec round: insert your hook under only the front loop of the next two stitches before pulling through. A standard sc2tog creates a visible bump in chenille, while the invisible decrease keeps the surface smooth and the shaping clean.

FAQs

Asked on the glider

the ones that come up on the glider

Can I use a different yarn instead of chenille?

Yes — any bulky-weight yarn will work at the same hook size, but the finished texture will differ. Acrylic or wool gives a more structured look, while chenille produces the soft, plush surface this pattern is designed for. Avoid very fuzzy yarns like mohair, as they make it difficult to see your stitches and count rounds accurately.