Beginner 2-3 Hours Worsted yarn

Worked on the glider, counted out loud —

Easy Crochet Hexagon Granny Slippers Free Pattern

Crochet cozy hexagon granny slippers with this easy free pattern featuring simple rounds, color-blocking ideas, and tips for a perfect customized fit.

Jump to the rounds

Before you sit down

Start each piece with a magic ring and work the first round of the hexagon to establish its center.

Continue through the remaining two rounds, adding stitches evenly at the corners to keep the hexagon shape flat.

Fasten off and weave in ends neatly, then repeat to make all the hexagon panels your pair requires.

Block the finished hexagons lightly so the edges lie flat and even before you move to assembly.

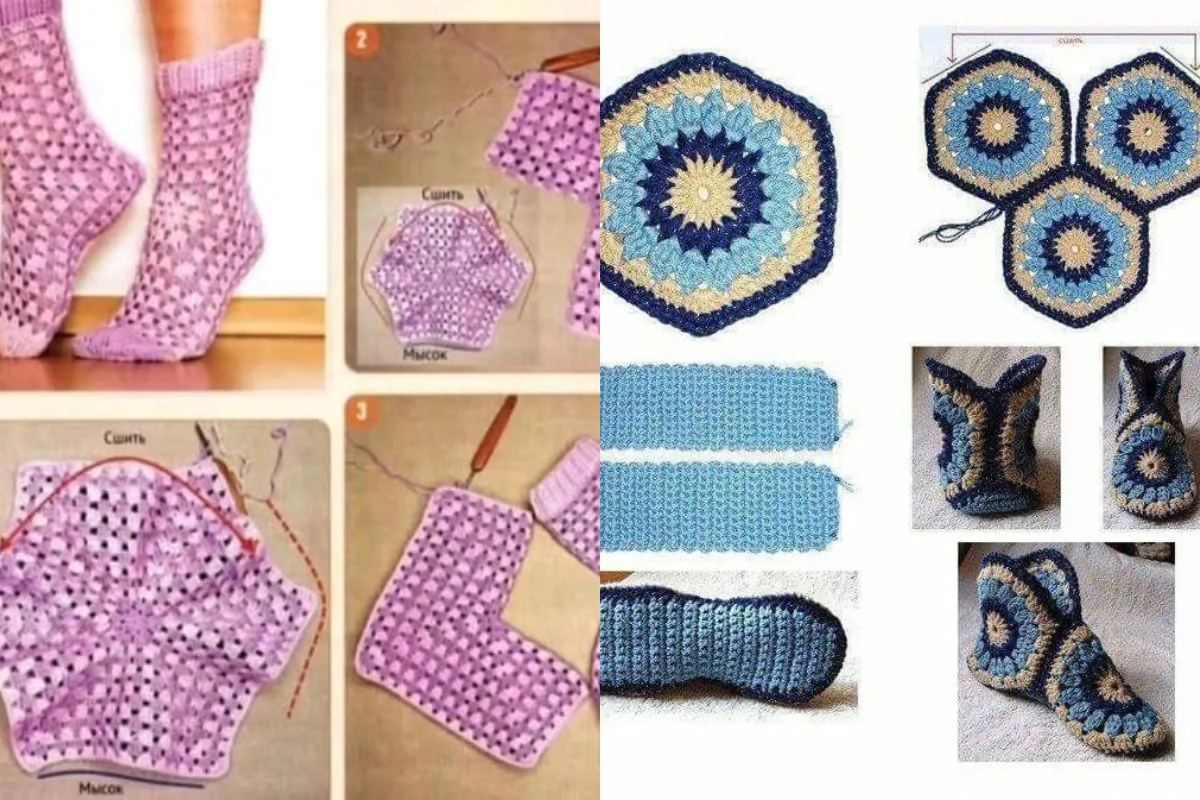
Arrange your hexagons in the intended slipper layout to check color placement and orientation ahead of sewing.

Follow the four assembly steps to seam the panels together, shaping them into a wearable slipper form.

Try the slippers on partway through assembly to check the fit before finishing every seam.

Weave in any remaining tails and trim close to the fabric for a clean, finished look.

What this one is

These hexagon granny slippers take the classic granny square and give it a fresh, geometric twist that instantly stands out from the usual round or oval slipper shapes. Built from simple hexagon motifs stitched in the round, they're a fun way to play with color while ending up with something genuinely wearable. This pattern is perfect for anyone who loves the look of traditional granny crochet but wants a project that feels a little more modern and eye-catching on the feet.

You'll be working the hexagon using basic granny-style rounds, so if you're comfortable with a magic ring, chain spaces, and simple increases, you're all set. There's no shaping math to stress over here — each hexagon is worked identically, then the pieces are seamed together into a slipper shape in the assembly step. Expect this to come together in about 2-3 hours per pair, making it a satisfying weekend or evening project you can pick up and put down.

The finished slippers have a chunky, textured look with a distinct geometric personality thanks to the hexagon panels, and they feel warm and squishy underfoot in medium-weight yarn. Because each hexagon is small enough to make on the go, this is a wonderfully portable project to keep in your bag for waiting rooms or car rides. They also make a thoughtful handmade gift — quick enough to whip up a pair for a friend without a huge time investment.

Variations

The color possibilities here are honestly endless, and that's what makes this pattern so fun to revisit. For a bold color-blocked look, try pairing a mustard yellow hexagon with navy and burnt orange accents — Vanna's Choice or With Love both come in punchy shades that hold their color well. If you'd rather let the yarn do the work, grab a gradient skein like Mandala or Caron Cakes and watch each hexagon shift subtly in tone as you stitch, giving a built-in ombre effect without any color changes on your part. For a cozier, more luxurious feel underfoot, swap your standard worsted-weight yarn for a velvet or boucle yarn like Bernat Baby Velvet — just be aware these plush yarns can be trickier to see stitches in, so work under good lighting. Want to make these seasonal? Try soft pastels like blush pink, mint, and lavender for spring, or deep forest green, cranberry, and cream for a cozy winter pair. To adjust sizing, simply add or subtract stitches evenly around the final round of the hexagon before assembly, keeping the increases consistent so the shape stays true — a slightly larger hexagon will naturally yield a roomier slipper. You could also mix two yarn weights in the same pair, using a thicker yarn for the sole hexagons and a lighter one for the top panels to play with texture and warmth in the same design. However you customize them, this pattern is forgiving enough to experiment with confidence.

I adore this pattern because it takes something as familiar as the granny square and turns it into a totally new silhouette just by changing the shape to a hexagon. Working the basic hexagon in rounds is so satisfying — you build it up quickly, and before you know it you have a stack of little geometric panels ready to become slippers. There's something almost puzzle-like about the assembly step, watching flat hexagons transform into a wearable shoe shape. I also love that this is genuinely a portable project; each hexagon is small enough to toss in a bag and finish while waiting for coffee or riding in the car. And because the pattern is so open to color choices, no two pairs ever look the same — I've made bold color-blocked versions for myself and soft pastel ones as gifts, and both felt completely different despite using the exact same stitch pattern. If you love instant gratification crochet that still lets you get a little creative, this one's a winner.
Common mistakes

  • Starting the hexagon with a loose or uneven center ringUse a magic ring instead of a chain-and-slip-stitch circle, and tug the tail firmly closed before working your first round so there's no gap at the center.
  • Losing track of which round you'rePlace a stitch marker in the first stitch of each round and move it up as you go, especially since hexagon rounds can look similar at a glance.
  • Inconsistent tension between hexagonsCrochet all your hexagons for one project in the same sitting or session when possible, and check gauge by laying finished hexagons on top of each other to compare size before assembling.
  • Skipping blocking before assemblyLightly steam or wet-block each hexagon and let it dry flat so the edges lie smooth, which makes the assembly step far easier and neater.
  • Seaming the hexagons together inLay out all your hexagons in the intended slipper shape before you start sewing, so you can double-check the orientation and color placement matches your plan.
  • Weaving in ends too loosely after color changesWeave each yarn tail through several stitches in different directions and trim only after gently tugging to confirm it's secure, preventing unraveling with wear.

The rounds, in full

Written out, round by round

Beginner2-3 Hours4 mmWorsted

Materials

Everything this one takes, in the order you will reach for it.

Yarn

  • Choose medium-weight yarn in your favorite colors.

Crochet Hook

  • Use a size appropriate for your yarn, typically 4mm to 5mm.

Yarn Needle

  • For sewing the hexagons together and weaving in ends.

Scissors

  • To trim the yarn.

keep this to hand

Abbreviations

US crochet terms, as used in this pattern.

  1. dcdouble crochet

Step 1: Create the Basic Hexagon

Start with a Magic Ring : Chain 3 (counts as the first double crochet).

Work 11 double crochets (dc) into the ring.

Join with a slip stitch to form a circle (12 dc total).

  1. Round 1Chain 3 (counts as the first double crochet). Work 11 double crochets (dc) into the ring. Join with a slip stitch to form a circle (12 dc total).(12)
  2. Round 2Chain 3, dc into the next stitch, chain 1 . Repeat around. Join with a slip stitch.
  3. Round 3Chain 3, 2 dc into the chain space, chain 1 . Repeat in each chain space around. Join with a slip stitch.
  4. Round 4(optional for larger sizes): Continue the same pattern, adding one dc cluster per side.

Tip : Use contrasting colors for each round to create a vibrant look!

Step 2: Assemble the Slippers

Hexagon Arrangement : Create six hexagons for each slipper (12 in total).

Lay out three hexagons in a row, with edges touching. The middle hexagon forms the sole, while the others fold up to create the sides.

Sew the Pieces Together : Use a whipstitch or single crochet to join the hexagons along their edges.

Leave one edge open to slide your foot into the slipper.

Repeat for the Second Slipper : Assemble and sew the remaining hexagons in the same way.

Assembly

Step 1

Edge Finishing :

Step 2

Crochet a round of single crochet or crab stitch along the opening for a polished look.

Step 3

Decorations :

Step 4

Add pom-poms, buttons, or a small crocheted flower for extra flair.

Important notes

Note 01

💡 Choose a hook one size closer to 4mm if you want a firmer, more structured hexagon, or closer to 5mm for a softer, drapier fabric underfoot.

Note 02

💡 Keep a small pair of scissors handy specifically for trimming yarn tails close to your work after weaving in, so no stray fuzz shows on the finished slippers.

Note 03

💡 If you're color-blocking, pre-wind small yarn cakes or bobbins for each shade before you start so you're not hunting through full skeins mid-hexagon.

Note 04

💡 Use a stitch marker in the very first stitch of round 1 on every hexagon so you always know where each round begins, since the hexagon shape can make this ambiguous.

Note 05

💡 Sew your hexagons together with the same yarn used in the project (or a coordinating neutral) so seams blend in rather than standing out against the color-blocked panels.

Note 06

💡 Try on your slippers-in-progress after the assembly step and before weaving in every last end, in case you want to adjust the fit slightly while there's still flexibility in the seams.

FAQs

Asked on the glider

the ones that come up on the glider

What yarn weight works best for these hexagon slippers?

Medium-weight (worsted) yarn is ideal because it creates a sturdy, warm fabric that holds its shape well underfoot. If you want an extra plush feel, a velvet or boucle yarn in the same weight category works beautifully too.

How many hexagons do I need to make one pair of slippers?

The exact count depends on your foot size and how you arrange the panels during assembly, but you'll be repeating the same 3-round hexagon multiple times per slipper. Lay out your hexagons against your foot before sewing to confirm you have enough coverage.

Can I make these slippers a different size?

Yes, you can adjust the size by adding or subtracting stitches evenly in the final round of the hexagon, which changes its overall dimensions. Just keep your increases even around all six sides so the hexagon shape stays balanced.

Do I need any special tools besides a hook and yarn?

You'll want a yarn needle for sewing the hexagons together and weaving in ends, plus scissors for trimming. No other special tools are required, which makes this a very budget-friendly project.

Is this pattern good for using up scrap yarn?

Absolutely, since each hexagon is small, it's a great way to use up leftover worsted-weight scraps in coordinating colors. Just make sure any yarns you combine are similar in weight so your finished hexagons stay uniform in size.