Intermediate 4-6 Hours Worsted yarn

Worked on the glider, counted out loud —

DIY Pretty Crochet Mia Slouch Boots Pattern

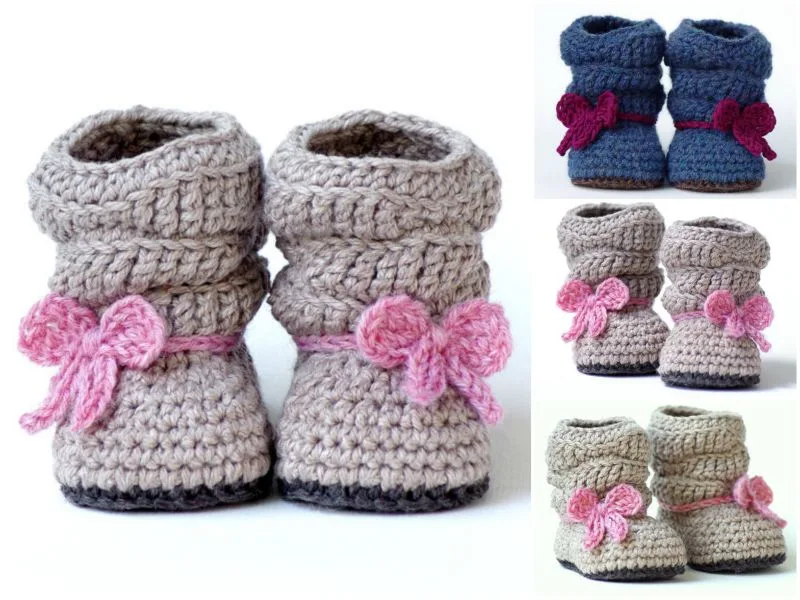
Crochet the Mia Slouch Boots with a knit-look ribbed cuff for a cozy slouchy look. A charming worsted-weight pattern perfect for gifting the whole family.

Jump to the rounds

Before you sit down

Begin by crocheting the flat, oval-shaped sole using two rounds of even increases for a sturdy base.

Fasten off the sole and set it aside, ready to anchor the boot body in the next stage.

Build the body of the boot upward in two rounds, shaping it to snugly wrap the foot and ankle.

Attach or continue directly into the ribbed cuff section using a loop-only stitch for that knit-look texture.

Work the cuff over two rounds, keeping tension relaxed so the rib stretches and folds naturally.

Sew the sole, body, and cuff pieces together neatly, weaving in yarn ends securely as you finish.

Fold the finished cuff down to reveal the signature slouchy silhouette the pattern is named for.

Optionally insert a sole liner for added support before gifting or wearing the finished boots.

What this one is

The Mia Slouch Boots are a charming three-part project that combines a sturdy crocheted sole, a snug boot body, and a signature knit-look ribbed cuff that folds down for that irresistible slouchy silhouette. Built specifically as a baby-sized design, these boots make an adorable addition to a little one's wardrobe while still offering that cozy, oversized-sweater energy we all love. They're perfect for crocheters who want a satisfying, giftable project that feels far more special than a basic bootie.

This pattern leans on core amigurumi-adjacent shaping techniques for the sole and body, paired with a ribbed stitch pattern for the cuff that mimics knitwear texture using only hook. Expect to work confidently with rounds, basic increases for the sole shape, and a rib technique that requires a bit of practice but pays off beautifully. With just three main parts, each spanning only two rounds, this is an approachable project for confident beginners and a quick, enjoyable make for intermediate crocheters — plan on roughly 4 to 6 hours start to finish.

Once assembled, you'll have a pair of mid-calf-length boots with a plush, textured cuff that slouches naturally for that effortlessly cute look. Made in worsted-weight wool or acrylic, they feel warm, soft, and durable enough for everyday wear, with optional sole inserts for extra support. Whether you're making them for a baby shower, a holiday-free winter gift, or simply to spoil someone in your life, the Mia Slouch Boots deliver serious handmade charm in a compact, satisfying project.

Variations

There's something so satisfying about building these boots piece by piece — starting with a simple two-round sole, shaping up the body, and finishing with that gorgeous ribbed cuff that gives the whole design its slouchy personality. I love how the knit-look rib stitch tricks everyone into thinking you spent hours knitting when it's actually all crochet magic. Each of the three parts comes together quickly, so you get that rewarding feeling of visible progress every step of the way instead of staring at one long, repetitive round count. The adjustable height is another reason I keep coming back to this pattern; I can make them mid-calf as written or shorten the cuff rounds for a more ankle-boot vibe depending on who I'm gifting them to. And because they're worked in worsted-weight yarn, they stitch up fast without sacrificing that cozy, huggable texture babies and toddlers love against their skin. Honestly, the moment you fold that cuff down and see the ribbing pop, you'll understand why this pattern has such a devoted following among crocheters who love a project with a little technical flair but zero fuss.

Common mistakes

  • Starting the sole with an uneven magic ring or loose centerPull the magic ring tail snugly closed before beginning increases so the sole center stays tight and doesn't leave a visible hole.
  • Losing track of increase placement on the sole roundsUse a stitch marker at the start of each round and count stitches after every round to confirm the increases are evenly distributed for a flat, oval sole shape.
  • Working the ribbed cuff too tightlyThe knit-look rib relies on working into the front or back loop consistently; keep your tension relaxed so the rib stretches easily and the slouch effect looks natural rather than stiff.
  • Skipping a fit check before attaching the sole insertTest the boot body against the actual sole (or foot) before sewing in optional sole inserts, since adjusting after assembly is much harder than before.
  • Weaving in ends too loosely at color or part transitionsSecure ends with a couple of small backstitches through the fabric before weaving them in, especially where the sole, body, and cuff pieces are sewn together, so seams don't loosen with wear.

The rounds, in full

Written out, round by round

Intermediate4-6 Hours5 mmWorsted

Materials

Everything this one takes, in the order you will reach for it.

Yarn

  • Worsted-weight yarn is ideal for this project, providing warmth and durability. Choose wool or acrylic for extra coziness.

Crochet hook

  • Use a hook that matches your yarn weight, typically 5mm or 6mm.

Sole inserts

  • Sole inserts (optional): These give extra structure and support to the boots.

Scissors

  • For trimming yarn ends.

Darning needle

  • For sewing pieces together and weaving in yarn ends.

Stitch markers

  • Stitch markers (optional): To keep track of rounds or pattern sections.

keep this to hand

Abbreviations

US crochet terms, as used in this pattern.

  1. chChain
  2. scSingle Crochet
  3. hdcHalf Double Crochet
  4. dcDouble Crochet
  5. sl stSlip Stitch
  6. st(s)Stitch(es)

Step 1: Crochet the Sole

The sole forms the foundation of your boots, providing shape and structure. For a more durable sole, you can use double strands or add a felt insole.

Foundation Chain : Ch 12.

  1. Row 1Hdc in the second ch from the hook and in each ch across. Ch 2, turn.
  2. Row 2-4Hdc in each stitch across, increasing one stitch at each end for a rounded toe and heel. Continue until the sole reaches your foot length.Finish Sole: Fasten off and leave a long tail for sewing. Make a second sole for the other boot.

Step 2: Create the Body of the Boot

The boot body is worked in the round, giving it a slouchy, comfortable shape.

Attach Yarn : Attach yarn to the back of the sole.

  1. Round 1Sc in each stitch around the sole to form the base of the boot body. Join with a sl st to the first sc.
  2. Round 2-10Work hdc in each st around for about 10 rounds to create the boot height.Increase for Slouch: For a slouchy look, work 2 hdc in every third stitch for the next 2 rounds.Continue Working Even: Hdc in each stitch for 4 more rounds, or until the boot reaches mid-calf length.

Tip: You can add more rounds for a taller boot or fewer rounds for an ankle-length version.

Step 3: Add the Cuff

The cuff gives the boots a finished, snug fit around the top.

  1. Round 1Ch 1, sc in each st around the top edge.
  2. Round 2Sc, ch 1, skip next st, sc in the next st to create a ribbed texture. Repeat around.
  3. Round 3-5Repeat Round 2 until the cuff reaches the desired height.Finish: Fasten off and weave in the ends.

Creating your own Crochet Mia Slouch Boots is a rewarding and stylish project that’s perfect for cozy days. With simple stitches and easy customizations, you can craft a pair of boots that suit your style and keep your feet warm. Enjoy the process of making these beautiful slouch boots, and don’t be afraid to add your own creative touches.

Happy crocheting!

Important notes

Note 01

💡 Choose a 5mm or 6mm hook based on your yarn's exact weight — swatch a small round first to confirm your gauge matches the intended cozy-but-not-bulky sole thickness.

Note 02

💡 Place a stitch marker at the beginning of every round across all three parts (sole, body, cuff) since this pattern has no visible seam to mark your round start.

Note 03

💡 If using optional sole inserts, cut them to size and test-fit them inside the crocheted sole before final assembly so you don't have to unpick stitches later.

Note 04

💡 When transitioning from the body to the ribbed cuff, take a moment to identify your loop-only working method (front loop or back loop) so the classic knit-look texture appears cleanly from round one.

Note 05

💡 Block your finished boots lightly with steam or a damp cloth to help the ribbed cuff relax into its signature slouchy fold rather than standing stiffly upright.

Note 06

💡 Keep a small tapestry needle on hand throughout — sewing the sole, body, and cuff pieces together neatly is just as important as the stitching itself for a polished, gift-ready finish.

FAQs

Asked on the glider

the ones that come up on the glider

What yarn weight works best for the Mia Slouch Boots?

Worsted-weight yarn in wool or acrylic is ideal, giving the boots warmth, structure, and durability. A 5mm or 6mm hook paired with worsted weight creates the right density for a supportive, cozy sole and body.

Can I make these boots bigger than the baby size?

Yes, you can scale up by adding extra increase rounds to the sole and a few additional rounds to the body before starting the cuff. Always check the fit against the intended foot as you go since sizing adjustments are easier to make mid-project.

Do I need sole inserts for this pattern?

Sole inserts are optional but recommended if you want extra structure and support underfoot. If you skip them, the crocheted sole alone will still hold its shape nicely for indoor wear.

How do I get that knit-look texture on the cuff?

The ribbed cuff achieves its knit-look appearance through consistent loop-only stitching (front or back loop) across the rounds. Keeping even tension throughout is key to a clean, stretchy rib effect.

Can I adjust the boot height?

Absolutely — the pattern is written for mid-calf-length boots, but you can shorten or lengthen the body and cuff rounds to create an ankle boot or a taller slouch style. Just keep the sole and body proportions consistent for the best fit.