Intermediate 4-6 Hours DK yarn

Worked on the glider, counted out loud —

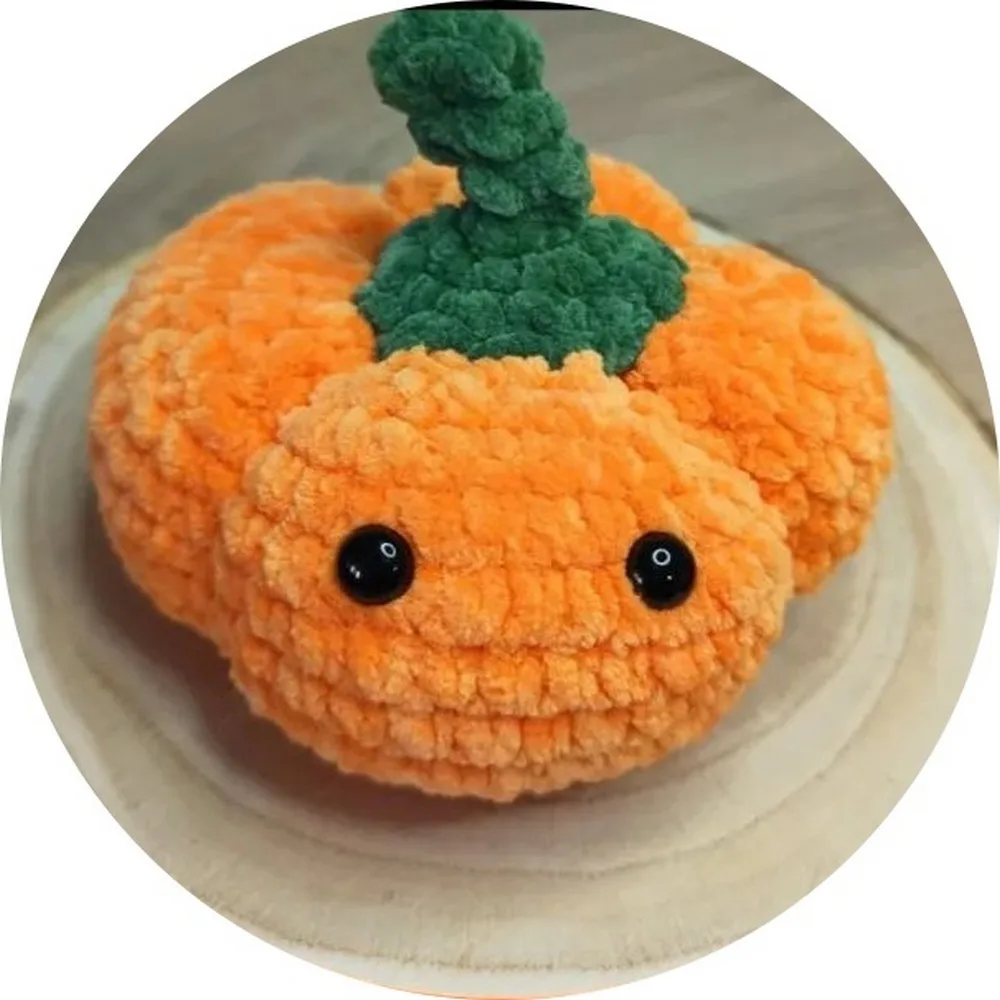
Cute Mini Crochet Pumpkin Amigurumi Pattern

Make this cute mini crochet pumpkin amigurumi with easy rounds, a curled stalk, and cozy stuffing—perfect for fall décor or a handmade gift.

Jump to the rounds

Before you sit down

Start the BODY with a magic ring and work single crochets in increasing rounds to build the rounded pumpkin base.

Continue through the middle rounds, keeping tension even so the sides curve out smoothly and symmetrically.

Begin stuffing gradually as you approach the halfway point, adding small amounts to keep the shape firm and even.

Attach the 10mm safety eyes once you can clearly see the front of the piece taking shape.

Work the decrease rounds near the top of the BODY to close the pumpkin's rounded silhouette neatly.

Finish stuffing fully before closing the last few stitches so the shape stays plump.

Crochet the STALK over its 4 rounds, then gently curl it by hand for that classic twisted look.

Center and stitch the STALK to the top of the BODY, weaving in all loose ends to finish.

What this one is

This pattern creates the sweetest little crochet pumpkin amigurumi, complete with a plump round body and a jaunty curled stalk on top. What makes it so special is how much personality it packs into such a small shape — it's the kind of project that looks like it belongs in a cozy autumn window display the moment you finish the last stitch. It's perfect for anyone who loves fall-themed crochet, wants a fast gift idea, or just needs a little burst of orange charm on their desk or shelf.

You'll work through the BODY over 14 rounds, shaping it from a magic ring into that classic rounded pumpkin silhouette, then finish with a 4-round STALK that gives it that authentic curled-vine look. This is a great project for confident beginners who've made a round amigurumi before, and it's ideal for advancing intermediate crocheters who want to practice smooth shaping and safety eye placement. Expect to spend somewhere around 4 to 6 hours total, including stuffing and finishing touches.

The finished pumpkin comes out mini and huggable, with a soft rounded body that sits nicely on its own thanks to firm stuffing, and a little stalk that adds just the right whimsical finishing touch. It has that squishy, cozy feel that makes amigurumi so satisfying to hold, and its small size makes it an easy gift to tuck into a card, lunchbox, or gift basket. Whether you keep it as a fall decoration or give it away, it's guaranteed to bring a smile.

Variations

I adore how this little pumpkin comes together so quickly without sacrificing any of that charming amigurumi detail. Building the BODY over 14 rounds means you get to watch the rounded pumpkin shape emerge gradually, and there's something so satisfying about seeing those increases and decreases sculpt a perfectly plump little form. The 10mm safety eyes give it just the right amount of sweet, curious expression — not too big, not too small. And don't even get me started on the STALK; those 4 quick rounds add so much character, giving the whole piece that unmistakable pumpkin silhouette. I also love that this pattern uses simple, accessible materials — just one yarn, one hook size, and basic notions — so there's no fuss gathering supplies before you dive in. It's the kind of project you can start after dinner and have sitting proudly on your shelf before bed. If you love amigurumi that feels achievable but still rewarding, with a shape-driven design rather than just a plain ball, this pumpkin will absolutely win you over.

Common mistakes

  • Starting the BODY with a loose magicPull the tail firmly after your first round of single crochets and check that the center closes completely before moving forward — a snug magic ring keeps the pumpkin looking seamless.
  • Losing track of which round you'rePlace a stitch marker in the first stitch of every round and move it up as you go; this makes it easy to pause and resume without miscounting.
  • Under-stuffing the BODY, leavingStuff in small pieces as you go rather than all at once at the end, working the filling into the curves so the shape stays plump and even all the way around.
  • Attaching the 10mm safety eyesInsert the eye posts loosely and hold the piece at arm's length to check placement before snapping on the backs — safety eyes are permanent once secured, so a quick preview saves frustration.
  • Rushing through the 4-round STALKWork each round at an even tension and gently curl the finished stalk with your fingers before attaching it, so it holds that classic twisted pumpkin-stem look.
  • Sewing the STALK on crooked or off-center.Use a removable stitch marker to mark the exact center top of the BODY first, then pin the stalk in place and check it from multiple angles before stitching it down permanently.

The rounds, in full

Written out, round by round

Intermediate4-6 Hours4.5 mmDK

Materials

Everything this one takes, in the order you will reach for it.

  • Yarn (I’ve used Himalajami Dolphin baby)
  • Crochet hook (I’ve used 4,5mm hook)
  • Safety eyes (10mm)
  • Scissors
  • Stuffing

keep this to hand

Abbreviations

US crochet terms, as used in this pattern.

  1. scsingle crochet
  2. MCMagic ring
  3. incincrease
  4. decdecrease
  5. slstslip stitch
  6. ()repeat what is in the brackets

BODY

Using body color

  1. Round 16sc in MC (6)
  2. Round 26 inc (12)
  3. Round 3(sc, inc) x6 (18)
  4. Round 4(2sc, inc) x6 (24)
  5. Round 5(3sc, inc) x6 (30)
  6. Round 6(4sc, inc) x6 (36)
  7. Round 7(5sc, inc) x6 (42)
  8. Round 8(6sc, inc) x6 (48)
  9. Rounds 9-1342sc (5 rounds)(42)
  10. Round 14(6sc, dec) x6 (42)
  11. Round 15(5sc, dec) x6 (36)
  12. Round 16(4sc, dec) x6 (30)
  13. Round 17(3sc, dec) x6 (24)Insert eyes between 14/15 around 4 stitches
  14. Round 18(2sc, dec) x6 (18)Start stuffing the body
  15. Round 19dec x6Fasten off and leave the long tail for sewing. Take the yarn up the side of the pumpkin and down through the center from the top to the bottom, pull tight and repeat around the pumpkin another 4 times.Secure the end.

STALK

Using green color

  1. Round 16 sc in MC (6)
  2. Round 2inc x6 (6)
  3. Round 3(1sc, inc) x6 (12)Fasten off and leave the long tail for sewing.
  4. Round 14sc in MC (4)
  5. Rounds 2-44sc (3 rounds)Fasten off and leave the long tail for sewing. Sew together.(4)

Important notes

Note 01

💡 Use a 4.5mm hook to match the pattern's gauge, since going up or down a size will change how tightly your stitches close and can leave gaps in the BODY.

Note 02

💡 Stuff the pumpkin firmly but in stages, adding small amounts as you complete each few rounds so the shape stays even instead of lumpy.

Note 03

💡 Keep a stitch marker in your working loop at all times during the 14-round BODY so you never lose your place mid-round.

Note 04

💡 Attach the 10mm safety eyes before you finish stuffing completely, since it's much easier to position them while you can still see and feel inside the piece.

Note 05

💡 Weave in yarn tails securely along the inside of the BODY and STALK so nothing works loose after repeated handling.

Note 06

💡 Block or gently shape the STALK by curling it around a pencil or knitting needle briefly before attaching, to help it hold its signature twisted look.

FAQs

Asked on the glider

the ones that come up on the glider

What yarn weight works best if I don't have Himalajami Dolphin Baby?

Any soft DK or light worsted weight yarn will work well as a substitute. Just make sure to use a 4.5mm hook or adjust slightly to keep your stitches tight enough that stuffing doesn't peek through.

Can I make this pumpkin without safety eyes?

Absolutely — you can embroider simple eyes with black yarn or embroidery floss instead. This is a great option if you're making the pumpkin for a very young child.

How much yarn do I need to complete the whole pumpkin?

Since this is a mini amigurumi with only 14 rounds for the BODY and 4 rounds for the STALK, you'll only need a small amount of yarn — likely less than half a standard skein in each color.

Is this pattern good for a first-time amigurumi maker?

It's best suited for someone who has made at least one round amigurumi before, since it involves consistent increases and decreases across 14 rounds. If you're brand new, practice a simple ball shape first.

How do I attach the STALK to the BODY neatly?

Center the STALK at the top of the BODY, pin it in place with a stitch marker, then whip stitch around the base using the yarn tail. Weave in the ends afterward so the seam stays hidden.