Intermediate 4-6 Hours Worsted yarn

Worked on the glider, counted out loud —

Crocheted Moccasin Slippers Pattern

Make cozy crocheted moccasin slippers with this step-by-step pattern covering the sole, body, and top for a warm, handmade fit.

Jump to the rounds

Before you sit down

Begin by crocheting the sole, working it into a firm, foot-shaped base that will support the rest of the slipper.

Check the sole against the intended foot to confirm the size before moving on to the next section.

Start the moccasin body directly onto the completed sole, building the sides up around the foot shape.

Continue shaping the body rounds so the sides rise evenly and wrap snugly around the foot.

Pause to test the fit again once the body is complete, adjusting tension if the slipper feels too loose or tight.

Add the moccasin top, working it to close over the front of the foot for that classic moccasin look.

Secure and weave in all yarn ends neatly along the inside seams so nothing rubs against bare skin.

Repeat the entire process for the second slipper, matching your tension and round counts to complete the pair.

What this one is

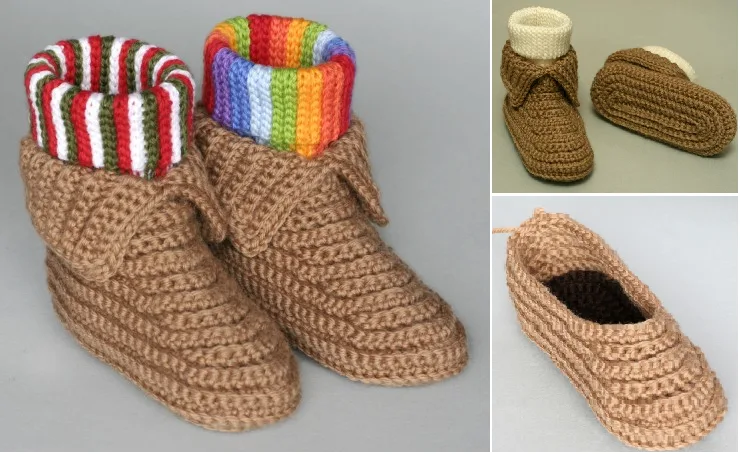
This crocheted moccasins pattern creates a pair of soft, snug slippers built in three distinct sections — the sole, the moccasin body, and the moccasin top — that come together into a shoe you'll actually want to wear all day. What makes it special is how it mimics the classic moccasin silhouette using nothing but yarn and a hook, giving you that cozy, house-shoe comfort without any sewing machine or leather tools. It's perfect for crocheters who want a functional, wearable project that still feels like a fun weekend craft.

Building the moccasins means working through three connected pattern parts, each with its own rounds, so you'll get practice with foundational shaping as the sole is formed and then built upward into the body and top. This is a great project for an intermediate-level crocheter — someone comfortable following multi-part patterns and shaping rounds, even if increases and decreases aren't second nature yet. Expect to spend somewhere around 4-6 hours total, especially if you're making a matching pair.

The finished result is a pair of soft, structured slippers with a rounded toe and a snug, moccasin-style fit that hugs the foot comfortably. They have that handmade charm — a little rustic, a little cozy — that makes them just as sweet to give as a gift as they are to keep for yourself. Because the pattern is worked in clear sections, you can easily adjust the look for different recipients, making them a thoughtful, personal present for chilly-weather lovers.

Variations

One of the best things about this moccasin pattern is how endlessly customizable it is once you understand the three basic sections. For color, try a neutral oatmeal or heathered gray body with a contrasting top in mustard, rust, or forest green for an autumn-cabin vibe — Wool-Ease or With Love both hold shape beautifully for footwear and come in rich, saturated colorways. If you want a softer, plusher slipper, swap to a chunky-weight yarn like Bernat Blanket and size up your hook accordingly, which will naturally add a few extra stitches to your sole rounds to keep the fit accurate. For sizing, work an extra round or two onto the sole before starting the body if you're making these for a larger foot, and correspondingly reduce a round for a child-sized pair — just measure against the intended wearer's foot as you go. Try a two-tone moccasin body by alternating your main color every other round for a striped effect, or work the moccasin top in a self-striping sock yarn held double for extra texture and visual interest. For gifting, monogram the moccasin top with a single contrasting cross-stitch initial once the piece is complete, or add a small pom-pom or tassel at the front seam for a playful finishing touch. Seasonal versions are easy too — a cream and burgundy pair feels wintery, while a soft pastel palette makes them a sweet baby shower or Mother's Day gift. However you customize them, the underlying sole-body-top structure stays the same, so feel free to experiment freely.

There's something so satisfying about watching these moccasins take shape one section at a time. You start with the sole, then build up the moccasin body, and finally add that signature moccasin top — and each part feels like its own little milestone. I love how the three-part structure keeps the project from feeling overwhelming; you're never staring down a giant pattern, just one manageable piece at a time. The rounded toe shaping is genuinely fun to work, and there's a real 'aha' moment when the body wraps around and starts looking like an actual shoe. Plus, once you've made one pair, you basically have the formula down for endless variations. I also love that these are wearable practically the moment you finish off your last stitch — no blocking marathon, no waiting around. They're the kind of project that makes you want to immediately start a second pair in a different color just to see how they turn out. Cozy, useful, and satisfying to make — that's my favorite combination in a pattern.
Common mistakes

  • Starting the sole rounds too looselyWork your foundation and first sole rounds with a slightly smaller hook than the rest of the pattern, or crochet tighter than usual, to give the sole enough structure to support weight.
  • Losing track of which round you'rePlace a stitch marker at the start of each new section and label it, or jot a quick note after finishing each of the three pattern parts so you always know exactly where you left off.
  • Making the moccasin body too tightCheck your stitch count against the sole's edge before starting the body rounds, and ease your tension slightly if the body starts to cup or curl inward.
  • Forgetting to try the slipperPause after completing the moccasin body to test the fit before adding the top, so you can adjust rounds if needed while it's still easy to rip back.
  • Working both moccasins to differentCrochet both moccasins side by side, alternating rounds between the pair, or at minimum keep notes on your hook size, yarn tension, and any adjustments so the second slipper matches the first.
  • Skipping a clean finish at the seamTake extra care with your slip stitches or seaming at this join, weaving in ends flat against the inside of the slipper so nothing rubs uncomfortably against the foot.

The rounds, in full

Written out, round by round

Intermediate4-6 Hours5 mmWorsted

Materials

Everything this one takes, in the order you will reach for it.

  • Yarn: Choose a durable yarn, such as wool-blend or acrylic, that's soft yet strong. Worsted weight (Category 4) is ideal for a comfortable fit.
  • Crochet Hook: Use the recommended hook size on your yarn label, typically around 5mm-6mm for worsted weight yarn.
  • Stitch Markers: Useful for keeping track of rounds and stitch counts.
  • Tapestry Needle: For weaving in ends and sewing seams.
  • Scissors: For trimming yarn.
  • Non-slip sole (optional): Adding a slip-resistant sole will make the moccasins safer for walking on hardwood or tile floors.

keep this to hand

Abbreviations

US crochet terms, as used in this pattern.

  1. scsingle crochet
  2. sc2togsingle crochet 2 stitches together (decrease)

1. Create the Sole

The sole serves as the foundation of your moccasin. This part should be dense to provide a sturdy base.

Instructions for Sole: This pattern is suitable for sizes S (US Women's 6-7), M (8-9), and L (10-11); adjust length by adding or reducing rows as needed. Chain 20 (S), 22 (M), or 24 (L) stitches, depending on your size.

  1. Round 1Single crochet (sc) in the second chain from the hook and in each chain across. In the last chain, work 3 sc to turn the corner. Continue single crocheting down the other side of the foundation chain, ending with 2 sc in the last stitch. Slip stitch to join. (40, 44, or 48 stitches)
  2. Round 2Chain 1. Work 2 sc in the first stitch, sc in the next. Repeat around, working 3 sc in each corner stitch to maintain the oval shape. Slip stitch to join.
  3. Round 3-4Repeat Round 2, increasing evenly around to form an oval that matches the length of your foot. Slip stitch to join, fasten off, and weave in ends.

2. Crochet the Moccasin Body

Now that you have a sturdy sole, you can start crocheting the body of the moccasin.

Attach Yarn to the Sole: Reattach your yarn to any point along the sole.

  1. Row 1Chain 1 and single crochet (sc) evenly around the entire sole, joining with a slip stitch. This creates a solid base to build the body.
  2. Rows 2-5Work in sc around, joining each row with a slip stitch. This will raise the walls of the moccasin, creating a slipper-like shape.
  3. Row 6(Toe Shaping): Begin decreasing for the toe. Start with sc in the first stitch, sc2tog (single crochet two stitches together), and repeat around the toe area, leaving the sides and back untouched. Slip stitch to join.

Tip: For a roomier toe area, continue without decreases for an additional row before starting the toe shaping.

3. Adding the Moccasin Top

The top part of the moccasin adds structure and warmth around the foot.

Mark Center Front: Identify the center front of the moccasin, using stitch markers if necessary.

  1. Rows 1-3Starting from the center front, sc across the top of the moccasin, ending at the opposite side of the front. Turn each row to create a flap over the foot.
  2. Row 4Work sc2tog at each end to taper the flap for a snug fit.
  3. Finishing RowSlip stitch around the entire moccasin opening for a clean edge. This step also reinforces the opening, making it more durable.

Important notes

Note 01

📏 This pattern is suitable for sizes S (US Women's 6-7), M (8-9), and L (10-11). Adjust the length by adding or reducing rows as needed.

Note 02

💡 Use a hook size that gives you a firm, dense fabric for the sole — too loose and the finished moccasin won't hold its shape underfoot.

Note 03

💡 Measure the wearer's foot before you begin the sole rounds so you can adjust the size early, rather than after the body is already attached.

Note 04

💡 Keep a stitch marker on the first stitch of each round throughout the sole and body sections so you never lose your place mid-round.

Note 05

💡 Work your two moccasins as a true pair, alternating sections between the left and right shoe, to keep tension and sizing consistent across both.

Note 06

💡 If your yarn has any give or stretch, size your sole very slightly snug — moccasins tend to loosen a touch with wear.

Note 07

💡 Weave in ends securely along the inside seams as you finish each of the three sections, since exposed tails can be uncomfortable against bare feet.

FAQs

Asked on the glider

the ones that come up on the glider

What yarn weight works best for this moccasin pattern?

A worsted weight yarn gives the best balance of structure and comfort for the sole, body, and top sections. Choose a sturdy acrylic or wool blend so the finished slippers hold their shape and stand up to regular wear.

How do I make sure both moccasins end up the same size?

Work the two slippers side by side, completing each section — sole, body, then top — for both feet before moving to the next part. This keeps your tension and round count consistent across the pair.

Can I make this pattern in a smaller size for kids?

Yes, simply work fewer rounds on the sole before starting the moccasin body, checking the size against the child's foot as you go. Reducing rounds proportionally through the body and top sections will keep the fit balanced.

Do these moccasins have a non-slip sole?

The pattern itself creates a soft yarn sole, so for indoor-outdoor wear you may want to add fabric or rubber sole grips after finishing. This isn't part of the core pattern but is a popular add-on for durability.

What skill level do I need to complete this pattern?

This pattern suits an intermediate crocheter who is comfortable following a multi-part pattern with shaping across separate sections. If you've completed a few structured projects before, you'll be able to follow the sole, body, and top sections without much trouble.